Starting Exchange Update
You can perform Exchange update in several ways. Select the one that best suits your situation.
- Create an Exchange Processing task and run it from Migration Manager. To create an Exchange Processing task, go to the Resource Processing | Tasks node, and click the Exchange Processing button in the right pane.
- Create an Exchange processing task, create a setup package for the task, delegate rights to perform this task to another person, and send the package to that person. The delegated administrator will then install the package and perform the Exchange processing as specified in the task configuration. Refer to the Delegating Resource Update topic for more details.
- Export the INI file with the appropriate settings for Exchange processing, and then create and configure an Exchange Processing task to run in stand-alone mode using this INI file. Refer to the Delegating Resource Update topic for more details.
Regardless of the method you select, Exchange Processing Wizard will guide you through the updating process. Complete the steps given by Exchange Processing Wizard, as described in the related topics.
Step 1. New Exchange Processing Task
Specify a name for the task and add a descriptive comment.
Step 2. Select Configuration Mode
Next, select whether you want to delegate this task to a trusted person or whether you want to configure and schedule the task.
- Delegate resource processing task—Select this option if you want to create the task and delegate it to a trusted person who will run the task.
- Configure resource processing task—Select this option if you want to create, configure, and schedule the task.
Depending on the mode you selected, the remaining steps offered by the wizard are different.
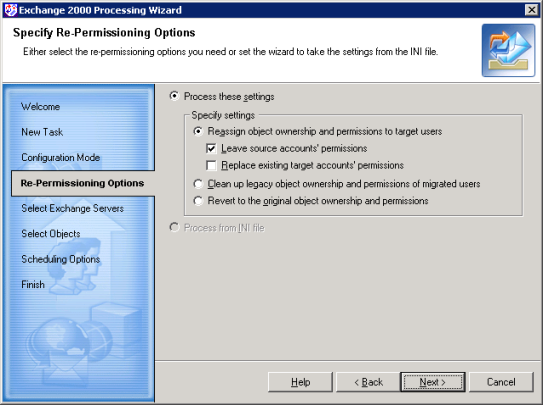
Step 3. Specify Re-Permissioning Options
This step is displayed regardless of the configuration mode you selected in the previous step.
This step lets you specify the options for the processing of Exchange objects.

- Reassign object ownership and permissions to target users—Select this option to re-assign permissions and ownership set to the Exchange objects to the new (target) user accounts.
- Leave source accounts’ permissions—Select this check box to allow access for both the source and target user accounts (recommended). This will make the update smoother by granting both accounts the same privileges for the coexistence period.
- Replace existing target accounts’ permissions—If permissions for the target user are already set (that is, the object Security Descriptor contains the target user’s SID), you can grant the source account’s permissions to the existing target account by selecting this check box. In this case, the target account’s permissions will be overwritten. Leaving this check box cleared will keep the target account’s permissions intact.
- Clean up legacy object ownership and permissions of migrated users—Select this option if you want to remove permissions granted for source accounts from the objects’ Access Control Lists (ACLs), thus disabling the rights for the legacy accounts. Normally, this should be done as soon as the coexistence period is over.
- Revert to the original object ownership and permissions— Select this option to undo re-permissioning, which removes target users from the objects’ Access Control Lists (ACL) and returns all rights to the source accounts.
|

|
NOTE: If two source users were merged to one target user during migration, and if only one of the source users had permissions on some objects, then after Exchange update and reverting permissions back, both users will have permissions on these objects (that is, the users will have common permissions). |
- Process from INI file—Select this option if you want to retrieve the processing options from an INI file. The INI settings file can be created in Migration Manager (Tools | Export to | INI File). See the Delegating Resource Update topic for more details. Note that if no INI file exists, the option is disabled.
|

|
Caution: This option is enabled only when the wizard runs in stand-alone mode.
The wizard cannot update permissions on a mailbox that has never been used. The Exchange store does not actually create the mailbox until the first time the user opens it, at which time Exchange creates the security descriptor in the store. Before processing a newly-created mailbox, activate it by logging on to it. Otherwise, the wizard will not process the mailbox permissions. |
