The Power Schemes object is used to establish power settings in order to save energy and reduce costs and may possibly save some wear and tear on computer equipment by managing how certain devices use power settings.
Power Scheme settings can be configured to run on Windows 7, 8.1 and 10. Power Schemes cannot be configured to run on Terminal Servers, Member Servers or Domain Controllers and 2008, 2008 R2, 2012, 2012 R2, 2016, and 2019 operating systems.
To configure Power settings on Windows 7 machines and above, select the Power Plan Settings tab.
Select Create/Modify or Remove from the Action list. The Create/Modify action will create a new Power plan if one does not already exist with the specified Power plan name or modify the existing Power plan if one already exists with the specified name. Remove will delete an existing Power plan if one exists with the specified Power plan name.
Select from existing Power plans Desktop Authority Power Plan, Balanced, Power Saver, and High performance pre-defined power plans. Enter a new Power plan name to define new configurations. Enter an existing power plan name to update an existing scheme.
Select one of the existing power plans as the base of your new custom power plan.
Enter the amount of idle time that must elapse before Windows turns off the display. This time can be set independently for a computer running on battery and when it is plugged in.
Enter the amount of idle time that must elapse before Windows puts the computer into sleep mode. This time can be set independently for a computer running on battery and when it is plugged in.
Select the Validation Logic tab to set the validation rules for this element.
Select the Notes tab to create any additional notes needed to document the profile element.
When adding or modifying a profile object element, the description appears above the settings tab. Enter a description to annotate the element. The default value for new profile elements can be changed by going to the system Preferences.
Out of the box, Desktop Authority accommodates virtually every installation's requirements simply by filling in the blanks of the objects in the Desktop Authority Manager. While feature-rich and easy-to-use, the Manager may not provide all of the desired functionality out of the box. That's where custom scripting comes in.
Custom Scripting can be used for automated software deployment, locating and/or copying files, special-case drive mappings or to override the Manager settings.
Custom scripting is relatively easy and can be as simple or complex as necessary -- though it does require programming knowledge in KiXtart, PowerShell or VBScript and often requires a working knowledge of the Windows registry. Custom scripts contain scripting code and may launch additional executables, batch files, or scripts of any type using the "shell" or "run" commands.
|
|
Note: Documentation about the KiXtart scripting language can be found at KiXtart.org, the official home of KiXtart. |
Pre-engine custom scripts are launched after Desktop Authority's defined configuration settings are read into memory but before these configuration settings are applied. This allows you to "override" variables defined by Desktop Authority with your own custom settings.
Post-engine custom scripts are launched after the Desktop Authority Engine processes the Manager defined configuration settings. This allows you to use drive mappings and other configuration settings after Desktop Authority has applied them to the client.
A custom script is an ASCII text file written using a scripting language. Desktop Authority supports KiXtart (.kix), PowerShell (.ps1) and VBScript (.vbs). A script may be created using Notepad or any other text editor. The script file may be created within or outside of the Manager.
To create a script from within the manager
|
|
Note: If creating a .kix script, be sure to leave all of the default contents of the script file intact and enter your script code between the comment lines. |
To modify an existing script from within the Manager
|
|
Note: Keep in mind that the script file may also be edited in any other appropriate editor you see fit outside of the Desktop Authority Manager. |
Using an existing script created outside of the manager
|
|
Note: To create a script outside of the Manager, simply load any appropriate text editor and begin typing. Once the script is complete (and tested) it may be added to the Pre and/or Post-Engine object within the Manager. |
As Desktop Authority processes the custom script elements defined by the Pre and/or Post Engine Script list, Validation Logic is applied to each script, beginning with the element at the top of the list. Prioritize the list entries by selecting one or more entries and clicking the Up or Down buttons to reorganize the list.
Figure 45: Set the order of the script entries for execution

Enter the name of the custom script file. The script file name must have an extension of .kix, .ps1 or .vbs. Click Browse to locate and select an existing script file from a network share. If the file does not already exist, Desktop Authority allows the creation of scripts directly from this dialog box. Once a file name with a recognizable extension ( .kix, .ps1, .vbs) is entered into the file name field the file may be edited. Click the Edit file button to edit it. The file will be created and/opened for edit in the system editor. If a new script is being created, some comments are automatically added to the file by Desktop Authority.
Dynamic Variables
Dynamic variables, environment variables or macros may be used as part of the custom script file name. These variables are translated during the client logon process.
Example:
File name: $UserId.kix
For the user Mary Jones, this will translate into mjones.kix when she logs on.
To insert a dynamic variable, press the F2 key and select the variable from the popup list. The dynamic variable will be inserted into the field at the cursor’s current position.
Dynamic variables may also be used as part of the content of a custom script. In order to use the Desktop Authority Dynamic variables within a PowerShell script, use $DA.davariablename. For example, if you wanted to enumerate the user's UserID, the dynamic variable is $UserID. You would format the variable as $DA.UserID in the PowerShell script.
In order to use dynamic variables in a VBScript use DA_davariablename. For example, if you wanted to enumerate the user's fullname, the dynamic variable is $FullName. You would format the variable as DA_FullName in the VBScript.
Administrative rights
Powershell and VBScripts may be run with Administrative rights by using the /admin switch following the file name.
|
|
Important: The administrative rights switch (/admin) cannot be used with a KiXtart (.kix) script since Desktop Authority already provides API functions that are executed with admin rights. Standard KiXtart functions do not use administrative rights. |
Example:
scriptname.ps1 /admin
scriptname.vbs /admin
\\servername\sharename\scriptname.ps1 /admin
\\servername\sharename\scriptname.vbs /admin
|
|
IMPORTANT: When using the administrative rights switch (/admin) to execute a PowerShell or VBScript, the any Desktop Authority dynamic variables used will be evaluated based on the context of the user logging in. However, if PowerShell or VBScript variables are used within the script, they will be evaluated based on the context of the Desktop Authority Client Service user account. |
There are not many rules about editing custom scripts, however, remember that each KiXtart script must end with a RETURN statement so that control is returned to the Desktop Authority Engine when the script is finished processing. This is not the case for Powershell and VBscripts.
Desktop Authority provides no error control over custom scripting. A syntax error in a custom script may cause Desktop Authority to unexpectedly terminate.
|
|
Note: Quest does not offer support for writing, modifying or troubleshooting custom scripts. |
Select the Validation Logic tab to set the validation rules for this element.
Select the Notes tab to create any additional notes needed to document the profile element.
When adding or modifying a profile object element, the description appears above the settings tab. Enter a description to annotate the element. The default value for new profile elements can be changed by going to the system Preferences.
The Printers object configures printer mappings. Printer mappings redirect local printer ports (LPTx) and printer resources to a shared network printer.
Select either Network Printer or IP Printer from the Printer Type list.
Enter the path of the network printer. The path should be specified in the form of \\server\share\. Optionally, click Browse to navigate to the network printer. Press the F2 key to use a dynamic variable.
Specify /DELETE in the Shared Printer prompt to remove all persistent printer mappings that a user has created on their workstation that corresponds to the same port number specified for the shared printer configuration.
IP Printer: Enter the path of the printer driver that will be installed to the client for the IP Printer.
Select Add, Remove, Remove Printer Driver or "-" from the list. This allows you to choose from automatically adding or removing a printer or removing a printer driver on a client. This applies to clients with Microsoft Windows 2008//7/8.1/10/2008 R2/2012/2012 R2/2016/2019 operating systems.
Keep in mind that IP Printers are machine specific (local ports). Therefore, everyone connected to the machine will have access to the specified IP Printer.
Select this check box to set any Auto-Added printers as the default printer on the client.
For Desktop Authority to be able to set an auto-added printer as the client’s default printer, the printer name must match the share name exactly. For example: On the server, if there is a printer called "HP4000 Accounting"; it must be shared as "HP4000 Accounting". Alternatively, the printer can be renamed to "HP4000AC" and shared as "HP4000AC".
Enter the TCP/IP address defined on the printer.
Select the printer’s supported printing protocol.
Specify the printer's port number when the RAW protocol is selected. Specify the printers queue name if the LPR protocol is selected.
Specify the printer name.
Specify the name that will appear in Windows Printer properties port list.
Specify the community name used by the printer.
Select a port number from the list or type a new LPT port. Valid LPT port numbers are 1 - 9.
Select this check box for Desktop Authority to ignore any requests to redirect (capture) or set an auto-added printer as the default printer if the client already has a printer defined on LPT1. Clear this check box for Desktop Authority to redirect (capture) or set an auto-added printer as the default, regardless of whether or not the client has a local printer defined on LPT1.
Select the Validation Logic tab to set the validation rules for this element.
Select the Notes tab to create any additional notes needed to document the profile element.
When adding or modifying a profile object element, the description appears above the settings tab. Enter a description to annotate the element. The default value for new profile elements can be changed by going to the system Preferences.
The Registry object provides a single point of control over changing values in the registry of the user’s computer. This object takes advantage of the DA Administrative Service, which allows Desktop Authority to modify any Windows 2008/7/8.1/10/2008 R2/2012/2012 R2/2016/2019 registry key/value, even if the user logging on does not have the necessary permissions to modify that particular key/value under their own security context.
|
|
NOTE: The Registry object is extremely versatile and, if used improperly, can cause computers not to function properly. The Registry object is designed for use by experienced administrators only. Always use caution when manipulating the registry on any computer, and extreme caution when using a product such as Desktop Authority to make a network-wide change to a group of computers at once. It is highly recommended to first test any registry modification on a specific user or computer (using Validation Logic) prior to rolling the change out to an entire group, subnet or domain. |
Instead of configuring a single registry setting per profile element, the Registry profile object lets you configure multiple registry actions within a single Registry profile element. Click Add from the Registry profile object to create a Registry profile element. This Registry implementation will save you time when implementing multiple registry settings. Group all registry settings together that will use the same Timing and Validation Logic settings. If you prefer, you can stick to the old way of doing things by adding one element to the Registry action list and create several Registry profile elements.
Click Add to add a new registry setting to the Registry action list.
Click Import to import existing registry (.reg) files.
There are two ways to import an existing registry file:
- Import registry entries into a single Registry profile element
- Import registry entries into multiple Registry profile elements
Figure 46: Import registry entries into a single Registry profile element
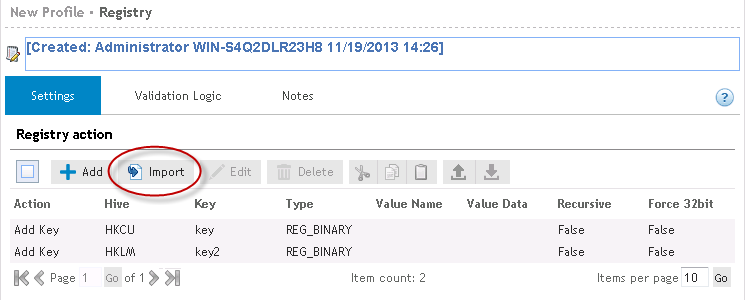
Figure 47: Import registry entries into multiple Registry profile elements
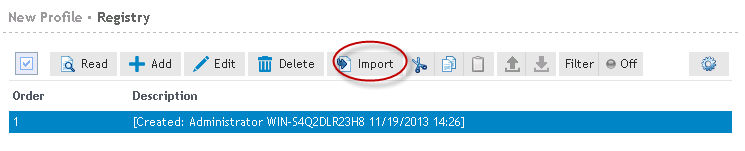
Clicking the Import button from the Registry profile object will import all entries within the selected .reg file as multiple elements in the Registry profile object. This will result in multiple Registry profile elements.
Select Edit to modify the currently selected registry action.
Select Delete to remove the currently selected registry action.
Registry actions can be managed by using the standard Windows Cut/Copy/Paste actions to maneuver them into child profiles or parent profiles. Drag and Drop actions may also be used for this purpose.
Registry actions will be evaluated on a client in the order they appear in the Registry action list, from the first Registry element to the last. The order of the Registry actions can be modified by using the Move Up and Move Down buttons. To move a registry action, you must first select it, by clicking on it. Once it is selected (it will be highlighted), press the Move Up or Move Down button based on which way you want to move the setting.
The order in which the Registry actions are displayed in the list is the order they will get processed in. For example, if there are 2 registry elements and they each have a registry action list, all actions for the first registry element will be processed and then all actions for the second registry actions list will be processed.
Once you have configured the registry action, click Confirm to save the settings or Cancel to abort the setting changes.
Select an action from the list to define how the registry setting is to be updated. Registry keys can be created and removed. Available actions are:
Select the hive on which to perform the action from the list. The following hives can be selected:
Enter the specific key to be added or updated in the registry. Keys are subcomponents of the registry hives. Dynamic variables are available for use in defining the key.
Select the value type to be stored in the registry key.
Valid types are:
The Type list is not applicable when the Action field is set to either Add Key or Delete Key.
Enter the name of the value for the registry key that will be written. Value is not applicable when the Action field is set to either Add Key or Delete Key.
A value is not required when the Action field is set to Write Value. If no value is specified, the data will be written to the key's default value.
Type the data you would like stored in the specified value. This field may contain static text, Desktop Authority Dynamic Variables, KiXtart macros or any combination of the three. Press the F2 key to select a dynamic variable from the list.
If you want to create a new value with no data, or to erase an existing registry value’s data, leave this field blank. The value will be created with no data.
Check this box to force the 32 bit registry location to be used instead of the 64 bit location when executing on 64 bit operating systems.
Select the Validation Logic tab to set the validation rules for this element.
Select the Notes tab to create any additional notes needed to document the profile element.
When adding or modifying a profile object element, the description appears above the settings tab. Enter a description to annotate the element. The default value for new profile elements can be changed by going to the system Preferences.


 Importing Registry Files