The Assign Script dialog box provides the ability to assign a logon script to domain user accounts in order for the user to qualify for User Management settings. Computers that are only going to be configured with administrator settings from Computer Management profiles and objects are not required to have a logon script defined.
In addition to assigning a logon script to domain users, this tool can also be used to query which users in your domain currently have a specific logon script assigned to them. Any user who is a Domain Admin has the ability to update the assign/unassign logon scripts for users.
On the left hand side of the Assign Script dialog, using the Active Directory OU and Groups tree, select the domain, group or organizational unit that will be used to locate users who will be assigned the Desktop Authority logon script.

The elements in the user list can be selected one at a time or several at one time. You can select more than one element in the list using the Shift or Ctrl key in combination with a mouse click. To select multiple users, hold down the CTRL key while clicking the individual users to select. Consecutive users in the grid can be selected by clicking the first user to select and then, while holding down the SHIFT key, clicking the last user to select. To select the entire list of users select the checkbox to the left of the column headers. This box will be empty if no users are selected and will be filled with a square if some users are selected. A user's selected status may be changed by clicking on it. If there is only one user in the list, it will always be selected.
Enter search criteria that will find matching Active Directory users. This is an inclusive search. Any user found with the search criteria in any part of the user name will be found as a match. Valid characters consist of [A-Z], [a-z] and [0-9].
Searching with a specific OU highlighted in the tree will search only that specific OU.
Click Assign script to assign a logon script to all selected users in the list. In most cases, the script to assign will be SLOGIC. However, depending upon circumstances, this can be changed and the new script can be selected from the drop list to the left of the Assign script button.
Click Unassign script to unassign a logon script from all selected users in the list. The script may also be unassigned from a specific user by clicking the Unassign link in the Actions column. This link will only appear for users who already have an assigned logon script.
The User list displays all users that have an established network account. Shown in this list are the User Name, Full Name, Description and associated logon script (if any).
GPO Deployment will push out and install an MSI file to each computer in the targeted Domain or OU(s). The MSI file contains Desktop Authority’s client files and must be installed to every computer that is to be managed by Desktop Authority.
The GPO is configured by selectively targeting the root of the domain or OUs (Active Directory Organizational Units) within the enterprise. 32-bit and 64-bit systems can also be selectively targeted. It is important to note that all computers within the selected domain or OU(s) will receive the client files unless a computer is defined as an exception.
Computer(s) to be excluded from the installation of the Desktop Authority client files are configured in the Global Common Management Exception Options. Excluded computers will not receive the necessary Desktop Authority client files that are necessary for the computer to be managed by Desktop Authority.
|
|
IMPORTANT: Client provisioning will determine the best way to install the client files to each workstation. This may include the use of GPO Deployment. Client provisioning provides a way to install the client files successfully on most computers in the network. |
|
|
IMPORTANT: GPO Deployment requires the Authenticated Users group to have Read, Execute and List NTFS permissions on the %windir%\SYSVOL\sysvol\%DomainName%\Policies\Desktop Authority\Desktop Authority Agent 8.0 folder. If this requirement is not configured, Desktop Authority will automatically add the Authenticated Users group to this folder with the required permissions. |
Select a preferred domain from the drop list to be used as the default domain against which queries are run. This includes the types of queries where domain specific information, such as a list of domain controllers, is required.
If the client files location is set to SYSVOL, select a server from the drop list as the target for the client files.
WMI Filters are used to fine tune the application of GPOs during a Group Policy refresh. A WMI Filter includes one or more WMI Query Language (WQL) queries. If any of these queries evaluate to True then the WMI filter is considered to evaluate to True and the GPO to which it is linked is applied. If the queries do not return anything in the resultant set then the GPO is not applied.
In most cases, this box should be selected. If however, WMI is posing a specific environment issue, unselect this option.
The GPO Extension will be deployed to the selected domain or OUs in this list. The extension is set to either Install or Uninstall the MSI. Click on a column header to sort the list either ascending or descending by the selected column.
The Organizational Unit to which the extension will be installed to or removed from.
The selected install mode for 32-bit and 64-bit computers.
Click Add to configure an OU for GPO deployment. The selected OU will be added to the GPO Deployment list.
GPO Deployment is supported on Windows 7 and above, Server 2008, Windows Server 2008 R2, Windows 2012, Windows 2012 R2, Windows Server 2016, Windows Server 2019, Windows 7, Windows 8.1 and Windows 10. Windows Installer and .NET 4.6 are required on the target computers. Desktop Authority will install these software requirements, if necessary.
First, the OU must be selected. To do this, navigate to the OU on the left hand pane. As you click on the OU, the Deploy DA Client to in the right hand pane will be filled in with the selection from the left pane.
Next, select Install or Uninstall for 32-bit systems and 64-bit systems.
|
|
NOTE: Global Option Exceptions will be respected. |
Confirm the selected settings and click Save to complete the GPO Deployment configuration for the selected OU.
Click Cancel to exit without saving any GPO Deployment configurations.
Click Remove to unlink the GPO from the OUs selected in the GPO Deployment list.
After unlinking the GPO, the following dialog provides the opportunity to remove the GPO and the associated files.
This dialog is only visible when the last GPO element is removed from the GPO Deployment list.
Figure 30: Delete GPO and associated files confirmation dialog

Selecting this box will delete the GPOs and WMI filters.
Selecting this box will remove the Desktop Authority Agent 8.0 folder under SYSVOL. The default path to this folder is C:\WINDOWS\SYSVOL\sysvol\[domain]\Policies\Desktop Authority\Desktop Authority Agent 8.0. This folder will be removed from one Domain Controller. During the course of normal replication on the domain, it will be removed from all other Domain Controllers.
Selecting this box will remove the Device Policy Master folder under SYSVOL. The default path to this folder is C:\WINDOWS\SYSVOL\sysvol\[domain]\Policies\Desktop Authority\Device Policy Master. This folder will be removed from one Domain Controller. During the course of normal replication on the domain, it will be removed from all other Domain Controllers.
If both checkboxes, Delete Desktop Authority Client Files from SYSVOL and Delete Desktop Authority Device Policy Master files from SYSVOL are selected, the Desktop Authority folder under SYSVOL will be removed along with all the folders and files underneath it. The default path to this folder is C:\WINDOWS\SYSVOL\sysvol\[domain]\Policies\Desktop Authority.
Click to edit the selected OU settings. Change either the 32-bit or 64-bit install modes.
Click Verify GPO's to confirm that the Desktop Authority GPO extensions and WMI filters are up to date correctly configured.
Click this button to increment the GPO extension internal version to the specified OUs. Once the version is incremented, the GPO will be recognized as a new version. It will be executed on any client whose version is different.
Click Refresh to update the GPO Deployment list.
There are two ways in which Desktop Authority can deploy the necessary client files to machines that will be managed by Desktop Authority. Desktop Authority uses Client Provisioning which encompasses both GPO-based Deployment and Logon-based Deployment. Client Provisioning dynamically chooses from the best of several deployment approaches at runtime. The specific technique used depends on the client environment, and the obstacles present in that environment.
Figure 31: Client Provisioning overview
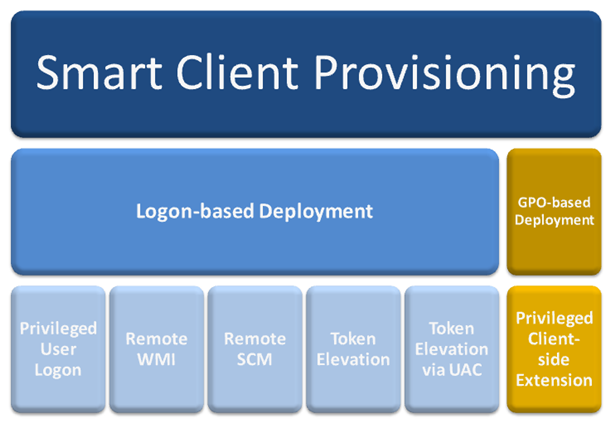
Desktop Authority GPO-based Deployment and Logon-based Deployment can both be used to deploy the Desktop Authority technology to client workstations and/or servers. They differ from each other in regard to the permission levels needed to accomplish the deployment. It is important to note that DA GPO does not require a user to login for the client files to be installed to the client, whereas the other methods used to deploy the client files will require a user logon. This is important to consider when provisioning workstations or servers.
Deploying the Privileged Client-side Extension with GPO-based Deployment requires higher permission levels than non-domain admins, such as an OU Admin would typically have. Therefore, in some cases an OU Admin would not be able to configure the client file deployment without assistance from a Domain Admin, which defeats the purpose of having an OU Admin.
It is due to this privilege level issue, that Smart Client Provisioning has been implemented. Client Provisioning will go through the following series of steps to get the DAClientInstall.MSI deployed or installed on a machine.
|
|
Important: It is important to note that if WMI fails to allow a remote connection, TCP ports 135 or 445 may be opened to allow this connection to be successful and thereby allow the installation of the client files. Opening these ports may be easier to configure than to configure GPO deployment throughout the enterprise. |
With Logon-based Deployment, client files can be delegated to client machines via NETLOGON, a custom NETLOGON or SYSVOL. This makes the Logon-based Deployment very flexible.
Select either NETLOGON or SYSVOL from the drop down menu. Client files will be replicated to the specified location and applied to each client computer when a user logs into the computer with the Desktop Authority logon-script (slogic.bat).
Select NETLOGON to use any NETLOGON share to store the client files. Using NETLOGON allows the NETLOGON share (or any custom share hosting the user files) to be used.
Selecting SYSVOL will allow client files to be stored in a single place, to be shared between GPO and logon-based provisioning.
|
|
Note: When using both Logon-based Deployment and GPO-based Deployment, using the SYSVOL location is the most efficient. The file location is shared for both GPO-based and Logon-based Deployments. This is most useful in large environments. Using SYSVOL requires domain admin privileges. |
Select this box to display an error message if the logon provisioning fails for some reason. This error will be displayed on the client.
Select this box to ensure that the logon-based provisioning completes successfully on the client, if UAC is enabled on the computer. During the provisioning process, a Windows UAC dialog will be displayed, if necessary. This may be required if the client-side firewall is unusually restrictive. The user must accept the request. If the permission is not granted or this box is not selected, Desktop Authority may not be able to provision the computer properly.
MSI packages contain all necessary files an application needs in order for it to be installed using Microsoft's Windows Installer. Windows Installer can install and/or uninstall MSI packages for any application regardless of the install package used by the manufacturer. Administrators can customize an MSI package by creating a transform (.MST) file. The transform can provide answers to Windows Installer when the MSI file calls for user input, such as choosing which options to install or the correct installation path. It can also remove unwanted features from the basic installation. MSP files are Microsoft Windows patch files that are updates to applications that have been previously installed with Windows Installer.
The Desktop Authority Software Distribution object is used to manage a repository of Microsoft Windows Installer (MSI, MST, MSP) packages.
The Software Distribution object provides the ability to:
Figure 32: Software Distribution process overview
Desktop Authority accesses Windows Installer packages, providing the ability to Import, Export, Modify, Delete and Publish these packages.
One or more packages may be selected in the Software Distribution list by using the Shift or Ctrl key in combination with a mouse click. To select multiple packages, hold down the CTRL key while clicking the individual packages to select. Consecutive packages in the grid can be selected by clicking the first package to select and then, while holding down the SHIFT key, clicking the last package to select. To select the entire list of packages select the checkbox to the left of the column headers. This box will be empty if no packages are selected and will be filled with a square if some packages are selected. A package's selected status may be changed by clicking on it.
Click Import to copy a Windows Installer package into the Desktop Authority repository. The Installer file must be an existing MSI, MST or MSP package.
Click Export to copy a Windows Installer package from the Desktop Authority repository to another defined location.
Click Publish to make the selected packages available for install by Desktop Authority’s MSI Packages object. The MSI package file is not initially copied to the server that the update service is installed to. However, when the client machine requests the package, the MSI package is copied to the server that the Update service is installed to. If a package is never requested by a client, it will not exist on the server.
For configuration information on the Update Service, see What is the Update Service?
Click Unpublish to remove Windows Installer packages from all distribution servers.
Click Delete to remove a Windows Installer package from the Desktop Authority repository.
Click Refresh to freshen the Software Packages list.
The Software Packages list defines all Windows Installer packages that are available for deployment. This includes MSI, MST and MSP files. Packages must be imported into the Desktop Authority repository to show in this list. The following information is available about each package in the list: Product Name, File Name, Published Status, Published Date, Manufacturer, Type, Version, Product Code, and File Size.
Click Show Differences between the published and unpublished versions of the selected package, if any differences exist.
This function is only available if the MSI is published and there are determined to be differences between the published and unpublished version of the package. If it is determined that there are no differences between the published and unpublished version of the package, this button will be disabled.
|
|
Note: This feature is not a standard part of Desktop Authority Essentials. To obtain this feature, Desktop Authority Essentials must be upgraded to the full version of Desktop Authority. |


