Select a Network Connection type to enable validation checking based on the current connection to the network, On-Network or Off-Network. If the Network connection of the computer matches one of the connection types selected, the configuration element will be processed.
Desktop Authority can manage the computer and user's session when they are not connected to the corporate network. As an example, think of a laptop that is connected to the network at the office but when being used remotely it is disconnected from the company network. In this case the computer, when used remotely, would be considered Off-Network.
Select On-Network to validate when the computer is connected to the corporate network, because it is located physically in the corporate building or facility, or through a VPN. This means that the domain controller is reachable and therefore Windows Domain and Active Directory services are available.
Select Off-Network to validate when the computer is connected to a private or public network with internet access but the corporate environment is not available, i.e. the domain controllers are not pingable and Active Directory services, and network shares are not available.
It is assumed that a Desktop Authority managed computer has run Desktop Authority at least once while connected to the network, thus it has installed the client side files.
Off-Network support is configured on the Deployment Settings > Off-Network Support page.
The ability to execute elements Off-Network is not supported on with all profile objects. Therefore, the Network Connection Validation Logic section will only be visible for objects where Off-Network execution is supported.
Below is the list of objects that support Off-Network Execution:
Computer Management
User Management
© 2022 Quest Software Inc. ALL RIGHTS RESERVED.
This guide contains proprietary information protected by copyright. The software described in this guide is furnished under a software license or nondisclosure agreement. This software may be used or copied only in accordance with the terms of the applicable agreement. No part of this guide may be reproduced or transmitted in any form or by any means, electronic or mechanical, including photocopying and recording for any purpose other than the purchaser’s personal use without the written permission of Quest Software Inc.
The information in this document is provided in connection with Quest Software products. No license, express or implied, by estoppel or otherwise, to any intellectual property right is granted by this document or in connection with the sale of Quest Software products. EXCEPT AS SET FORTH IN THE TERMS AND CONDITIONS AS SPECIFIED IN THE LICENSE AGREEMENT FOR THIS PRODUCT, QUEST SOFTWARE ASSUMES NO LIABILITY WHATSOEVER AND DISCLAIMS ANY EXPRESS, IMPLIED OR STATUTORY WARRANTY RELATING TO ITS PRODUCTS INCLUDING, BUT NOT LIMITED TO, THE IMPLIED WARRANTY OF MERCHANTABILITY, FITNESS FOR A PARTICULAR PURPOSE, OR NON-INFRINGEMENT. IN NO EVENT SHALL QUEST SOFTWARE BE LIABLE FOR ANY DIRECT, INDIRECT, CONSEQUENTIAL, PUNITIVE, SPECIAL OR INCIDENTAL DAMAGES (INCLUDING, WITHOUT LIMITATION, DAMAGES FOR LOSS OF PROFITS, BUSINESS INTERRUPTION OR LOSS OF INFORMATION) ARISING OUT OF THE USE OR INABILITY TO USE THIS DOCUMENT, EVEN IF QUEST SOFTWARE HAS BEEN ADVISED OF THE POSSIBILITY OF SUCH DAMAGES. Quest Software makes no representations or warranties with respect to the accuracy or completeness of the contents of this document and reserves the right to make changes to specifications and product descriptions at any time without notice. Quest Software does not make any commitment to update the information contained in this document..
If you have any questions regarding your potential use of this material, contact:
Quest Software Inc.
Attn: LEGAL Dept
4 Polaris Way
Aliso Viejo, CA 92656
Refer to our Web site (https://www.quest.com) for regional and international office information.
Patents
Quest Software is proud of our advanced technology. Patents and pending patents may apply to this product. For the most current information about applicable patents for this product, please visit our website at https://www.quest.com/legal.
Trademarks
Quest, the Quest logo, and Join the Innovation are trademarks and registered trademarks of Quest Software Inc. For a complete list of Quest marks, visit https://www.quest.com/legal/trademark-information.aspx. All other trademarks and registered trademarks are property of their respective owners.
Legend
|
|
Warning: A WARNING icon indicates a potential for property damage, personal injury, or death. |
|
|
Caution: A CAUTION icon indicates potential damage to hardware or loss of data if instructions are not followed. |
|
|
|
Desktop Authority Administrator Guide
Updated - January 2022
Software Version - 11.2.1
A Profile is a collection of elements that define a set of configurations and default profile settings, including log file definitions, default descriptions, default Validation Logic settings, alerts and custom scripts. Profiles are applied to a particular category of users or computers based on the validation logic defined in the profile settings.
A profile may contain other profiles (children). This allows for greater flexibility and further granularity for its contained configuration elements.
User Profiles are evaluated and applied to the current user's working environment during the logon and/or logoff process or Refresh intervals. Computer Profiles are evaluated and applied to a computer during the Startup and/or Shutdown process, Refresh intervals or based on a defined Scheduled. Only profiles that pass the Validation Logic test will be executed at the specified time on the clients and/or computers.
Using profiles enables greater manageability and control over client configurations. Using profiles also offers the reward of faster logon script processing. Since profiles tend to break down a large number of configurations into smaller groups of configurations, not all settings are processed or validated at logon time. If a profile is deemed to be invalid for the client, all elements in the profile are bypassed thus saving the processing time it would have normally taken to validate each of the elements separately.
The Manager displays profiles in the Profiles branch of the Navigation tree. There are separate tabs for User Profiles and Computer Profiles. Click /
on a profile to expand or contract the objects and categories contained within the profile.
Figure 9: Overview of the parts on the navigation pane tree
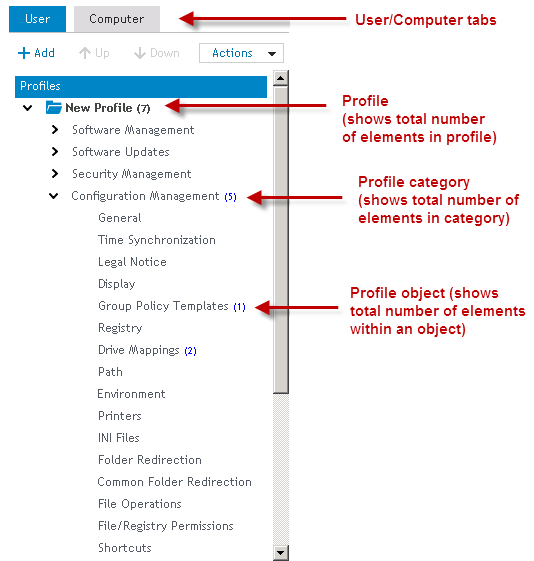
Within each part of the Profile tree, if there are elements within it (Profile, Category, Object) the number of total elements will be displayed within parentheses. Passing the cursor on top of the profile, category or object will display a tooltip with more information about the number of active and inactive elements within the section.
Profiles can be maintained by selecting an action from the Actions drop box. Click Add to create a new Profile. Prior to selecting an action, select either the Computer or User tab and then select either the Profile root or a specific profile to modify.
Figure 10: Select an action from the Actions list
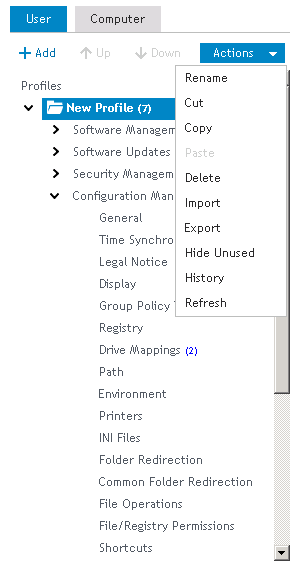
Select Add to create a new profile. The newly added profile will be added to the point in the tree that is highlighted. Select the Profiles root to add a new parent profile. Select an existing profile before the Add to make a new child profile.
Every newly created Parent or Child profile is automatically assigned a Profile Admin Role by default. The Profile Admin role by default has full access to Add, Change and Delete elements in all Profile objects as well as the ability to add, change and delete profiles.
Select Rename to modify the currently selected profile's name.
Select Delete to remove the currently selected profile. If the profile to be deleted contains any children, the child profiles will also be removed. Upon deletion, a confirmation dialog is presented, if selected in Preferences > Confirmations.
Select Delete, Export and delete or Cancel to continue the delete procedure. The Export and delete option will save the profile to a file in a user selected location. The profile could be imported at a later time using the Import action on the Profile Actions menu.
|
|
Note: History cannot undo the deletion of a profile. Please confirm the deletion of the profile before performing the action. |
Profiles may be managed by using the standard Windows Cut/Copy/Paste actions to maneuver them into child profiles or parent profiles. Drag and Drop actions may also be used for this purpose.
Profiles can be imported for the use of restoring a previously exported profile, or for importing it into another Desktop Authority Manager.
Profiles can be exported for the use of a backup, or for importing it into another Desktop Authority Manager. The Export option copies the selected profile's configurations (profile.slc, profile.sld and profile.slp) to a selected location.
|
|
Note: When exporting profiles using Internet Explorer 9 with Enhanced security turned on, the Do not save encrypted pages to disk setting must be turned off in order for the file to be downloaded and saved. IE Enhanced security automatically turns this option on. Since Desktop Authority requires secure pages (https), the files cannot be saved while this option is turned on. |
This option will Show or Hide unused profile elements. This action affects all profiles (parent and children).
Profiles will be evaluated on a client in the order they appear in the Navigation tree. This order can be modified by using the Move Up and Move Down buttons. To move a profile, you must first select it, by clicking on it. Once it is selected (it will be highlighted), press the Move Up or Move Down button based on which way you want to move the profile.
The Desktop Authority Manager keeps track of actions taken during the current session with Desktop Authority.
Figure 11: Example History window

Click History to see the actions that have taken place. Click Undo to go back to a specific action or Redo to repeat and action that was previously Undone.
Operations may be undone by any user, regardless of who originally executed the action, as long as the user has the permission to perform the specific operation. If the user attempts to undo an action to which he does not have permission to, the undo operation will stop at the point where the permission does not exist.
Note: History cannot undo the deletion of a profile. Please confirm the deletion of the profile before performing the action.
Update the Profile tree display.
Profiles have several configuration options. These include Validation Logic, Default Validation Logic, Default Timing, Permissions and Named Schedulers and are available as Tabs in the View Pane.
To modify any of the options on the profile configuration tabs, click on Edit. This will put the settings into edit mode with Save and Cancel at the bottom of the display. You must click either Save or Cancel to complete the edit.
Validation Logic is used in conjunction with profiles to determine whether the configuration elements within a profile should be considered for processing on the client. Once the profile passes the validation test, each configuration element within the profile is processed. These entries are first verified by testing the validation logic defined for the entry. If the entry passes the validation logic test, it is executed on the client. If the validation logic for the profile does not meet the client specifications then no elements within the profile are processed.
It is important to keep in mind that not all configuration elements will be executed on a client just because a profile passes the validation logic test. This is due to the secondary validation logic provided for, on individual configuration element within the profile.
For detailed information about Validation Logic settings see the Validation Logic concepts help topic.
Only a Super User/Group has the ability to change the Validation Logic on a root level profile.
Default Validation Logic is used to provide defaults to any new configuration element defined within the profile. Changing the Default Validation Logic for a profile will not change the validation logic defined for the profile or any existing configuration element.
For detailed information about Validation Logic settings see the Validation Logic concepts help topic.
Only a Super User/Group has the ability to change the Default Validation Logic on a root level profile.
Default Timing is used to provide defaults to the timing tab for any new configuration element defined within Computer Management profiles. Changing the Default Timing for a profile will not change the Timing defined for the profile or any existing configuration element.
For detailed information about Timing settings see the Validation Logic Timing help topic.
Only a Super User/Group has the ability to change the Default Validation Logic on a root level profile.
The Advanced tab contains specialized profile options.
Select the If this profile is validated during execution, do not process any subsequent profiles option, to stop processing all following profiles once this profile is validated and processed.
Keep in mind that profiles are process the order that they appear in the navigation pane. The order of the profiles may be rearranged by using any of the methods described in the Profile Management topic.
Only a Super User/Group has the ability to change the Advanced options on a root level profile.
The Permissions tab is used to assign permissions to users by assigning a user to a role.
Roles are created from the Console Access Settings menu selection. Most often roles are established to represent a common job function that is performed by one or more employees. A role defines the functions that a member of the role will be able to perform.
For more detail on using Role Based Administration, see Role Based Administration Overview.
To update the members of a role, select the Role from the Roles list. Click Add Member or Delete Member to update the Members list.
Only a Super User/Group has the ability to change the Permissions on a root level profile.
The Named Schedules tab is used to create, modify or delete saved schedules. A Schedule is used as a Timing option. When applied to an element, it allows the element to be executed at a specified cycle and time period. Click Add, Delete or highlight a schedule to update.
A Schedule can be added to any Computer Management Profile element within the profile it was created in. Schedules are inherited by children profiles. Schedules created in one parent profile are not available in any other profile that is not related to the one it is created in.
Schedules can also be created within an element's Timing options window by choosing the Scheduled timing option on the element's timing tab.


