Chatta subito con l'assistenza
Chat con il supporto

NetVault 12.4 - Administration Guide for Managed Service Providers

Introduction Getting started Configuring clients Managing catalog search Configuring storage devices
About storage devices SAN considerations Quest DR Series systems Quest QoreStor NetVault SmartDisk EMC Data Domain Systems Snapshot Array Manager Virtual Tape Libraries Virtual standalone drives Shared Virtual Tape Libraries Physical tape devices Storage tiers
Backing up data Managing policies Restoring data Managing NetVault Backup dashboard Managing jobs Monitoring logs Managing storage devices
Role-based access to manage storage devices Monitoring device activity Managing disk-based storage devices in list view Managing disk-based storage devices in tree view Managing the Snapshot Array Manager Managing tape libraries in list view Managing tape libraries in tree view Managing tape drives in list view Managing tape drives in tree view Adding shared devices
Managing storage media Managing user and group accounts Managing Tenant Monitoring events and configuring notifications Reporting in NetVault Backup Working with client clusters Configuring default settings for NetVault Backup
About configuring default settings Configuring encryption settings Configuring plug-in options Configuring default settings for post-scripts Configuring default settings for Verify Plug-in Configuring Deployment Manager Settings Configuring Job Manager settings Configuring Logging Daemon settings Configuring Media Manager settings Configuring Network Manager settings Configuring Process Manager settings Configuring RAS device settings Configuring Schedule Manager settings Configuring Web Service settings Configuring Auditor Daemon settings Configuring firewall settings Configuring general settings Configuring security settings Synchronizing NetVault Time Configuring the reporting utility Configuring NetVault Backup WebUI default settings Configuring NetVault Backup to use a specific VSS provider Configuring default settings using Txtconfig
Diagnostic tracing Managing diagnostic data Using the deviceconfig utility NetVault Backup processes Environment variables Network ports used by NetVault Backup Troubleshooting
Common errors Safe Mode in NetVault Backup

Generating reports

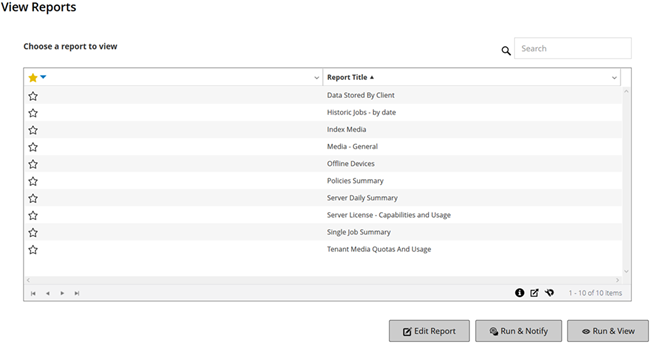
You can access the reports from the View Reports page. You can run and view reports on demand or create report schedules to automatically generate reports at specified times. NetVault Backup also allows use of events and notification methods to send reports by email reports.

2
On the View Reports page, select the report that you want to generate. For information about available predefined reports, see Available reports.
Set the filters that you want to use, and click OK. For more information about filter options, see Setting filters for report.

Setting a favorite report

On View Reports page, you can select any report (s) to mark it as a favorite report to easily access it from the list of predefined reports.

2
On the View Reports page, click the empty star next to the report in the first column that you want to favorite.

The favorite reports are displayed on top of the list in alphabetical order, followed by the remaining reports.

To remove a favorite from the reports list, click a filled-in star next to the report.

Setting filters for report

When you run a canned report that includes any filter conditions, the Set filters for report dialog box is displayed. You can set one or more conditions, based on which the reporting system generates the output. For each filter field that you want to use, you must select the filter operator and specify the comparison value. For example, the following Set filters for report dialog box is displayed for the report- Data Stored By Client.

To set report filters:
Relative date: TODAY-n[time variable]
Example: TODAY-7DA
Relative time: NOW-n[timevaribale] or TODAY-n[time variable]
Example: NOW-12HO
State: You can select this check box to compare the field state as opposed to the value it contains. The field state comparison option is designed for advanced users who have a good understanding of the NetVault Backup reporting system.
For example, you can specify the state Unknown to find or exclude records that are not available in one of the tables.
Regexp: You can select this check box to match a regular expression instead of a constant value. The expression can contain text and wildcard characters.
As above: The As above check box is shown when the same filter field is applied to multiple report components. You can select this check box to use the same comparison value that is configured for the preceding field.
4
After setting the filters, click OK to close the dialog box.

Editing report job definitions

You can edit a report job definition to modify the report schedule or configure user‑defined events for the report. NetVault Backup lets you distribute the generated reports by email or print the reports through the notification system.

2
On the View Reports page, select the report that you want to edit, and click Edit Report.
3
On the Edit Report Job Definition page, configure the following options.

Schedule

This option is used to run the report immediately.

For scheduled events, make sure that you specify the user-defined event in the Report Completed Event and Report Failure Event field.

Report Completed Event

Specify the event that you want to raise when the job completes successfully.

Report Failure Event

Specify the event that you want to raise when the job fails.

4
Click Save, and in the Save Report Job dialog box, click OK.
When you save the job, the configured events are added to the Report Job event class. MSP administrator must set the notification profile for the event for the respective user groups of the tenant, so that the tenant (tenant administrator or tenant user) can receive event notifications when the report is generated. For more information, see Using notification methods to send reports by email reports.
Related Documents

The document was helpful.

Seleziona valutazione

I easily found the information I needed.

Seleziona valutazione