Chatta subito con l'assistenza
Chat con il supporto

Enterprise Reporter 3.5.1 - Installation and Deployment Guide

Product Overview Installation Considerations for Enterprise Reporter Installing and Configuring Enterprise Reporter Managing Your Enterprise Reporter Deployment Troubleshooting Issues with Enterprise Reporter Appendix: Database Content Wizard Appendix: Encryption Key Manager Appendix: Log Viewer

Minimum permissions for installing Enterprise Reporter

During your first installation, when you install the Enterprise Reporter server, there are two sets of credentials that you need to supply, as well as optional SQL credentials. This table outlines what the credentials are used for, and what permissions they require.

Logged in user

Installing the components of Enterprise Reporter

Administrator access on the local computer.

Creating the Enterprise Reporter database, roles and logins on the SQL Server® (unless SQL credentials are provided)

Must have the right to create databases, logins and groups.

Creating the security groups

Depends on the type of groups that are chosen, but must have the right to create groups in the chosen environment.

Securing the Configuration Manager and the Report Manager. The logged in user is added to the Reporter_Discovery_Admins, Reporter_Reporting_Admins, Reporter_Reporting_Operators, and Reporter_Discovery_Nodes security groups as an administrator for both consoles when installing the server.


Service Account

Supplied during installation

Installing and running the Enterprise Reporter server

Login as service right is conferred on the service account by the logged in credentials during installation.

Connecting to the Enterprise Reporter database (unless SQL permissions are provided)

Read and write permissions are automatically granted during database creation.

Securing the Configuration Manager and Report Manager. The service account is automatically added to the Reporter_Discovery_Admins, Reporter_Reporting_Admins, Reporter_Reporting_Operators, and Reporter_Discovery_Nodes security groups when installing the server.


Optional SQL credentials

Supplied during installation

Can be used to create the Enterprise Reporter database

Must have the right to create databases, logins and groups.

If supplied, are used to connect the database by the Enterprise Reporter server.

Read and write permissions are automatically granted during database creation.

Port Requirements

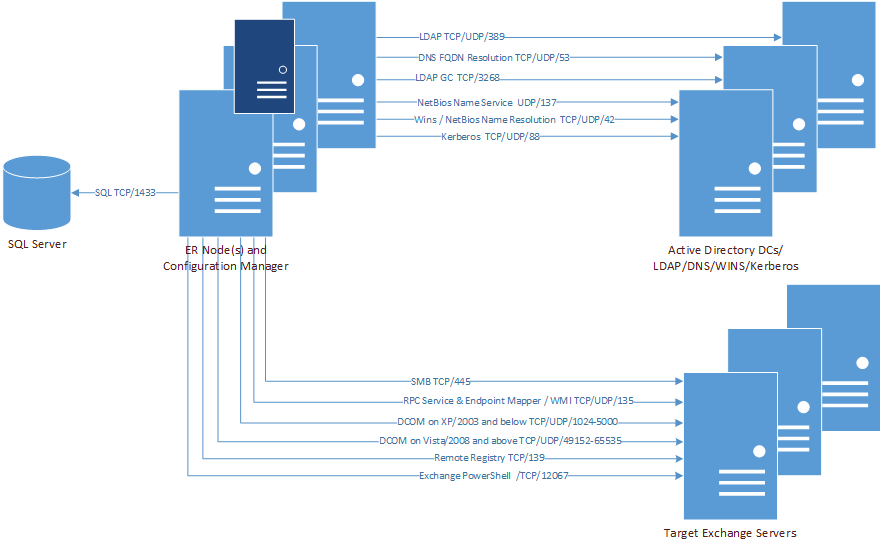
For the Enterprise Reporter components to communicate, some ports must be open.

The following figure shows the ports that are used by the various Enterprise Reporter components.

*For more information on ports used when creating a discovery, see Table 17.

**For more information on ports used during data collections, see Table 18.

The following table shows the ports used by all of the Enterprise Reporter components.


FTP

20, 21

TCP


X


SMTP

25

TCP

X

X


X


WINS / NetBiOS Name Resolution

42

TCP
UDP


X


DNS FQDN Resolution

53

TCP
UDP

X

X


X


Kerberos

88

TCP
UDP

X


X


RPC Service & Endpoint Mapper / WMI

135

TCP
UDP

X


NetBIOS Name Service

137

UDP


X


NetBIOS Datagram (browsing)

138

UDP

X


LDAP

389

TCP
UDP

X


SQL

1433

TCP


X

X

X

X

SQL Server Browser Service

1434

TCP
UDP

X

X


Enterprise Reporter Node

7737

TCP


X

X

Enterprise Reporter Server

7738

TCP

X

X


X

X

The following table outlines the ports used by all of the Enterprise Reporter discoveries.

WINS / NetBiOS Name Resolution

42

TCP
UDP

X


X

X


X


X


X


X

DNS FQDN Resolution

53

TCP
UDP

X


X

X


X


X


X


X

HTTP

80

TCP


X

X


X*

X


X


X


X

X

Kerberos

88

TCP
UDP

X


X

X*


X


X


X


X

RPC Service & Endpoint Mapper / WMI

135

TCP
UDP


X


X


X


X


X

NetBIOS Name Service

137

UDP

X


X

X


X


X


X


X

Remote Registry

139

TCP


X

X


X


X


X


ICMP


X


X


X


X


X

LDAP

389

TCP
UDP

X


X

X


X


X


X


X

HTTPS

443

TCP
UDP


X

X


X


X


X

X

SMB / Remote Registry

445

TCP

X


X


X


X


X


X

LDAP Secure

636

TCP

X


DCOM on XP/2003 and below
(uses an open port in this range)

1024
- 5000

TCP
UDP


X

X


X


X


X

SQL

1433

TCP

X

X

X

X

X

X

X

X

X

X

X

X

X

SQL Server Browser Service

1434

UDP


X

LDAP GC

3268

TCP

X


X


WinRM

5985
5986

TCP
UDP


X

X


X

DCOM on Vista/2008 and above
(uses an open port in this range)

49152
- 65535

TCP
UDP


X

X

X

X


X


X


X

*Exchange 2013 and higher

The following figures outline the ports used by the Enterprise Reporter discoveries.

Additional ports for Azure and Microsoft 365 discoveries to be set on the Node:
 

Additional port for Exchange discovery to be set on the Node:


These ports need to be set on Active Roles server and Enterprise Reporter server:


Firewall Requirements

The following changes are required to be made to the Windows Firewall settings to allow Enterprise Reporter to return all available data during a discovery. Without these settings, the data returned during a discovery will be limited and the discovery will indicate the following error:


Windows 2022

Start | Control Panel | System and Security | Windows Defender Firewall

Scroll down and select Allow an app or feature through Windows Defender Firewall

Select File and Print Sharing and Windows Management Instrumentation (WMI) (if not already selected)

The check box in the Domain column will be selected.

Click OK..

Windows 2019

Start | Control Panel | System and Security | Windows Defender Firewall

Scroll down and select Allow an app through Windows Firewall

Select Windows Management Instrumentation (WMI) and File and Print Sharing (if not already selected)

The check box in the Domain column will be selected.

Click OK.

Windows 2016

Start | Control Panel |System and Security

Select Allow an app through Windows Firewall

Select Windows Management Instrumentation (WMI) and File and Print Sharing

The check box in the Domain column will be selected.

Click OK.

Windows 2012 and Windows 2012 R2

Start | Control Panel | System and Security

Select Allow an app through Windows Firewall.

Select Windows Management Instrumentation (WMI).
The check box in the Domain column will be selected.

Click OK.

Windows 2008 R2

Start | Control Panel | System and Security | Windows Firewall.

Select Allow a program or feature through Windows Firewall.

Select Windows Management Instrumentation (WMI).
The check box in the Domain column will be selected.

Click OK.

Windows 2008

Start | Control Panel | Windows Firewall.

Select Allow a program through Windows Firewall.

Select the Exceptions tab.

Scroll down and select Windows Management Instrumentation (WMI) and click OK.

Windows 2003 and Windows 2003 R2

Run the following command-line context:

netsh firewall set service type = remoteadmin mode = enable

Windows 11

In the center on the Task Bar, select Search and type Windows Defender Firewall

Select Allow a program or feature through Windows Firewall.

Select File and Printer Sharing and Windows Management Instrumentation (WMI).

The checkbox in the Domain column will be selected. Click OK.

Start the Remote Registry service and set it to Automatic. This step is required to collect data such as installed software, event logs, and security policies.

Windows 8, Windows 8.1, and Windows 10

In the lower left hand corned of the screen right click and select Control Panel.

Select System and Security | Windows Firewall.

Select Allow a program or feature through Windows Firewall.

Select File and Printer Sharing and Windows Management Instrumentation (WMI).
The checkbox in the Domain column will be selected.

Click OK.

Start the Remote Registry service and set it to Automatic.
This step is required to collect data such as installed software, event logs, and security policies.

Windows 7

Start | Control Panel | System and Security | Windows Firewall.

Select Allow a program or feature through Windows Firewall.

Select File and Printer Sharing and Windows Management Instrumentation (WMI).
The checkbox in the Domain column will be selected.

Click OK.

Start the Remote Registry service and set it to Automatic.
This step is required to collect data such as installed software, event logs, and security policies.

Windows Vista

Start | Control Panel | Security | Windows Firewall.

Select Allow a program or feature through Windows Firewall.

Select the Exceptions tab.

Select File and Printer Sharing and Windows Management Instrumentation (WMI).

Click OK.

Windows XP

Start | Control Panel | Security Center| Windows Firewall.

Select the Exceptions tab.

Select File and Printer Sharing.

Click OK.

Database Requirements

The Enterprise Reporter server requires a database to store configuration specifications and the information that will be collected from your network environment. Before you install Enterprise Reporter, determine where you will set up your database. It should reside on a SQL Server® that is accessible from the computer running the Enterprise Reporter server. For more information, see SQL Server supported versions .

See also:

Configuring the Database and Security Groups

For the server to function, you must have a fully configured Enterprise Reporter database. You can either:

The simplest way to configure the database is to allow Enterprise Reporter to set up the database following installation. You need to know the SQL Server® on which you want to create the database, and you can use either Windows® or SQL Server® credentials to connect to your SQL Server®.

There are parameters that you can set when creating an Enterprise Reporter database:

When you allow Enterprise Reporter to create the database, you also have the option to automatically create the following Domain Local security groups:

You may optionally enter customized group names during setup. Assign names that reflect the purpose of each group to ensure clarity when group names are displayed in various system administration tools.

These groups provide access to the appropriate tables in the Enterprise Reporter database and are used to allow Windows authentication on the SQL Server. For more information, see Security Groups in Enterprise Reporter .

A corresponding SQL login and role is created for each group.


Related Documents

The document was helpful.

Seleziona valutazione

I easily found the information I needed.

Seleziona valutazione