Test and Pilot Migrations
Any full scale migration should be preceded by test and pilot migrations, to confirm that your migration processes and procedures will accommodate the organization requirements.
- A test migration uses real users and real data in a segregated test environment, or dummy users and dummy data in your live production environment.
- A pilot migration uses a small portion of real users and real data in the live production environment.
In either case - a test or pilot migration - the data to be migrated should be a representative sample of the production data, and the test or pilot migration should be run with the Quest applications set for the same configuration and process options that you intend to use for the production migration. it is recommended to select test or pilot users whose usage and data types make them representative of the total user population. Then create and run matching / migration tasks for those accounts, including all range of tasks you are planning to perform. When the tasks are completed, review errors and warnings, if any. See Event Management section for more information.
Quest recommends that you use both test and pilot migrations:
Perform one or more test migrations in a separate test environment, migrating test copies of real users and their real data. The separate test environment ensures that no test process will affect the data or configurations of your production environment. If a test exposes any problems under migration, you can make amendments and then repeat the test by simply dumping the test environment and recreating it from scratch.
When you are confident that your test migrations have sufficiently refined your planned migration, perform a pilot migration for 20 or 30 users to verify if your planned migration is satisfactory for your "real world."
Project Management
A migration project contains the full set of migration features and provides a summary of all the migration activities in the project dashboard. You can work with a single migration project or you can set up multiple migration projects to split staggered migration plans into manageable projects.
In this topic:
Creating a new migration project
- Sign in to Quest On Demand.
- From the navigation pane, click Migration to open the Migration projects view.
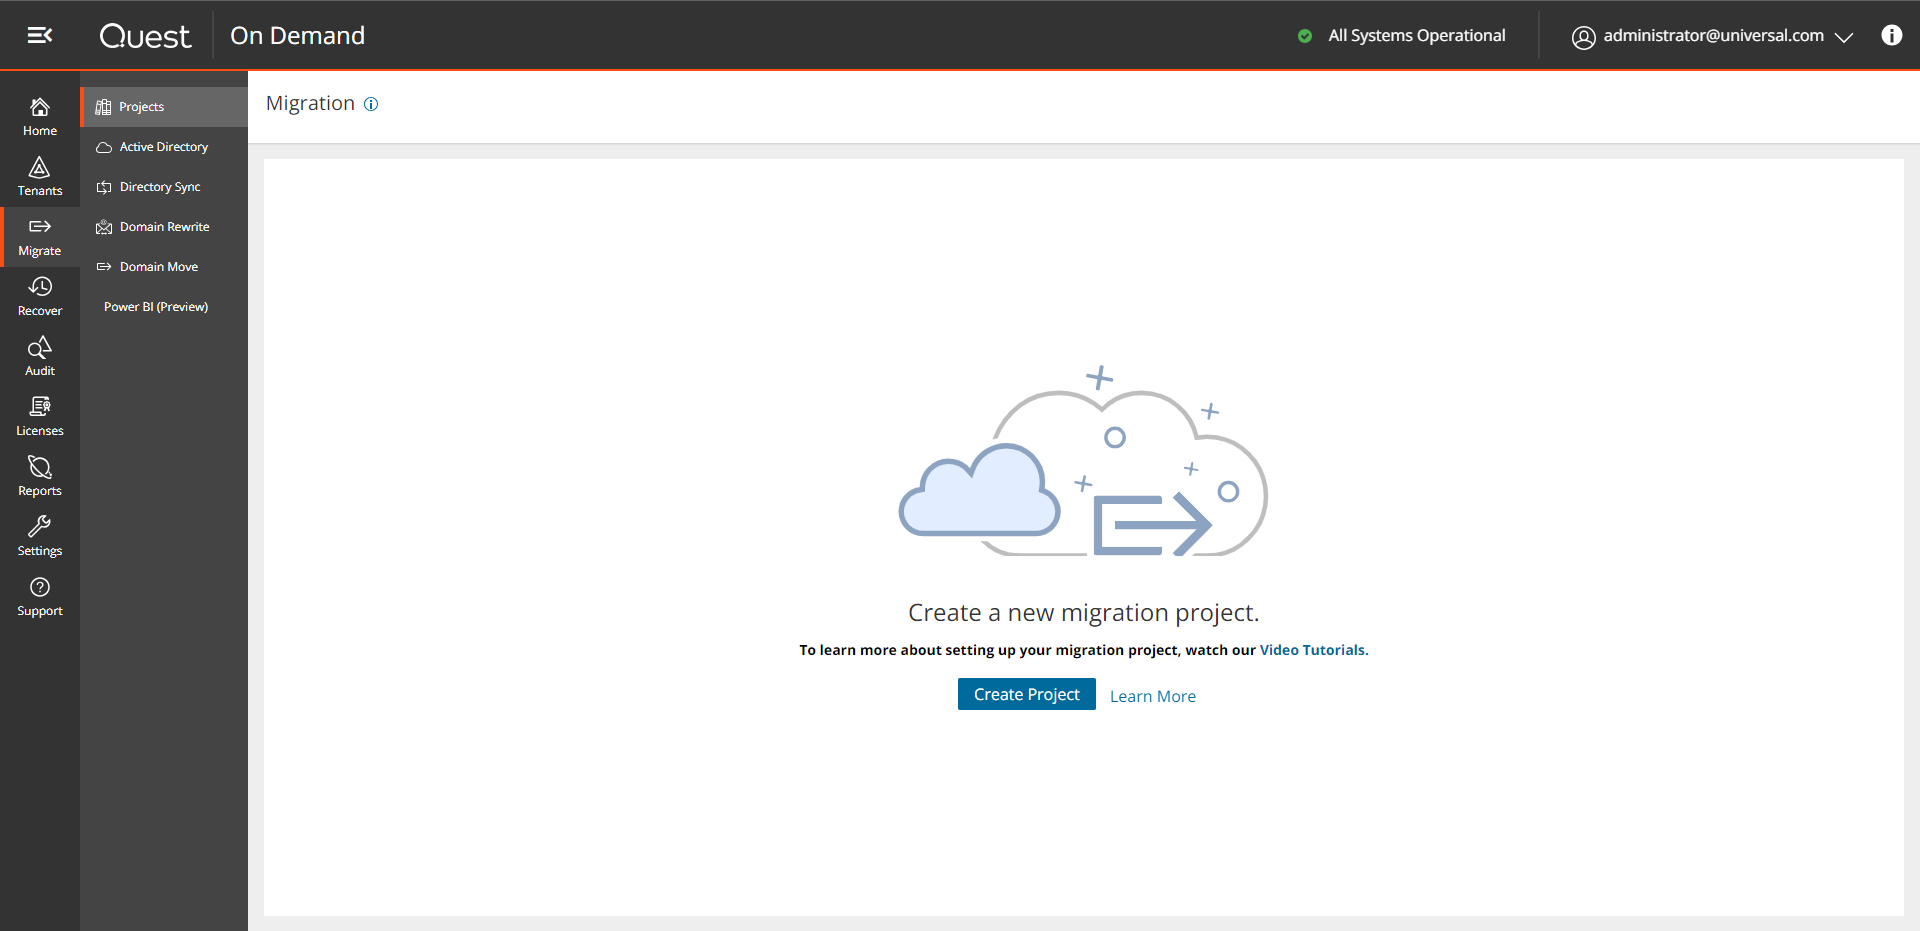
- Click Create Project.
-or-
If you have already created one or more projects, click Create Project as shown below.

- Select Hybrid Exchange from the project types page.
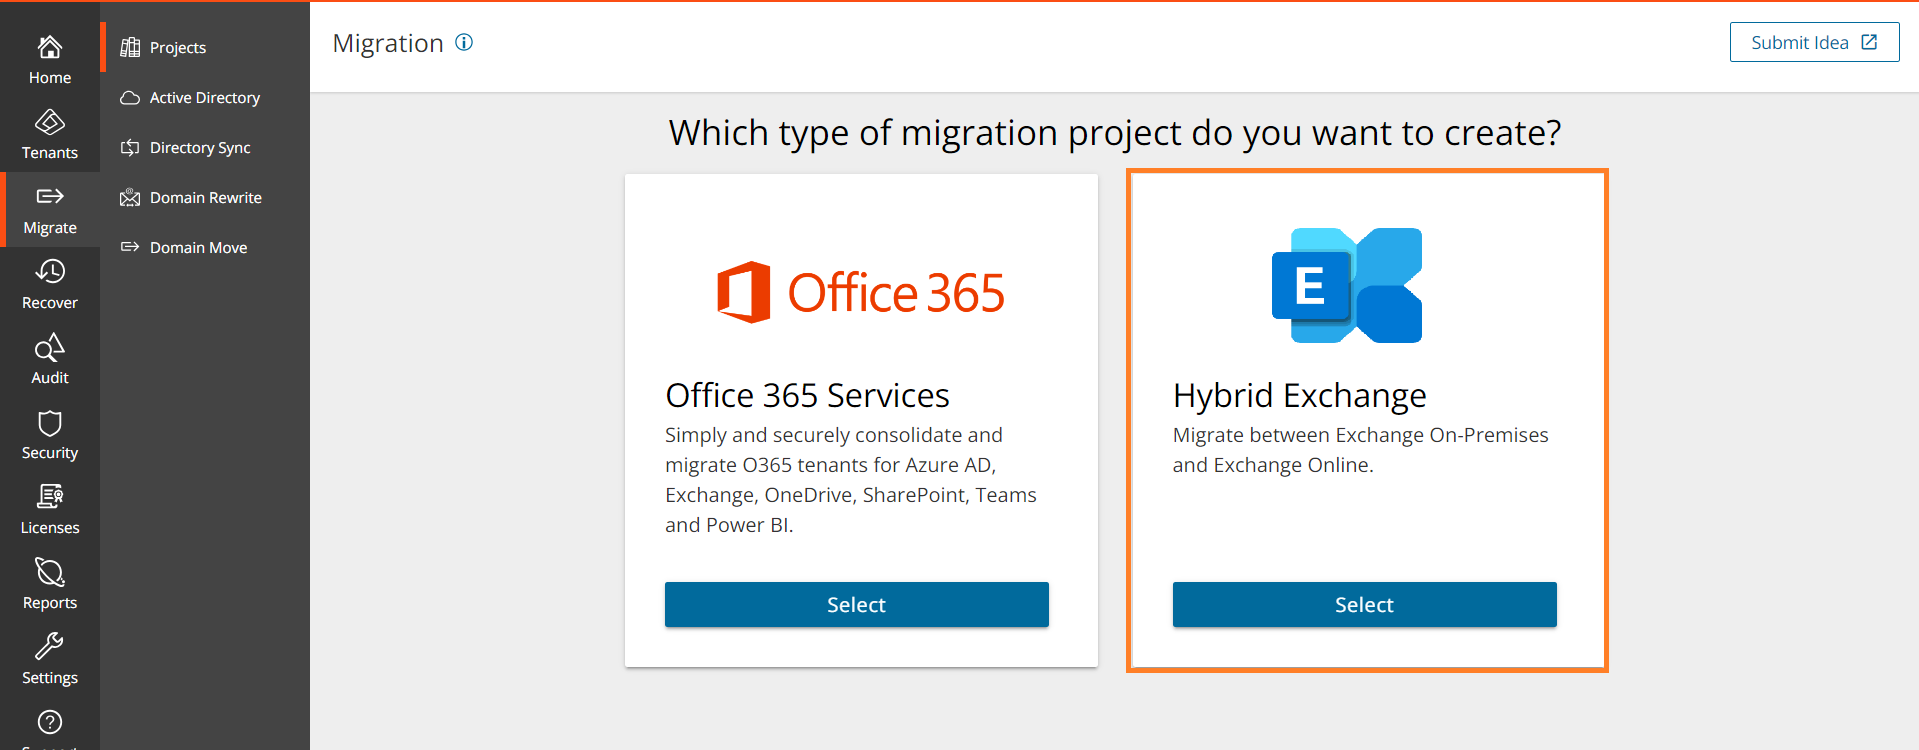
- The New Project wizard starts.
- Step 1: Select Source and Target
Enter the information in the fields as described below:
- Project Name - specify a meaningful name for the project. Maximum number of characters is 128.
- Description - enter a description about the project. Maximum number of characters is 200.
- Source Type - select the email source from the following options.
- Microsoft Exchange 2010 SP2 - SE - the email source is an on premises Exchange server.
- Microsoft 365 - the email source is a Microsoft 365 tenant.
- Source tenant - name of the source if the Source Type selected is Microsoft 365.
- Target Type - select the email target from the following options.
- Microsoft 365 - the email target is a Microsoft 365 tenant. This option is available only if the source type selected is Microsoft Exchange 2010 SP2 - SE.
- Microsoft Exchange 2010 SP2 - SE - the email target is an on premises Exchange server.
- Target tenant - name of the target tenant if the Target Type selected is Microsoft 365.
- Microsoft Exchange EWS endpoint - enter the URL of the Microsoft Exchange EWS endpoint of the source or target on-premise Exchange server selected.
- Hybrid Modern Authentication (HMA) - this option appears when you choose Microsoft Exchange 2010 SP2 - SE as the source or target. Select this option to allow the On Demand service principal to access mailboxes, which are hosted on-premises, by using authorization tokens obtained from the source or target tenant. When you select this option, the following settings are also considered:
- Exchange admin username - enter the Microsoft Exchange administrator username.
- Exchange admin password - enter the Microsoft Exchange administrator password.
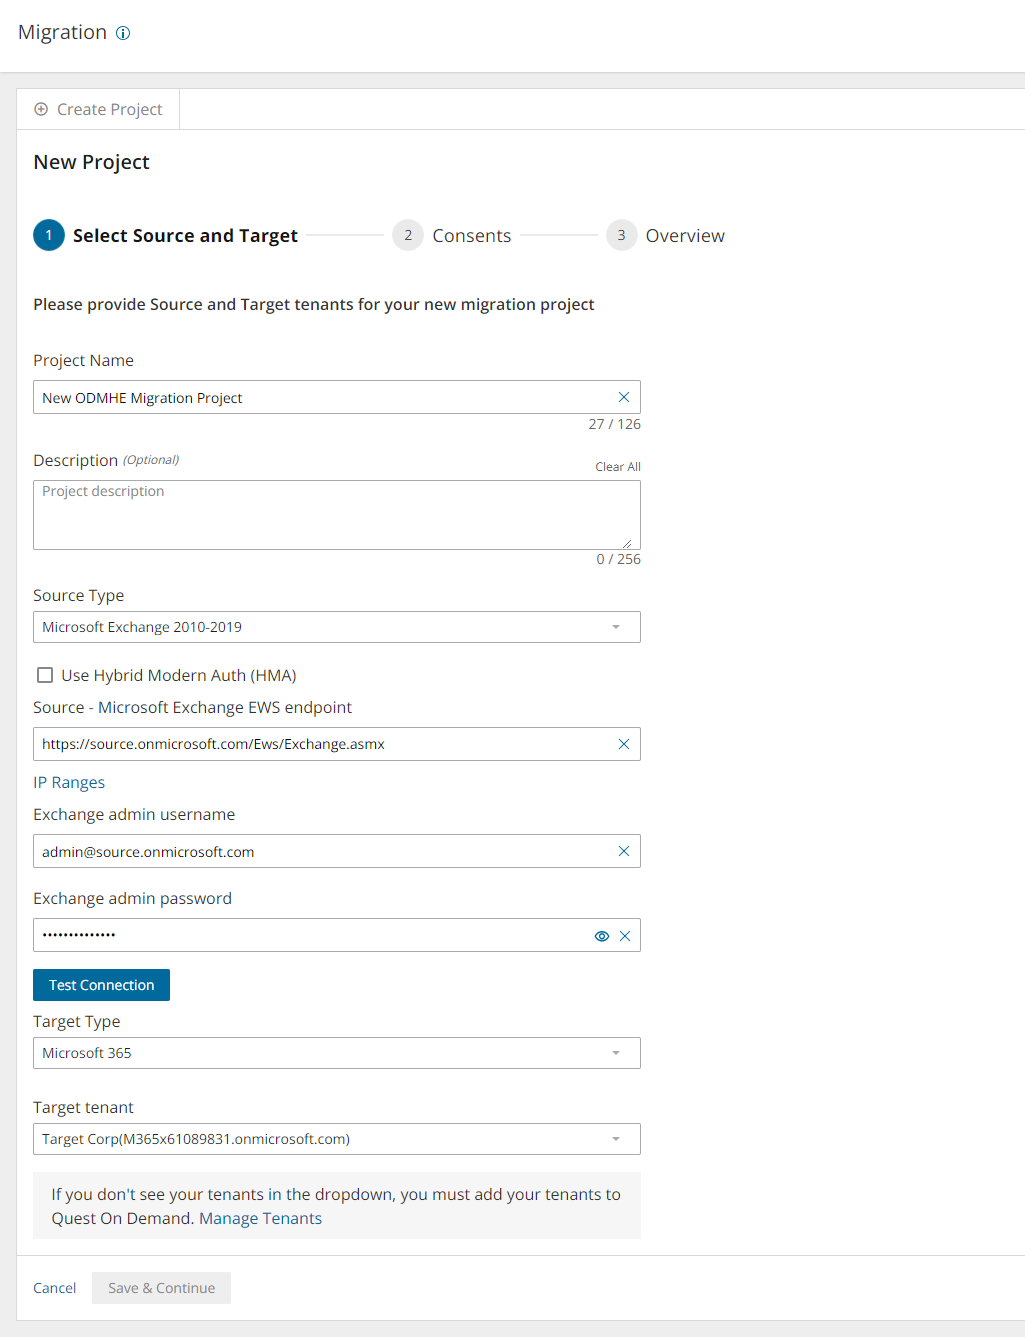
- Click Test Connection. If the connection is successfully verified, a confirmation message appears. Otherwise click Edit and re-enter the Microsoft Exchange administrator credentials.
- Click Save and Continue. You must successfully establish a connection to the Microsoft Exchange EWS endpoint to activate this button.
- Step 3: Consents
The migration service principals must be granted the necessary consents. See Consents and permissions for more information. If HMA is enabled then the consents for both tenants are displayed. If HMA is not enabled then only the consents for the source or target tenant that has the Exchange Online is displayed.
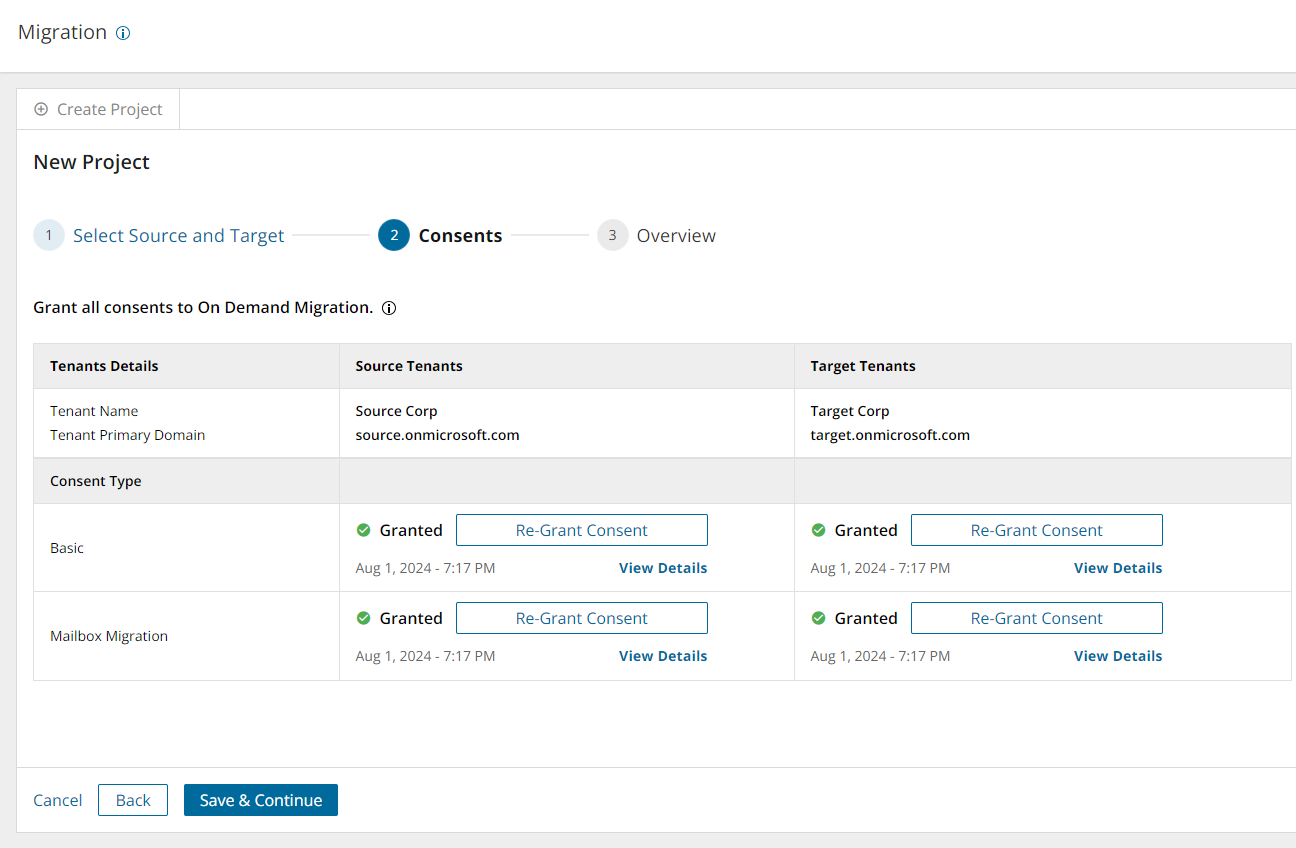
To grant consent the service principals:
- Click Grant Consent to grant the consents to the service principal if the tenant consents were not granted when you added the tenant.
-or-
Click Regrant Consent to refresh the consents granted to the service principals. It is recommended that you regrant consent to ensure that the consent to the service principals are refreshed.
- Click Save and Continue.
- Step 5: Overview
- Verify the information you have provided for each step. Click Edit to return to the step and revise the information as needed.
- Select Open Project to open the project dashboard.
- Click Finish to activate the project.
Viewing migration projects
- Sign in to Quest On Demand.
- From the navigation pane, click Migration to open the Migration projects view.
- You can view the projects in two formats:
- Tile view
- This view presents each project as a tile. Click
 from the view selector in the actions menu to select this view.
- It is the default view and contains links to the migration workspaces from the set of icons in the tile.
- You can sort the tiles by Date Created or Alphabetical from the sort criteria dropdown in the actions menu.
- List View
- This view displays the projects as a list. Click
 from the view selector in the actions menu to select this view.
- This view is useful when you have a large number of projects. Click on a column header to sort the list by its column values.
Renaming a migration project
- Sign in to Quest On Demand.
- From the navigation pane, click Migration to open the Migration projects view.
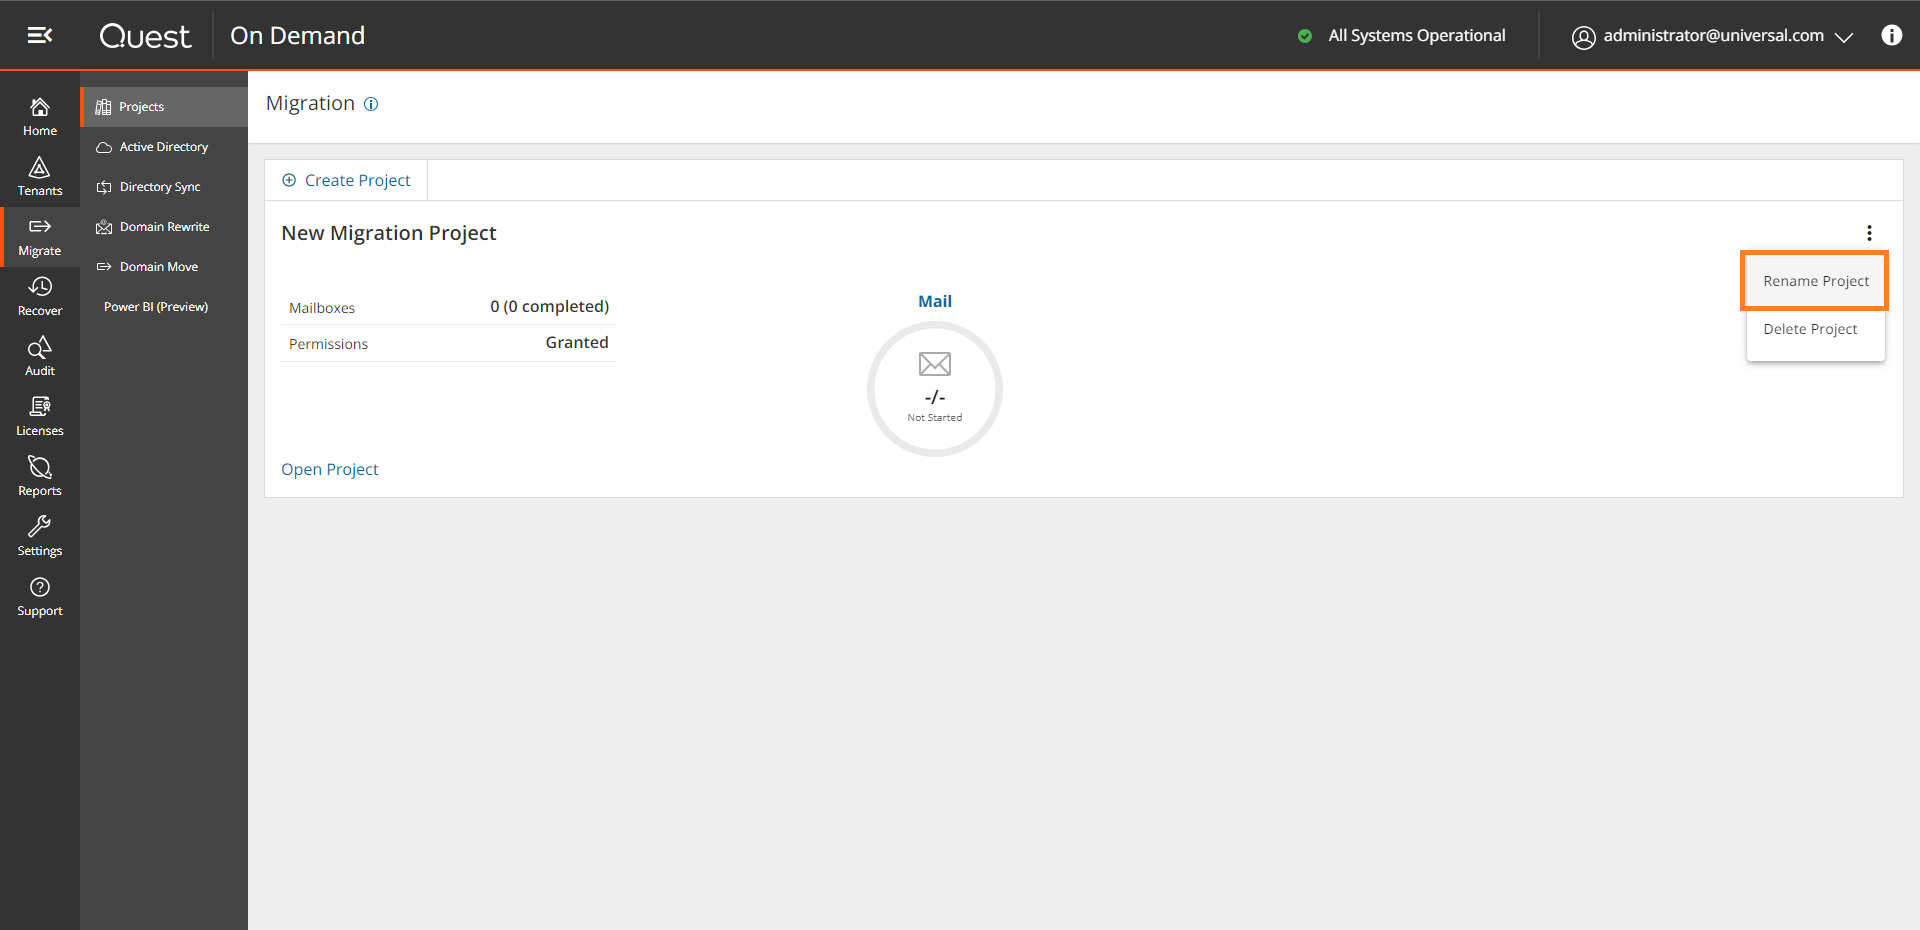
- From the top right-hand corner of the project panel, click the More Actions icon (3 dots). Then click Rename Project.
- Revise the name or description as needed.
- Click Save Project Name to save the changes and close the dialog.
Deleting a migration project
- Sign in to Quest On Demand.
- From the navigation pane, click Migration to open the Migration projects view.
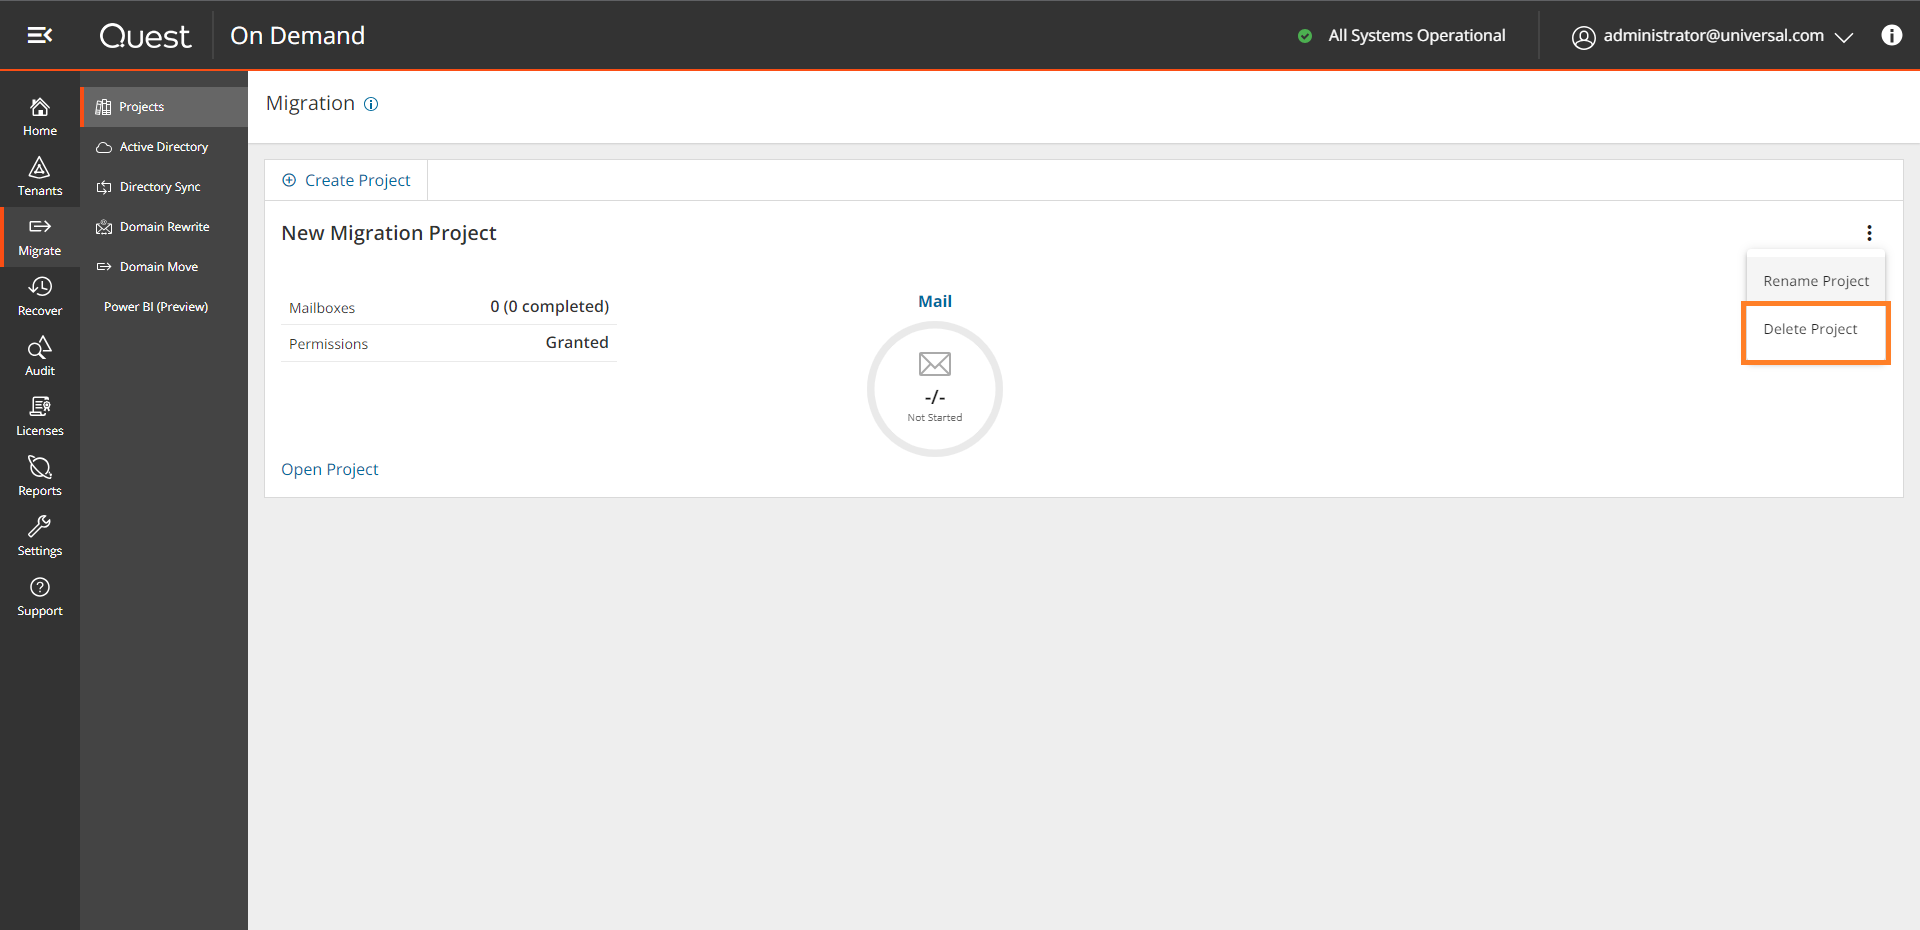
- From the top right-hand corner of the project panel, click the More Actions icon (3 dots). Then click Delete Project.
- Click OK to confirm the deletion.
On Demand Migration Workspaces
Click Open Project in the tile view or click a project name in the list view, to open its project workspace. The project workspace displays important information about your project and associated reports.
In each project, On Demand Migration also creates a migration workspace. The migration workspace is a logical collections of migration tools for the On Demand Hybrid Exchange assets and information about the assets in the source and target tenants.
You can go directly to the migration workspace by clicking the asset icon in the project tile. The icon you see will depend on your role, licenses and the assets selected when the project was created. You can hover over an icon to see the name of the asset type.
Configuring Connections
You can re-configure connection information about the project from the Dashboard as described below.
To configure connections:
- Log in to Quest On Demand and choose an organization if you have set up multiple organizations.
- From the navigation pane, click Migration to open the My Projects list.
- Create a new project or open an existing project.
- The migration workspace opens.. Then click Dashboard.
- Click Configure Connections from the Dashboard menu.
- From the Configure Connection wizard select the source or target tenant that you want to configure. Then click Edit.
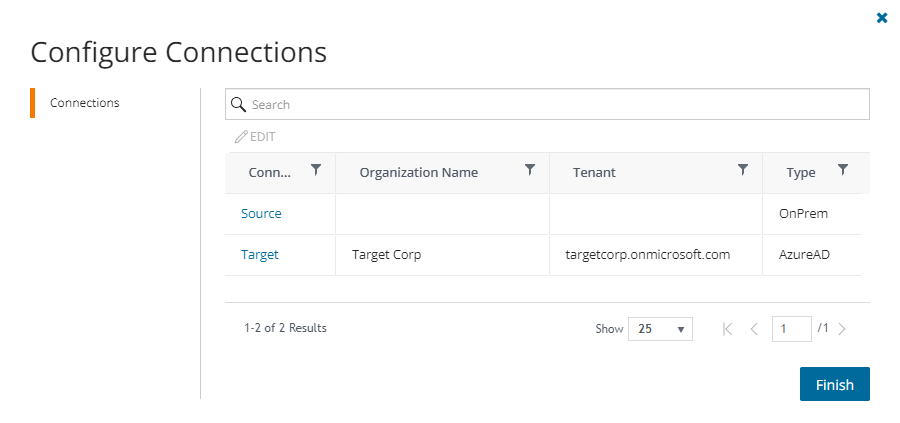
- The properties that appear in the Configure Connections dialog are based on the project settings for the source and target.
| EWS Url |
Concurrent PowerShell connections |
| Exchange admin username |
Custom EWS Url |
| Exchange admin password |
|
 |
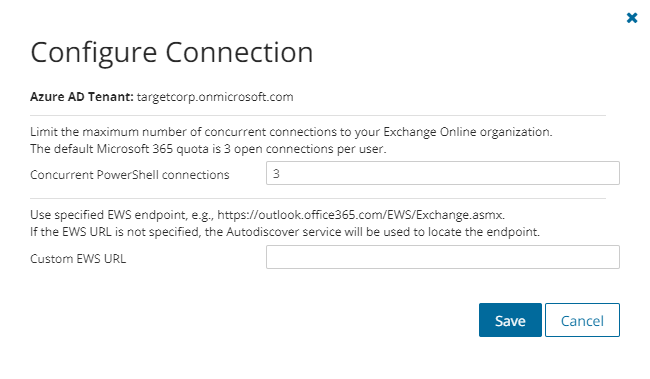 |
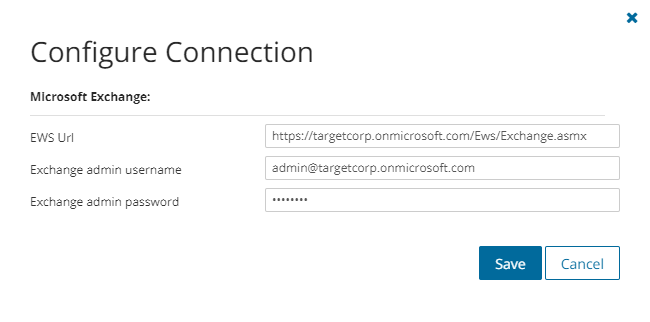
Configure the settings as described below:
- EWS Url - enter the URL of the Microsoft Exchange EWS endpoint of the source or target Exchange server selected.
- Exchange admin username - enter the Microsoft Exchange administrator username.
- Exchange admin password - enter the Microsoft Exchange administrator password.
- Concurrent PowerShell connections - you can increase Concurrent PowerShell connections settings to speed up the concurrent tasks completion or set the value in case of editing of the migration projects that have been created in previous versions of the On Demand Migration for Hybrid Exchange. The default Microsoft 365 quota is 3 open connections per user.
|

|
Caution: Do not exceed the maximum number of concurrent PowerShell connections allowed for your organization to avoid throttling issues. To increase the maximum number of allowed concurrent connections open a support ticket with Microsoft. |
- Custom EWS Url - specify custom EWS endpoint for connecting to Exchange Web Services (EWS), if you do not want to use EWS endpoint located by the Auto-discover service automatically.
- Click Save to commit your changes.
- When both source and target connections are configured, click Finish.
Migration Workspace
In this topic:
Dashboard
Information about the migration project is summarized on the project dashboard.
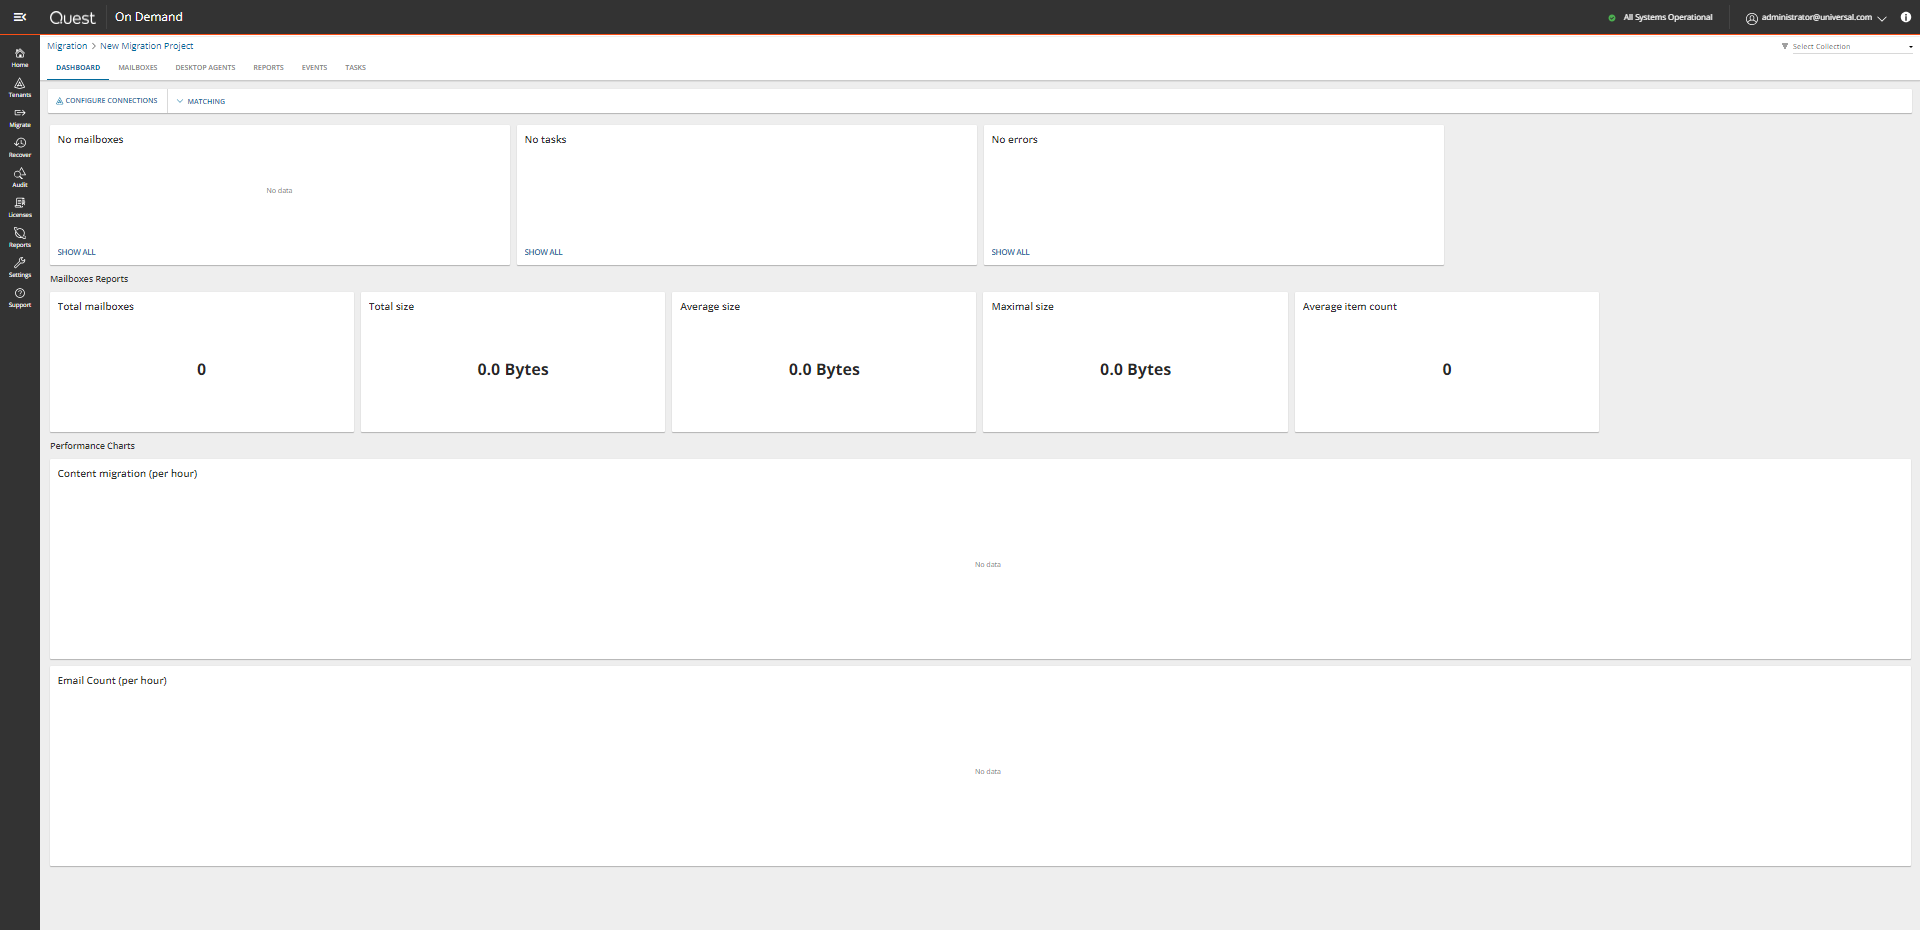
When you create a new project all the tiles are empty. Each tile on this dashboard presents a summary of the migration activities and lets you navigate to the respective migration service dashboards or list views as described below:
- Mailboxes - display the most recent mailboxes that were migrated.
- Tasks - displays the five most recent tasks that were completed. Click Show All to open the Tasks List view.
- Errors - displays the five most recent errors that occurred. Click Show All to open the Events List view.
- Mailboxes Reports - This section displays a collection of reports about the mailboxes that were migrated.
- Total mailboxes
- Total size
- Average size
- Maximal size
- Average item count
- Performance Charts - this section displays a collection of performance charts about the mailbox migration service.
- Content migration (per hour)
- Email Count (per hour)
Mailboxes Tab
This tab displays the summary of the Mailboxes from the source and target tenants. Initially, the Mailboxes List View displays the list of accounts with mailboxes and other columns are blank. As you run the discovery, collect statistics and migration tasks, the list view will display more information about the accounts and the state of the mailbox migrations.
To open the Mailboxes tab, open the project, and select the Mailboxes tab.
The Mailboxes tab has the following components:
Notification panel - presents relevant information and shortcuts to migration activities.
Filter panel - consists of predefined filters to help you search for mailboxes. See Filtering for more information about working with filters. The predefined filters are:
- Mailbox State - returns a list of mailboxes based on the selected mailbox stage. See the Mailbox State column description below for filter values.
- Migration Status - status of the most recent task that was run for this mailbox. Valid values are New, Stopped, In Progress, Failed and Completed.
- ODM Licensed - returns a list of mailboxes that have consumed ODM licenses during migration.
- Source Mailbox Type - type of mailbox in the source. See Type column description below for filter values.
- Mailbox Size - size of the mailbox in MB.
List View - displays information about Mailboxes in the source and target tenants. Use the Edit Columns to show or hide columns in the list. The columns are as described below:
- Mailbox State - indicates various mailbox stages in the migration process of a primary mailbox.
- Discovered - mailbox-enabled account has been found in the source.
- Provisioning - mailbox is being set up in the target tenant.
- Provisioning Failed - mailbox could not be set up in the target tenant.
- Matched - mailbox in source matched to mailbox in target tenant.
- Mapped - mailbox in source mapped to mailbox in target tenant.
- Queued - mailbox migration task is waiting for migration service resources to be available. For more information, see How Queuing Works.
- Migrating - source and target tenants analyzed and mailbox migration started.
- Migrated - mailbox migrated successfully to the target tenant.
- Migrated with Issues - some content is migrated but errors or warnings were encountered during migration. Use a reporting task to look for missing files or other errors.
- Migration Failed - critical error occurred during migration and nothing has been migrated. See task event details for more information.
- Switched - mailbox is switched between source and target.
- Migration Stopped - mailbox migration task has been stopped by the user.
- Migration Status - status of the most recent task that was run for this mailbox. Valid values are New, Stopped, In Progress, Failed and Completed.
- Priority - priority of the latest migration task for this mailbox.
- Type - icon that indicates the type of mailbox. The following mailbox types are supported:
- User -mailbox associated with an individual user or account. It stores and manages email messages, contacts, calendar events, and other personal information for a specific user.
- Resource - mailbox designed for non-human entities or shared resources rather than individual users. It is used to manage and organize emails, events, or other information related to a specific resource such as a meeting room, equipment, or shared space.
- Room - mailbox is specifically used to manage and coordinate reservations and scheduling for physical meeting rooms or spaces. Users can book or schedule the room through the room mailbox, helping to avoid conflicts and ensure efficient use of meeting spaces.
- Equipment - similar to a room mailbox but is used to manage resources other than meeting rooms, such as projectors, audio-visual equipment, or any shared equipment. It helps in scheduling and coordinating the use of equipment among different users.
- Scheduled - mailbox associated with a specific schedule or timeline. It might be used to manage and organize emails or events based on predefined schedules or timeframes.
- Shared - a mailbox that multiple users can access and use collaboratively. It is often used for teams or groups to manage communications, such as a shared email address for customer support or a shared calendar for a project team.
- Source Mailbox - account mailbox in the source.
- Source UPN - user Principal Name (UPN) of the source account.
- Target Mailbox - account mailbox in the target tenant.
- Target UPN - user Principal Name (UPN) of the target account.
- ODM Licensed - indicated whether or not the mailboxes has consumed ODM licenses during migration.
- All items - number of all the items in a mailbox. Includes email messages, contacts, calendar events, and other personal information
- Total Size - size of the mailbox in MB.
- Items to Migrate - the number of items considered for migration in the primary mailbox after the estimation phase.
- Processed - the number of items in the primary mailbox which were attempted to migrate.
- Errors - count of errors during migration.
Mailbox Details - When you select an mailbox-enabled account from the List View, the Mailbox Detail pane opens. The information in the pane is described below. Some properties may not appear in the screenshot because they are relevant to specific situations.
-
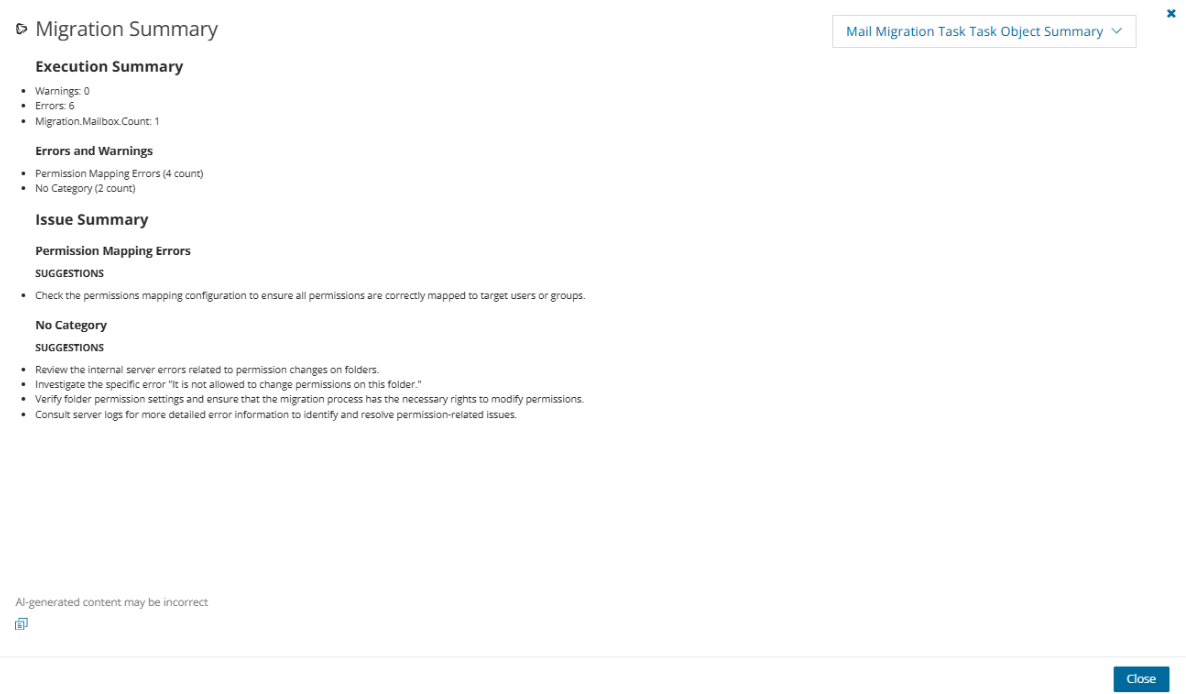
- View AI Summary - This link is available if you opted for the AI feature in the organization you created (see Organizations and Regions), and the task is a migration task that supports the AI migration assistant and you selected the Generate AI summaries option in the Reporting step of the migration wizard. Click this link after the task has completed, to view the AI-generated migration summary.
|

|
NOTE: The View AI Summary link may take a while to appear depending on the volume of tasks and objects being migrated. If this is the first time you have selected this option, the Quest Policies prompt appears. Read the Quest AI Terms of use and click Accept to proceed. This s a one-time acceptance prompt and your acceptance covers all migration tasks that support the AI migration assistant. |
- Source Email - User email of the source account.
- Target Email - User email of the target account.
- Status - status of the most recent task that was run for this mailbox.
- Account State -
- Events - count of the events that occurred during mailbox processing through one or more tasks.
- Collections - list of collections that contain the selected mailbox-enabled account.
- Tasks - list of tasks invoked for the selected mailbox-enabled account.
