Tchater maintenant avec le support
Tchattez avec un ingénieur du support

KACE Systems Management Appliance 14.0 Common Documents - KACE Service Desk Administrator Guide

About the KACE Service Desk Getting started
Configuring the appliance
Requirements and specifications Power-on the appliance and log in to the Administrator Console Access the Command Line Console Tracking configuration changes Configuring System-level and Admin-level General Settings Configure appliance date and time settings Managing user notifications Enable Two-Factor Authentication for all users Verifying port settings, NTP service, and website access Configuring network and security settings Configuring session timeout and auto-refresh settings Configuring locale settings Configuring the default theme Configure data sharing preferences About DIACAP compliance requirements Configuring Mobile Device Access Enable fast switching for organizations and linked appliances Linking Quest KACE appliances Configuring history settings Configuring Content Security Policy
Setting up and using labels to manage groups of items Configuring user accounts, LDAP authentication, and SSO Deploying the KACE Agent to managed devices Using Replication Shares Managing credentials Configuring assets
About the Asset Management component Using the Asset Management Dashboard About managing assets Adding and customizing Asset Types and maintaining asset information Managing Software assets Managing physical and logical assets Maintaining and using manual asset information Managing locations Managing contracts Managing licenses Managing purchase records
Setting up License Compliance Managing License Compliance Setting up Service Desk Configure the Cache Lifetime for Service Desk widgets Creating and managing organizations Importing and exporting appliance resources
Managing inventory
Using the Inventory Dashboard Using Device Discovery Managing device inventory
About managing devices Features available for each device management method About inventory information Tracking changes to inventory settings Managing inventory information Finding and managing devices Registering KACE Agent with the appliance Provisioning the KACE Agent Manually deploying the KACE Agent Using Agentless management Adding devices manually in the Administrator Console or by using the API Forcing inventory updates Managing MIA devices Obtaining Dell warranty information
Managing applications on the Software page Managing Software Catalog inventory
About the Software Catalog Viewing Software Catalog information Adding applications to the Software Catalog Managing License assets for Software Catalog applications Associate Managed Installations with Cataloged Software Using software metering Using Application Control Update or reinstall the Software Catalog
Managing process, startup program, and service inventory Writing custom inventory rules
Deploying packages to managed devices
Distributing software and using Wake-on-LAN Broadcasting alerts to managed devices Running scripts on managed devices Using Task Chains
Patching devices and maintaining security
Using the Security Dashboard About patch management Subscribing to and downloading patches Creating and managing patch schedules Managing patch inventory Managing Windows Feature Updates Managing Dell devices and updates Managing Linux package upgrades Manage quarantined file attachments
Using reports and scheduling notifications Monitoring devices
Getting started with monitoring Working with monitoring profiles Managing monitoring for devices Working with alerts
Using the Service Desk
Configuring Service Desk Using the Service Desk Dashboard Managing Service Desk tickets, processes, and reports
Overview of Service Desk ticket lifecycle Creating tickets from the Administrator Console and User Console Creating and managing tickets by email Viewing tickets and managing comments, work, and attachments Merging tickets Using the ticket escalation process Using Service Desk processes Using Ticket Rules Run Service Desk reports Archiving, restoring, and deleting tickets Managing ticket deletion
Managing Service Desk ticket queues About User Downloads and Knowledge Base articles Customizing Service Desk ticket settings Configuring SMTP email servers
Maintenance and troubleshooting
Maintaining the appliance Troubleshooting the appliance
Appendixes Glossary About us Legal notices

Install and configure the location database

Install and configure the location database

User session details include the IP address of the currently logged-in user. This information is displayed on the Recent Sessions page. For public IP addresses you can also display the geographical location associated with a specific IP address, however this requires a location database to be installed on the appliance. You can install the MaxMind Geolocation database free of charge and display user locations for any public IP address.

MaxMind offers country and city databases. A city database is typically larger in size and takes longer to install. A country database provides only the name of the country associated with each public IP address, while a city database allows the appliance to display the city, state (if applicable), and the country.

You can periodically refresh the location database by installing an updated version. While it is possible to install multiple databases over time, the most recently installed database overwrites the contents of the previous version. For example, if a country database is already installed, and you install a city database on the appliance, the Location column on the Recent Sessions page reflects the information from the newly installed city database.

For complete information about MaxMind Geolocation databases, visit https://www.maxmind.com/.

If the Organization component is enabled on the appliance, log in to the appliance System Administration Console, https://appliance_hostname/system, or select System in the drop-down list in the top-right corner of the page, then select Settings > Control Panel.
3.
On the General Settings page that appears, in the Geolocation Lookup Database section, point to the downloaded ZIP file.
To do that, under MaxMind Geolocation Database, click Choose file and navigate to the newly downloaded file.
4.
Click Save.

Next, you can go to the Recent Sessions page and review the location data for the current user. See View a list of user sessions.

View a list of user sessions

View a list of user sessions

You can review user sessions on the appliance. Use the My Recent Sessions pane to see the latest sessions associated with your account. You can also review all sessions that are currently active on the appliance on the Recent Sessions page.

In case the appliance detects multiple sessions for the current user, the icon displays a red exclamation point.

1.
Log in to the appliance Administrator Console, https://appliance_hostname/admin. Or, if the Show organization menu in admin header option is enabled in the appliance General Settings, select an organization in the drop-down list in the top-right corner of the page next to the login information.
3.
In the My Recent Sessions pane that appears, review the list of your latest user sessions.
4.
To see all sessions that are currently active on the appliance, in the My Recent Sessions pane, click View All Recent Sessions.
On the Recent Sessions page that appears, each entry displays the user name, the browser used, the operating system, IP address, the session duration, the date and time of the last activity, and any applicable actions. For users with a public IP address, if you have a location database installed, it also shows their location. See Install and configure the location database.

Deploying the KACE Agent to managed devices

Deploying the KACE Agent to managed devices

The KACE Agent is an application that can be installed on devices to enable inventory reporting and other device management features. KACE Agents installed on managed devices communicate with the appliance through an agent messaging protocol. Agents perform scheduled tasks, such as collecting inventory information from, and distributing software to, managed devices.

You can deploy the KACE Agent to managed devices using one of the following methods.

Tip:
 
Provisioning the KACE Agent: You can use the Agent Provisioning Assistant to perform provisioning for devices with Windows, Mac OS X, and Linux operating systems. Within the Assistant, you can choose between using the appliance GPO Provisioning Tool for deploying the Agent to Windows devices, or using Onboard Provisioning for deploying the Agent to Windows, Mac OS X, or Linux devices. See Provisioning the KACE Agent.
Manually deploying the KACE Agent: Use manual deployment is useful when automated Agent provisioning is not practical or when you want to deploy the KACE Agent using email, logon scripts, GPO (Group Policy Objects), or Active Directory. The appliance includes KACE Agent installers for different OS platforms. Each platforms offers one or more ways to deploy the KACE agent. To get started, visit the following sections and their sub-topics:

Using Replication Shares

Using Replication Shares

Replication Shares are devices that keep copies of files for distribution, and they are especially useful if your managed devices are deployed across multiple geographic locations.

For example, using a Replication Share, a device in New York could download files from another device at the same office, rather than downloading those files from a appliance in Los Angeles. A Replication Share is a full replication of all digital assets and is managed automatically by the appliance. Whenever a Replication Share is specified for a label, devices in that label go to the Replication Share to get files.

In addition, you can use Replication Shares to deploy of Managed Installations, patches, or Dell Updates where network bandwidth and speed are issues. Replication Shares are good alternatives to downloading directly from an appliance.

Replication Shares enable an appliance to replicate application installers, patches, upgrades, and script dependencies to a shared folder on a device. If any replication item is deleted from the appliance, it is marked for deletion in the Replication Share and deleted in the replication task cycle. The figure shows a Replication Share configuration and task flow.

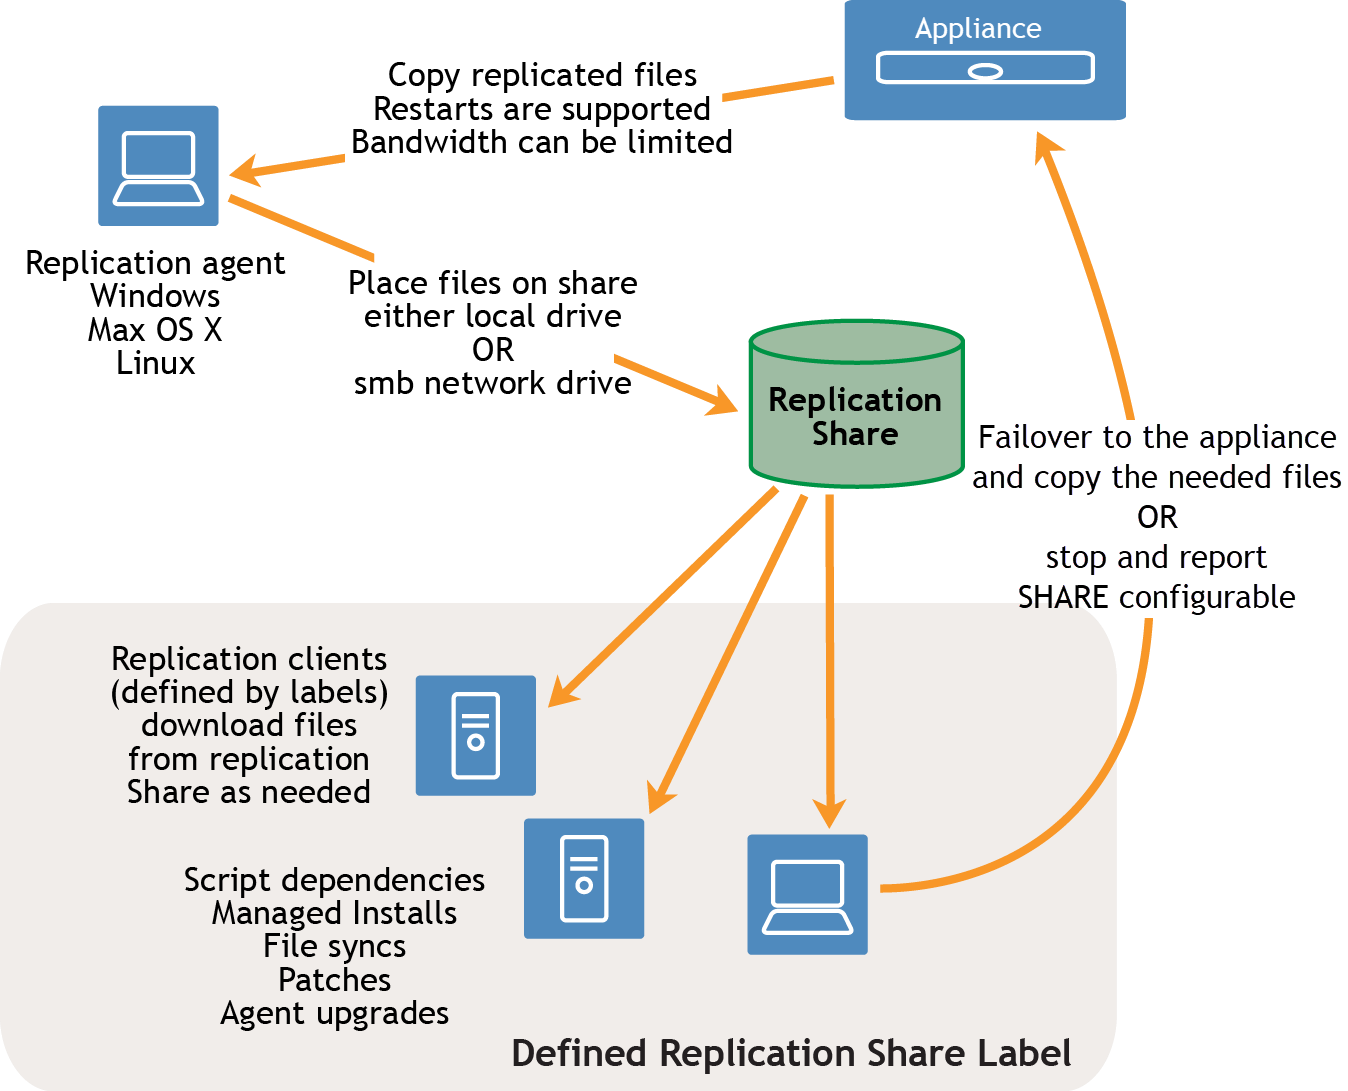
Figure 9. Replication Share configuration

In the task flow, an arrow goes from a appliance to a Replication Agent. The arrow has a tag reading "copy replication files. Restarts are supported. Bandwidth can be limited. The Replication Agent can run be a Windows device, a Mac OS X device, or a Linux device. An arrow goes from the Replication Agent to the Replication Share. The has a tag reading "Place file on Share, either local drive or smb network drive." From the Replication Share, arrows go to various Replication Clients that are defined by a Replication Share Label.

To create a Replication Share, identify one device at each remote location to act as a Replication Device. The appliance copies all the replication items to the Replication Device at the specified destination path. The replication process automatically restarts if it is stopped due to a network failure or replication schedule. If stopped, the replication process restarts at the point it was stopped.

Sneaker net share: You can create a folder and copy the contents of an existing replication folder to it. You can then specify this folder as the new replication folder in the appliance. The appliance determines whether the new folder has all the replication items present and replicates only the new ones, which conserves bandwidth. You can manually copy the contents of replication folder to a new folder. The replication folder created in a device follows following hierarchy:

\\machinename\foldername\repl2\replicationitems folder

The device name and folder name is user defined while repl2 is automatically created by appliance. The replication items folder includes the folder for patches, kbots, upgrade files, and applications.

All the replication items are first listed in the replication queue and then copied one at a time to the destination path. Any new replication item is first listed in the replication queue and then copied after an interval of 10 minutes.

Replication items are copied in this order:

Documents connexes

The document was helpful.

Sélectionner une évaluation

I easily found the information I needed.

Sélectionner une évaluation