Keeping client workstation times synchronized is simple to configure using the Time Synchronization dialog box. This synchronizes each workstation’s clock with a specified server. When the client logs on the network, the time is automatically adjusted to match the server’s time.
Enter the name of the Time Server which the client will by synchronized with. Type the server name or click Browse to locate and select a server.
Select the Validation Logic tab to set the validation rules for this element.
Select the Notes tab to create any additional notes needed to document the profile element.
When adding or modifying a profile object element, the description appears above the settings tab. Enter a description to annotate the element. The default value for new profile elements can be changed by going to the system Preferences.
The myriad of portable storage mediums today make it essential for corporations to prohibit or monitor the use of certain devices on the company network. These devices can be very harmful to a corporation. Confidential data can easily be copied to any portable device, viruses can be introduced to the network and spread corporate wide and illegal software can be copied to the company network.
NOTE: To use this feature, you must have Microsoft Visual C++ 2005 redistributable installed on your system. For more information on how to obtain and install this package, see your Microsoft documentation.
Since most portable devices are small in size it is simple for any employee to use these devices regardless of a written or verbal company policy. The users' ability to use these devices and/or transfer data to and from these devices must be restricted. The USB/Port Security object will do just this.
Users and/or groups of users can be restricted from using certain types of removable storage devices. Desktop Authority's USB/Port Security object will protect the company network against unauthorized usage of devices such as MP3 players, PDAs, WiFi and more. The list of devices includes USB, Firewire (1394), Serial, Parallel, Floppy disks, IR, Bluetooth, IDE, SCSI, PCMCIA, IoMega, Blackberry, Pocket PC devices, Pocket OS devices, Hard disk, DVD, CD ROM, Modem, Plug and Play Storage, Flash Memory, PDA, MP3 Player devices, USB Printers, USB Scanners, USB add-on WiFi Adapters. The comprehensive list of devices is displayed in the device configuration list when creating the USB/Port Security element.
The list below shows the hierarchy of the list of devices in the USB and Port Security option for Desktop Authority, and some of the management options available for them:
* Uses a database of well-known MP3 players supplied by Desktop Authority, which can be extended by altering the C:\Program Files\Quest\Desktop Authority\PortSecurity\EmbargoDeviceClasses.xml file on each desktop
** Does not include partitions containing virtual memory, boot files or Windows system files
Validation Logic is used to determine which desktop computers will be configured with a given Permission Set. The Permission Set defines a permanent access control list for all portable devices on those desktop computers that match the Validation Logic. The access control list is enforced for all users and groups in the enterprise, regardless of who logged in and caused the permission set to be applied. The access control list remains in effect until a different permission set is applied to the desktop computer. Best practices will use Validation Logic to apply a Permission Set per computer or group of computers rather than by user since the Permission Set is enforced for all users and groups that subsequently access the desktop computer.
Permission Sets are defined within the USB/Port Security object. A Permission Set is a container that defines a set of devices and the type of access that is allowed for each device. Once a Permission Set is created, Users/Groups are assigned to the Permission Set. By default, all device types are given full control permissions when the permission set is created.
An explicit deny for a device type within a Permission Set will always supersede an explicit allow within another Permission Set in the same element. If a user validates for an element (containing multiple Permission Sets) that both denies and grants him/her access to a certain type of device, he/she will be denied access to that type of device. If a Permission Set does not explicitly grant a user permission to access a type of device, that user will automatically be denied access to that device type.
*If a user validates for multiple USB/Port Security elements, only the last element will be applied. The permissions in all permission sets for the validated USB/Port Security elements are summed to produce a "most restrictive" access control list.
Select Install or Remove to update the client workstation. An Install action will update the client workstation with the processes necessary to poll, allow and deny access to the client ports. A Remove action will uninstall all USB/Port Security client-side files and permissions.
Select this check box to display an icon in the notification area, at the far right of the taskbar of the client workstation. The icon indicates that USB/Port Security is actively watching client devices. Learn more about USB/Port Security on the client.
Select this check box to enable pop up device alerts in the notification area, at the far right of the taskbar on the client workstation. Learn more about USB/Port Security on the client.
|
|
Note: When Show Balloons on Desktop is selected and Show Desktop task bar icon is not selected, the task bar icon will appear if and when there are device alerts to show via a balloon message. However, when the icon does appear the context menu will be disabled. |
A permission set is a container that defines a set of devices and the type of access that is allowed for each device. Permissions include View, Write, Full Control and Deny.
The Permission Set list shows all of the sets of rules which have been configured.
Click Add to create a new Permission Set. By default, all devices in the permission set are given Full Control permissions.
Click Edit to modify the selected permission set including the Permission Set name as well as the permissions allowed for selected devices and users/groups.
Once the permission set is defined (Add or Edit mode), the permissions for necessary devices should be defined. Each device can have its own permissions, Read, Write, Full Control or Deny. Once the devices are configured, users who this permission set applies to should be defined. Users include both single users and/or groups. Click Add in the Users list to select a user/group to assign to the Permission Set. Select a user or group from the user list and click Remove to delete it.
Select this option, when adding or editing a permission set, to disable all USB devices except Human Interface Devices (HID). A HID is any device that takes input. Included in this category are devices such as Keyboard, Mouse, Trackball, Touchpad, Webcam, Headset and others.
Click Remove to remove the selected permission set.
The Logging tab provides Data Collection options for USB/Port Security. This is where you can select specific types of data to collect. Choose from the following statuses: File Access Success, File Access Failure, Device Access Success, Device Access Failure.
Select this box to include File Access Success events to the log file.
Select this box to include File Access Failure events to the log file.
Select this box to include File Device Access Success events to the log file.
Select this box to include File Device Access Failure events to the log file.
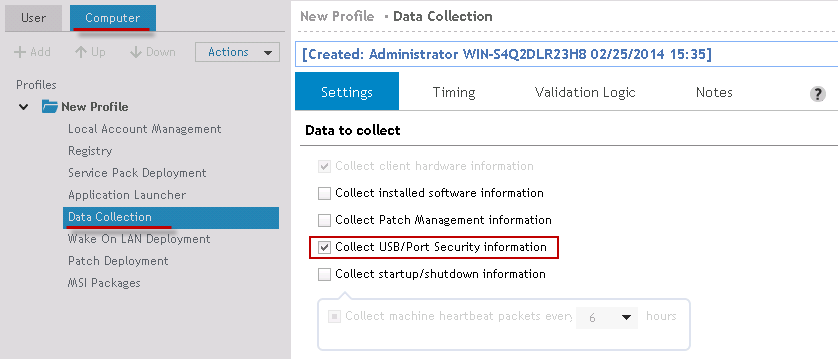
In order to collect USB/Port Security data, the Collect USB/Port Security Information box must be selected in the Computer Management Data Collection object.
Figure 49: Configure Data Collection to collect USB/Port Security data
The USB/Port Security USB Device Exceptions tab provides a way to define a list of devices that are allowed/prohibited in to the Enterprise environment. Every USB device has a Vendor ID (VID) and Product ID (PID) to uniquely identify the device. These IDs are unique 16-bit numbers assigned to a specific vendor and product and are used for auto-detection, installation and configuration of the device to the machine.
Finding the VID/PID and Serial Number of a device
To look up the VID and PID of a device, go to the Device Manager. Locate the device in the list of components. Right-click on it and choose Properties. From the Properties dialog, select the Details tab.
Figure 50: Determine the VID and PID of a device
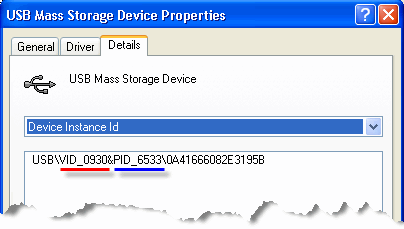
The VID and PID identifiers can be found within the Device Instance Id as shown above.
The Exceptions list is a list of devices that are either Allowed or Denied in the Enterprise's environment. Click Add to add a device to the list. Click Edit to update an existing device in the list. Click Delete to remove a device from the list.
Click Add Existing to add devices to the list that have been use in the enterprise environment.
Devices can be listed in a Comma-Separated file (CSV) with the VID, PID, Serial Number and Description. Click Import to read the file into the exception list. Click Export to write the devices in the list to a Comma-Separated file (CSV).
Select either Allow or Deny in the first column. Specify the VID and PID number for the specific device. The VID and PID numbers are required. Next enter a serial number and a description. The serial number and description fields are optional.
Select the USB/Port Security Administrative Override tab to configure a password for the ability to temporarily override restricted device settings on the client computer.
Select this box to set an administrative override password. This password can be used in the USB/Port Security service on the client computer.
On the client, right-click the USB/Port Security icon and select will give the user a new menu option to Disable Restrictions. If the correct password is entered, restrictions are lifted for the remainder of the user session.
Select the Validation Logic tab to set the validation rules for this element.
Select the Notes tab to create any additional notes needed to document the profile element.
When adding or modifying a profile object element, the description appears above the settings tab. Enter a description to annotate the element. The default value for new profile elements can be changed by going to the system Preferences.
|
|
*Note: This feature is not a standard part of Desktop Authority Essentials. To obtain this feature, Desktop Authority Essentials must be upgraded to the Standard edition of Desktop Authority. |
The myriad of portable storage mediums today make it essential for corporations to prohibit or monitor the use of certain devices on the company network. These devices can be very harmful to a corporation. Confidential data can easily be copied to any portable device, viruses can be introduced to the network and spread corporate wide and illegal software can be copied to the company network.
NOTE: To use this feature, you must have Microsoft Visual C++ 2005 redistributable installed on your system. For more information on how to obtain and install this package, see your Microsoft documentation.
Since most portable devices are small in size it is simple for any employee to use these devices regardless of a written or verbal company policy. The users' ability to use these devices and/or transfer data to and from these devices must be restricted. The USB/Port Security object will do just this.
Users and/or groups of users can be restricted from using certain types of removable storage devices. Desktop Authority's USB/Port Security object will protect the company network against unauthorized usage of devices such as MP3 players, PDAs, WiFi and more. The list of devices includes USB, Firewire (1394), Serial, Parallel, Floppy disks, IR, Bluetooth, IDE, SCSI, PCMCIA, IoMega, Blackberry, Pocket PC devices, Pocket OS devices, Hard disk, DVD, CD ROM, Modem, Plug and Play Storage, Flash Memory, PDA, MP3 Player devices, USB Printers, USB Scanners, USB add-on WiFi Adapters. The comprehensive list of devices is displayed in the device configuration list when creating the USB/Port Security element.
The list below shows the hierarchy of the list of devices in the USB and Port Security option for Desktop Authority, and some of the management options available for them:
* Uses a database of well-known MP3 players supplied by Desktop Authority, which can be extended by altering the C:\Program Files\Quest\Desktop Authority\PortSecurity\EmbargoDeviceClasses.xml file on each desktop
** Does not include partitions containing virtual memory, boot files or Windows system files
Validation Logic is used to determine which desktop computers will be configured with a given Permission Set. The Permission Set defines a permanent access control list for all portable devices on those desktop computers that match the Validation Logic. The access control list is enforced for all users and groups in the enterprise, regardless of who logged in and caused the permission set to be applied. The access control list remains in effect until a different permission set is applied to the desktop computer. Best practices will use Validation Logic to apply a Permission Set per computer or group of computers rather than by user since the Permission Set is enforced for all users and groups that subsequently access the desktop computer.
Permission Sets are defined within the USB/Port Security object. A Permission Set is a container that defines a set of devices and the type of access that is allowed for each device. Once a Permission Set is created, Users/Groups are assigned to the Permission Set. By default, all device types are given full control permissions when the permission set is created.
An explicit deny for a device type within a Permission Set will always supersede an explicit allow within another Permission Set in the same element. If a user validates for an element (containing multiple Permission Sets) that both denies and grants him/her access to a certain type of device, he/she will be denied access to that type of device. If a Permission Set does not explicitly grant a user permission to access a type of device, that user will automatically be denied access to that device type.
*If a user validates for multiple USB/Port Security elements, only the last element will be applied. The permissions in all permission sets for the validated USB/Port Security elements are summed to produce a "most restrictive" access control list.
Select Install or Remove to update the client workstation. An Install action will update the client workstation with the processes necessary to poll, allow and deny access to the client ports. A Remove action will uninstall all USB/Port Security client-side files and permissions.
Select this check box to display an icon in the notification area, at the far right of the taskbar of the client workstation. The icon indicates that USB/Port Security is actively watching client devices. Learn more about USB/Port Security on the client.
Select this check box to enable pop up device alerts in the notification area, at the far right of the taskbar on the client workstation. Learn more about USB/Port Security on the client.
|
|
Note: When Show Balloons on Desktop is selected and Show Desktop task bar icon is not selected, the task bar icon will appear if and when there are device alerts to show via a balloon message. However, when the icon does appear the context menu will be disabled. |
A permission set is a container that defines a set of devices and the type of access that is allowed for each device. Permissions include View, Write, Full Control and Deny.
The Permission Set list shows all of the sets of rules which have been configured.
Click Add to create a new Permission Set. By default, all devices in the permission set are given Full Control permissions.
Click Edit to modify the selected permission set including the Permission Set name as well as the permissions allowed for selected devices and users/groups.
Once the permission set is defined (Add or Edit mode), the permissions for necessary devices should be defined. Each device can have its own permissions, Read, Write, Full Control or Deny. Once the devices are configured, users who this permission set applies to should be defined. Users include both single users and/or groups. Click Add in the Users list to select a user/group to assign to the Permission Set. Select a user or group from the user list and click Remove to delete it.
Select this option, when adding or editing a permission set, to disable all USB devices except Human Interface Devices (HID). A HID is any device that takes input. Included in this category are devices such as Keyboard, Mouse, Trackball, Touchpad, Webcam, Headset and others.
Click Remove to remove the selected permission set.
The Logging tab provides Data Collection options for USB/Port Security. This is where you can select specific types of data to collect. Choose from the following statuses: File Access Success, File Access Failure, Device Access Success, Device Access Failure.
Select this box to include File Access Success events to the log file.
Select this box to include File Access Failure events to the log file.
Select this box to include File Device Access Success events to the log file.
Select this box to include File Device Access Failure events to the log file.
In order to collect USB/Port Security data, the Collect USB/Port Security Information box must be selected in the Computer Management Data Collection object.
Figure 49: Configure Data Collection to collect USB/Port Security data
The USB/Port Security USB Device Exceptions tab provides a way to define a list of devices that are allowed/prohibited in to the Enterprise environment. Every USB device has a Vendor ID (VID) and Product ID (PID) to uniquely identify the device. These IDs are unique 16-bit numbers assigned to a specific vendor and product and are used for auto-detection, installation and configuration of the device to the machine.
Finding the VID/PID and Serial Number of a device
To look up the VID and PID of a device, go to the Device Manager. Locate the device in the list of components. Right-click on it and choose Properties. From the Properties dialog, select the Details tab.
Figure 50: Determine the VID and PID of a device
The VID and PID identifiers can be found within the Device Instance Id as shown above.
The Exceptions list is a list of devices that are either Allowed or Denied in the Enterprise's environment. Click Add to add a device to the list. Click Edit to update an existing device in the list. Click Delete to remove a device from the list.
Click Add Existing to add devices to the list that have been use in the enterprise environment.
Devices can be listed in a Comma-Separated file (CSV) with the VID, PID, Serial Number and Description. Click Import to read the file into the exception list. Click Export to write the devices in the list to a Comma-Separated file (CSV).
Select either Allow or Deny in the first column. Specify the VID and PID number for the specific device. The VID and PID numbers are required. Next enter a serial number and a description. The serial number and description fields are optional.
Select the USB/Port Security Administrative Override tab to configure a password for the ability to temporarily override restricted device settings on the client computer.
Select this box to set an administrative override password. This password can be used in the USB/Port Security service on the client computer.
On the client, right-click the USB/Port Security icon and select will give the user a new menu option to Disable Restrictions. If the correct password is entered, restrictions are lifted for the remainder of the user session.
Select the Validation Logic tab to set the validation rules for this element.
Select the Notes tab to create any additional notes needed to document the profile element.
When adding or modifying a profile object element, the description appears above the settings tab. Enter a description to annotate the element. The default value for new profile elements can be changed by going to the system Preferences.
|
|
*Note: This feature is not a standard part of Desktop Authority Essentials. To obtain this feature, Desktop Authority Essentials must be upgraded to the Standard edition of Desktop Authority. |
Once a client validates for a USB/Port Security configuration, the USB/Port Security icon will be displayed in the client notification area.
Figure 51: USB/Port Security notification icon
USB/Port Security continually watches the system in order to secure the various devices/ports against the use of restricted devices on the company network. Clients can be notified via a popup warning upon the attempted use of a restricted device. If the system tray is not hidden from the client, permissions can be viewed via the system tray icon.
To configure the client side of USB/Port Security, select the profile's USB/Port Security object.
Select Disable Popups from the popup menu of the USB/Port Security system try icon to hide all system notifications from the client workspace.
Select Disable Restrictions from the popup menu of the USB/Port Security system tray icon to override any security restrictions on your devices.
Enter the override password and click OK. You will be notified that the restrictions on the computer have been removed temporarily for the user's session on the computer.
Select See My Permissions from the popup menu of the USB/Port Security system try icon to view access permissions to system devices/ports.
Figure 52: Viewing permissions set on computer


