The Data Collection object is used to configure which Computer data is collected from the client computers connected to the environment to which Desktop Authority is installed.
Data is collected by Desktop Authority's Operations service and the ETLProcessor plugin. These two plugins are available in the Server Manager > Operations Service tab for configuration.
Select this box to allow Desktop Authority to keep track of hardware information for each computer in the enterprise.
|
|
Note: Collect client hardware information must be enabled in order for Wake On LAN Deployment to wake up targeted computers. This Data Collection option allows for the MAC addresses to be collected. |
Select this box to allow Desktop Authority to keep track of the installed software on each computer in the enterprise.
Select this box to allow Desktop Authority to keep track of the devices plugged in to each computer in the enterprise. Detailed USB/Port Security data collection options can be set in the User Management USB/Port Security object.
Select this box to disable the collection of startup and shutdown events. Deselect this box to collect data about these events.
Select this box to specify how often the client computer will notify Desktop Authority that the computer is it still powered up. The default collection time period is every 6 hours. This allows for more accurate reporting.
Select the Timing tab to configure when this element will be executed. Computer Management objects can execute at computer Startup, Shutdown, defined Refresh intervals or based on customized Schedules.
Select the Validation Logic tab to set the validation rules for this element.
Select the Notes tab to create any additional notes needed to document the profile element.
When adding or modifying a profile object element, the description appears above the settings tab. Enter a description to annotate the element. The default value for new profile elements can be changed by going to the system Preferences.
Wake On LAN (WOL) is a computing standard by which computers that are asleep can be sent a message through the network to wake them up. Wake on LAN is supported on all Microsoft Windows operating systems. Machines can be awoken when in Sleep, Hibernate or Stand by modes.
|
|
Note: Wake on LAN is only supported from Sleep or Hibernation states in Windows 8.1. Refer to Microsoft KB Article 2776718 for more information. |
The only requirement for WOL is a computer with a NIC and Bios that supports WOL. There are usually 2 settings in the BIOS to support this. In the BIOS enable the PXE setting, and/or depending on the computer hardware in the BIOS - Power Management, enable Wake On LAN.
As well as turning on WOL in the BIOS, the OS must also be configured to support WOL. On client machines, go to the LAN Connection properties and click the Configure button. On the Power Management tab, enable the "Allow this device to wake the computer" (Windows 7).
Desktop Authority's implementation of WOL consists of beacon machines that are used to send out packets to wake specified computers. A beacon is defined as any computer managed by Desktop Authority that validates for a Wake on LAN element. Once a machine validates for a WOL element, it becomes a beacon and begins sending out packets to each computer specified in the WOL settings. Since a computer can only send out packets when it is powered on and awake, ensure that computers designated as beacons will be on at the time the WOL element is scheduled to execute.
Figure 39: Wake on LAN graphical overview
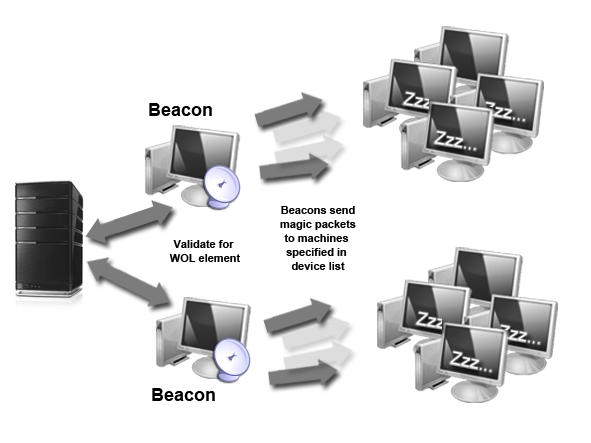
Once a beacon is determined by passing validation logic for a WOL element, the machine will send out special WOL "magic" packets to all machines specified in the WOL element's settings.
Add a custom entry to the WOL List by Machine name, IP address, MAC address or by Excluded MAC address.
Select a computer from a list of machines discovered by Data Collection. Computer can be selected by Machine names, IP addresses, MAC addresses or by Excluded MAC addresses. All available items in the system inventory will be listed and will be available for selection
Select one or more elements from the WOL list and click the Remove button.
Click Import to import a list of Machine names, IP addresses, MAC addresses, or Excluded MAC addresses.
When importing, the import file must be a .CSV file containing one column of one or more Machine Names, IP Addresses, MAC Addresses, or Excluded MAC Addresses exclusively.
Example:
| ACME.Machine1 |
| ACME.Machine2 |
|
ACME.Machine3 |
The above example list provides the following result when imported:
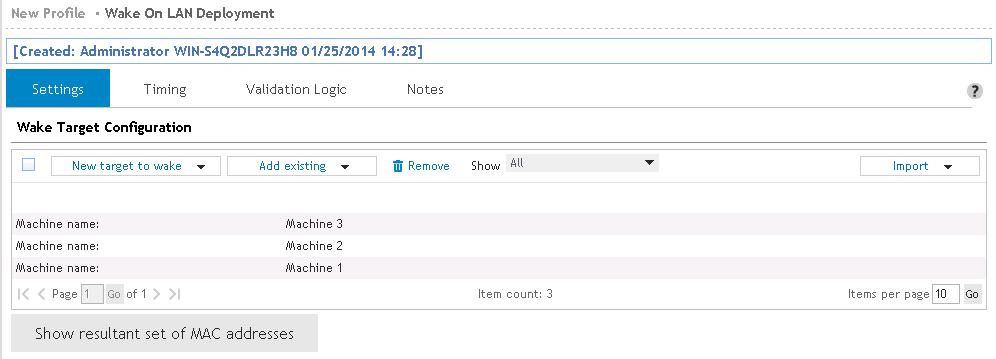
Retrieve a complete list of all MAC addresses that this beacon will send the "magic" packet to. MAC addresses are retrieved from the Hardware inventory database. If a MAC address cannot be retrieved for a computer, it will not be woken up when the WOL element is executed.
|
|
Note: Some routers and switches may filter out magic packets resulting in the inability to wake the target machines. Therefore, it is recommended to select a beacon that resides on the same subnet as the target machine(s). |
Select the Timing tab to configure when this element will be executed. Computer Management objects can execute at computer Startup, Shutdown, defined Refresh intervals or based on customized Schedules.
Select the Validation Logic tab to set the validation rules for this element.
Select the Notes tab to create any additional notes needed to document the profile element.
When adding or modifying a profile object element, the description appears above the settings tab. Enter a description to annotate the element. The default value for new profile elements can be changed by going to the system Preferences.
Computer Management Application Launcher, MSI Packages and Service Pack Deployment have Execution Option settings which can optionally alert the user on the client, if any, that an element is about to execute.
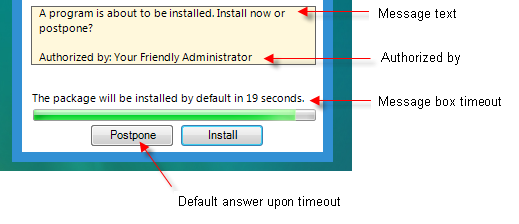
If the Ask user's permission to execute element option is selected, a message box similar to the one below, will be displayed on the desktop. The user will be notified before the element is executed and will be given an option to postpone the action.
Figure 40: Client side permission box
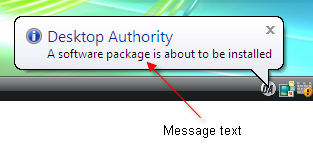
If the Show Balloon message to users before element executes option is selected, a balloon will be displayed in the system notification area.
Figure 41: Client side balloon notification
© 2019 Quest Software Inc. ALL RIGHTS RESERVED.
This guide contains proprietary information protected by copyright. The software described in this guide is furnished under a software license or nondisclosure agreement. This software may be used or copied only in accordance with the terms of the applicable agreement. No part of this guide may be reproduced or transmitted in any form or by any means, electronic or mechanical, including photocopying and recording for any purpose other than the purchaser’s personal use without the written permission of Quest Software Inc.
The information in this document is provided in connection with Quest Software products. No license, express or implied, by estoppel or otherwise, to any intellectual property right is granted by this document or in connection with the sale of Quest Software products. EXCEPT AS SET FORTH IN THE TERMS AND CONDITIONS AS SPECIFIED IN THE LICENSE AGREEMENT FOR THIS PRODUCT, QUEST SOFTWARE ASSUMES NO LIABILITY WHATSOEVER AND DISCLAIMS ANY EXPRESS, IMPLIED OR STATUTORY WARRANTY RELATING TO ITS PRODUCTS INCLUDING, BUT NOT LIMITED TO, THE IMPLIED WARRANTY OF MERCHANTABILITY, FITNESS FOR A PARTICULAR PURPOSE, OR NON-INFRINGEMENT. IN NO EVENT SHALL QUEST SOFTWARE BE LIABLE FOR ANY DIRECT, INDIRECT, CONSEQUENTIAL, PUNITIVE, SPECIAL OR INCIDENTAL DAMAGES (INCLUDING, WITHOUT LIMITATION, DAMAGES FOR LOSS OF PROFITS, BUSINESS INTERRUPTION OR LOSS OF INFORMATION) ARISING OUT OF THE USE OR INABILITY TO USE THIS DOCUMENT, EVEN IF QUEST SOFTWARE HAS BEEN ADVISED OF THE POSSIBILITY OF SUCH DAMAGES. Quest Software makes no representations or warranties with respect to the accuracy or completeness of the contents of this document and reserves the right to make changes to specifications and product descriptions at any time without notice. Quest Software does not make any commitment to update the information contained in this document..
If you have any questions regarding your potential use of this material, contact:
Quest Software Inc.
Attn: LEGAL Dept
4 Polaris Way
Aliso Viejo, CA 92656
Refer to our Web site (https://www.quest.com) for regional and international office information.
Patents
Quest Software is proud of our advanced technology. Patents and pending patents may apply to this product. For the most current information about applicable patents for this product, please visit our website at https://www.quest.com/legal.
Trademarks
Quest, the Quest logo, and Join the Innovation are trademarks and registered trademarks of Quest Software Inc. For a complete list of Quest marks, visit https://www.quest.com/legal/trademark-information.aspx. All other trademarks and registered trademarks are property of their respective owners.
Legend
|
|
Warning: A WARNING icon indicates a potential for property damage, personal injury, or death. |
|
|
Caution: A CAUTION icon indicates potential damage to hardware or loss of data if instructions are not followed. |
|
|
|
Desktop Authority Administrator Guide
Updated - December 2019
Software Version - 11.1