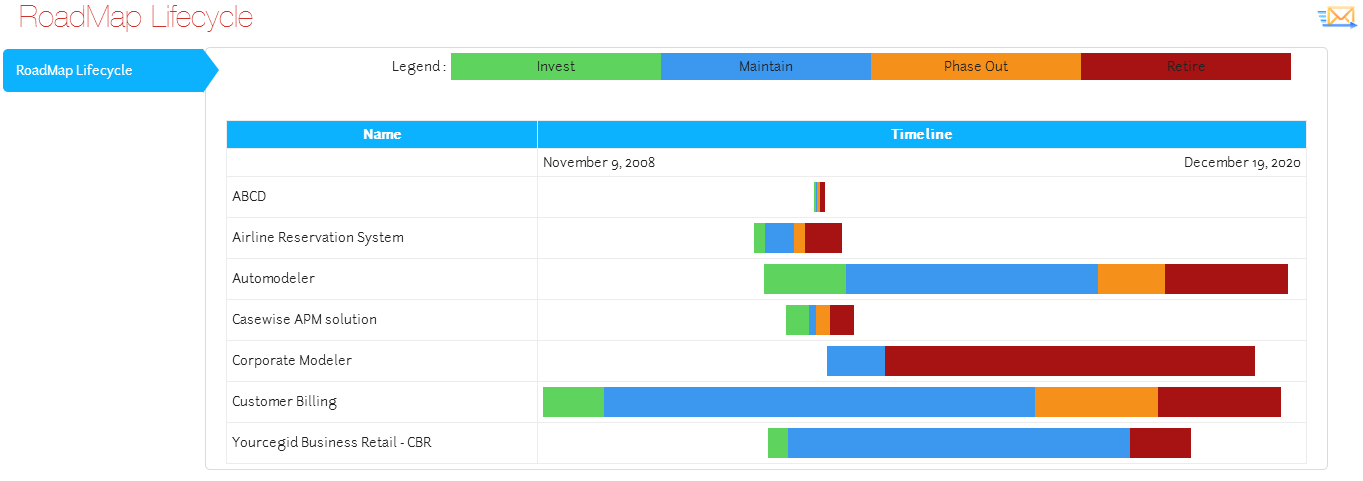
A Lifecycle Roadmap is a type of Gantt chart that enables you to show a number of objects, displaying their overall time frame, as well as highlighting in different colors the phases involved in their lifecycle.
You can display any number of phases in your lifecycle.
When you use a Lifecycle Roadmap you can also show the names of each of the phases in a color-coded legend so users can understand the chart.
You can use Lifecycle Roadmaps as the main element on Index Pages only.
|
|
Lifecycle Roadmaps require that you have a total of Date/Time properties on your object to represent the Start dates of each phase in the cycle, |
|---|
Why and how should you use one?
Use a Lifecycle Roadmap when you want to view the lifespan of an object, such as a Project, but you also want to see the breakdown of phases within the overall timeframe.
For example, you could have a Technology object representing a server, which has four lifecycle phases: Development, Testing, Active, and Retirement. Each stage has a corresponding Date/Time property to represent the start date of the phase, and the final phase also has a corresponding end date property.
Where and when can you use one?
Use the table below to see where you can use a Recursive Pie Chart:
|
Page Type |
Parent node |
Tabs |
Number on page |
Editable |
|---|---|---|---|---|
|
Index Page |
Object Type node |
Yes - optional |
1 |
No |
|
Object Page |
Association Type node |
Yes - mandatory |
1 |
No |
What do you want to do?
Create a new Lifecycle Roadmap for your page
|
|
These instructions assume that you have already created your page, including any filtering you may want so that only the objects you want displayed are shown. |
|---|
To create a new Lifecycle Roadmap for your page:
Use the Selected Properties area on your Object Type node to select all the properties you want to reference on the roadmap
Ensure the Layout node for your element is set to Empty
For an Index Page the Layout node is the one directly under the Object Type node.
For an Object Page the Layout node is the one directly under the Association Type node
Right-click the Layout node and choose Add Behaviors > Roadmap Lifecycle
A Roadmap Lifecycle node is added below the Layout node
Select the Roadmap Lifecycle node and set the properties
|
|
Use lower case to enter Scriptnames. |
|---|
Use the Dates field to enter a comma-separated list representing the start dates of all the phases in your roadmap, as well as the end date of the final phase
Enter the Scriptnames of the start date properties for each of the phases in the lifecycle, followed by the Scriptname of the end date property of the final phase
For example: astart,bstart,cstart,dstart,dend
In the Steps field enter the names of each of the four phases as you want them to be displayed in the web page, separating them with a comma
Example: 'Development,Testing,Active,Retirement'
Save your Site.
The Site is saved and the Lifecycle Roadmap is created.


