Chat now with support
Chat with Support

On Demand Migration

On Demand is a cloud based management platform, providing access to multiple Quest Software Microsoft management tools through a single interface. Cloud based is a term that refers to applications, services or resources made available to users on demand via the Internet. Quest On Demand is a Software as a Service (SaaS) application where application software is hosted in the cloud and made available to users through quest-on-demand.com.

On Demand management is based on the concepts of organizations, modules, and Azure Active Directory (AD) tenants. When you sign up for the On Demand service, you create an organization. The organization can subscribe to modules. Organization administrators can use the tools provided by the modules to perform administrative actions on Azure AD tenants.

Login to Your Account
  1. Visit the On Demand Portal at http://quest-on-demand.com
  2. Enter your email address
  3. Enter your password
  4. Click "Sign in"

Create a New Account and Organization
  1. Visit the On Demand Portal at https://quest-on-demand.com
  2. Click "Sign up for a new Account"
  3. Enter your "First name" and "Last name"
  4. Enter your email address and click "Verify Your Email"
    Note: please use the email address associated with your Purchase Order / Quote. This is the email address where you received the "Welcome email" and will be used to send a verification code that will be entered later.
  5. Enter a Password
  6. Choose a "Country"
  7. Accept the "Software Transaction Agreement"
  8. Click "Sign Up"
  9. Enter the verification code you received in the email address entered in Step 4
  10. Click "Verify"
  11. Enter an Organization Name
  12. Select a region to host your On Demand Organization
  13. Click "Create New organization"
  14. Accept the Software Transaction Agreement
  15. Click "Agree"
Note: If you have signed up with Quest On Demand before, it will state that your account already exists. If this is the case, see the "Reset your password" section below

Create a New User Login under an existing organization
Before you begin:
  1. You must have a valid email address where you can receive confirmation emails.
  2. An On Demand administrator must add your email address in the On Demand portal with the appropriate user role in the Permissions page (see Managing users below).
Once your email address has been granted the appropriate On Demand user permissions:
  1. Visit the On Demand Portal at https://quest-on-demand.com
  2. Click "Sign up for a new Account"
  3. Enter you "First name" and "Last name"
  4. Enter your email address and click Verify your Email
  5. Enter a Password
  6. Choose a "Country"
  7. Accept the "Software Transaction Agreement"
  8. Click "Sign Up"
  9. Enter the verification code you received in the email address entered in Step 4
  10. Click "Verify"

Reset your password
  1. Visit the On Demand Portal at http://quest-on-demand.com
  2. Click "Forgot your Quest Software Password?" link
  3. Enter your email address
  4. Click "Send Reset Instructions"
  5. Follow the instructions in your reset password email.
Note: If you are coming from the “Create a new account” screen click “Sign in with an existing account”


On Demand management is based on the concepts of organizations, modules, and Azure Active Directory (AD) tenants. When you sign up for the On Demand service, you create an organization. The organization can subscribe to modules. Organization administrators can use the tools provided by the modules to perform administrative actions on Azure AD tenants. When choosing your Organization, you should consider which region is appropriate to store your On Demand data in Microsoft Azure depending on your requirements and preferences regarding data location and performance. An Organization cannot be moved once created.

The following regions are currently supported:
  • United States
  • Ireland

On Demand Users are added to the organization to perform various tasks. There are two user roles in On Demand that define the scope of tasks that can be performed. The user who signed up for On Demand and created the organization is an On Demand Global administrator. On Demand Global Administrator.


Adding a User
  1. In the side navigation panel on the left, click Settings.
  2. On the Settings page, click Permissions
  3. Select an Administrator type:
    1. To add an On Demand Organization Administrator, click On Demand Organization.
    2. To add an administrator for a specific module, click on the module name.
  4. The current users assigned with the selected Administrator Type are displayed below the Add email address field.
  5. In the Add email address field, enter the email address of the user you want to add.
  6. Click add
  7. Click save
  8. The user is added to the list of administrators. Inform the user that they can now log in to your organization. See “Create a New User Login under an existing organization” above)

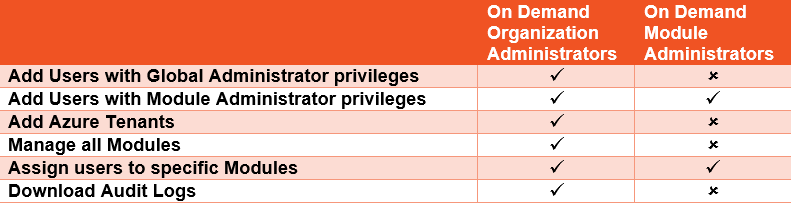
A Tenant is a Microsoft Office 365 tenant account or organization. Before you can use On Demand modules, you must first complete the registration and configuration of your Microsoft Office 365 tenant account.

Once your Microsoft tenant accounts are setup and verified you will need to add them to the On Demand portal in order to manage them using On Demand modules. On Demand supports adding and managing multiple tenants.

Note: When adding a tenant, you will be required to sign-in to the Microsoft tenant account using a user account that has the Microsoft Azure Global Administrator role.

To Add a Tenant

  1. Click Tenants from the navigation menu
  2. Click “Add Tenant”
  3. The Add Tenant dialog box will come up stating you must be a global administrator, click Continue
  4. This will redirect you to a sign page to add your o365 tenant, enter the appropriate credentials and sign in
  5. You will be prompted with a list of permissions On Demand requires, Click Accept
  6. Once completed you will be redirected back to the On Demand console and the Tenant should now be added


To Delete a Tenant

  1. Click Tenants from the navigation menu
  2. Click the 3 vertical dots to the right of the Tenant name
  3. Click Remove
  4. You will be prompted with a dialog box that states removing the Tenant cannot be undone and that it disables all functions related to the tenant. If you are sure click Remove


On Demand Migrations allows you to securely migrate users, groups, and Exchange mailboxes from one Azure AD/Office 365 tenant to another Azure AD/Office 365 Tenant. Migrations can be completed in collections to help you design the migration. Collections can be based on departments, locations etc.

The initial discovery of account can take time especially in large environments, and will be considerably longer when choosing to include statistics on mailboxes.

Add a new project

On the Migration Projects page, click "+New Project"

    In the New Project Window:
    1. Select the source tenant
    2. Select the target tenant
    3. Enter a Project Description
    4. Click "Save"


Configure Connections

In the Project section of the Dashboard, click "Configure Connections"

    In the Configure Connections Window:
    1. Select your Source Tenant and click "edit"
    2. Enter the Administrator Credentials for the Source Tenant
    3. Click "Click Here" under Grant necessary permissions
    4. On the next screen that pops up called "Migration Manager for Azure" enter the Administrator Credentials for the Source Tenant and click "Sign in".
    5. On the next screen review the information and click "Accept"
    6. Next select your Target Tenant and click "edit"
    7. Enter the Administrator Credentials for the Target Tenant
    8. Click "Click Here" under Grant necessary permissions
    9. On the next screen that pops up called "Migration Manager for Azure" enter the Administrator Credentials for the Target Tenant and click "Sign in".
    10. On the next screen review the information and click "Accept"
    11. Once this window disappears click save in the "Configure Connection" screen
    12. Click "Finish"


The dashboard is the main screen of On Demand Migrations after creating the project, which shows a holistic view of your migration project.

The dashboard contains a “Getting Started” section, which shows you the typical flow of a migration and preparation. You will also see a quick overview of how many accounts, mailboxes and OneDrive users you have, as well is will show you the last 5 tasks and errors that occurred.

This screen changes based on the collection you are in (collections explained below “Setting up your first Migration” step 1), and will only show information for the collection you are in.

In the Project on the Dashboard

  1. Click "Create a discovery task"
  2. In the New Discovery Task window, enter a Name for this Discovery Task
  3. In Discovery Options you can choose to select "Include statistics on Mailbox"
    Include Statistics on Mailbox may offer helpful insights into further migration steps, but considerably increases the discovery time.
  4. In the Summary, verify the information is correct and select "Start the task automatically when the wizard is finished.
  5. Click Finish

Enable Calendar Sharing

In the Project, select "Enable Calendar Sharing"

On the New Calendar Sharing Task window: 

  1. Enter Source domain
  2. Enter Target domain
  3. Click Next
  4. Enter a Name for the Task
  5. Select “Start the task automatically when the wizard is finished”
  6. Click Finish


The following steps will guide you through setting up and running your first migration in On Demand Migrations.


  1. Create a Collection

    A collection is a subset of mailboxes/accounts to be migrated at one time. Collections help you manage migration projects in smaller subsets of mailboxes/accounts which are generally mailboxes/accounts from the same Office, department, Country etc.

    1. In the Project, select Mailboxes
    2. Select the mailboxes/accounts you want to add to a Collection
    3. Click New Collection
    4. Enter a Collection Name
    5. Click Save

  2. Migrate Accounts
    1. In the Project, select the collection you want to migrate
    2. In the next screen, click "Select Accounts"
    3. In the Accounts Screen, click the top box to select all Accounts in the collection
    4. Click Migrate Accounts
    5. On the New Migration Task screen enter a name for this Migration Task
    6. Select "Start the task automatically when the wizard is finished
    7. Click Finish
    8. Select Tasks to verify this task has started
    9. Once this task is complete select Events to see if there were any Errors or Warnings during the migration

  3. Migrate Mail
    1. In the Project, select the collection you want to migrate
    2. In the next screen, click "Select Mailboxes"
    3. In the Mailboxes Screen, click the top box to select all Mailboxes in the collection
    4. Click Migrate Mail
    5. On the New Migration Task screen choose the type of Mailbox in the Migration scenario and the type of data you wish to migrate
    6. Click Next
    7. On the Licensing Plan screen select the licensing plan you wish to use to assign licenses and select the appropriate
      • Assign the selected plan to unlicensed accounts only. Licensed accounts retain their existing plan
      • Assign the selected plan for all accounts. All existing license assignments are replaced
      • Add the selected plan to all accounts. Users who already have a license are assigned an additional plan
    8. In the Items to exclude window, select the types of Data you wish to exclude from the Migration as well as enter any folder names you wish to exclude. If required, enter a date range by adding the dates in the "Exclude mail after" and "Exclude mail before" sections
    9. Click Next
    10. On the Summary Screen enter a name for this Mail Migration task, and verify your options are correct
    11. Select "Start the task automatically when the wizard is finished."
    12. Click Finish
    13. Select Tasks to verify this task has started
    14. Once this task is complete select Events to see if there were any Errors or Warnings during the migration

  4. Switch Mailbox
    1. In the Project, select the collection you want to switch the mailboxes
    2. In the next screen, click "Select Mailboxes"
    3. In the Mailboxes Screen, click the top box to select all Mailboxes in the collection
    4. Click Switch Mailboxes
    5. On the New Mailbox Switch Task
      1. Download the Client Update Agent
      2. Choose the correct “Mail Forwarding direction” you want to use
      3. Set the “Custom Domain for forwarding” to the correct domain
    6. Click Next
    7. On the Summary screen verify the information is correct and enter a name for this Switch Mailbox Task
    8. Select "Start the task automatically when the wizard is finished."
    9. Click Finish
    10. Select Tasks to verify this task has started
    11. Once the task is complete follow the instructions in the Readme.txt file from the Client Update Agent (odmclient.zip) you downloaded in step “5.1”

  5. Migrate OneDrive
    1. In the Project, select the collection you want to migrate
    2. In the next screen, click "Select OneDrive"
    3. In the OneDrive Screen, click the top box to select all Accounts in the collection
    4. Click Migrate OneDrive
    5. On the New OneDrive Migration Task screen, verify the permissions have been granted, if they have not grant these now
    6. Click Next
    7. On the Summary screen verify the information is correct and enter a name for this OneDrive Migration Task
    8. Select "Start the task automatically when the wizard is finished."
    9. Click Finish
    10. Select Tasks to verify this task has started
    11. Once this task is complete select Events to see if there were any Errors or Warnings during the migration


Create a Resource Processing Task

  1. In the Project, select the collection you want to Process Resources for
  2. In the next screen, click "Select the Accounts"
  3. In the Accounts Screen, click the top box to select all Accounts in the collection
  4. Click Process Resources
  5. On the New Resource Processing Task Window select the Resources you wish to process
    Note: if processing SharePoint online you need to enable external sharing in Office 365 SharePoint admin center by clicking "Sharing" and selecting "Allow sharing only with the external users that already exist in your organization's directory".
  6. Click Next
  7. Enter a name for this Task, and verify the settings and Select "Start the task automatically when the wizard is finished."
  8. Click Finish


On rare occasions, On Demand or one of its modules may be temporarily down for maintenance. Maintenance schedules and outages will be posted in the On Demand portal.

Visit our Status Page to check if there are any outages and subscribe to receive update notifications via email, SMS, Webhook, Atom and RSS feeds.

The support portal is a comprehensive resource for users of Quest products to get help and support. A few of the key resources in the support portal are below:

Register for a Support Account
Visit the Support Product Page
Search the Knowledgebase
Download User Guides and Product Documentation