|
|
Catalog: After selecting a repository, click this icon to search or browse for a specific savepoint. |
|
|
File Level Restore: When you want to restore an individual file from a savepoint, click this icon to access the File Level Restore dialog box. |
|
|
FLR From Manifest: When you want to restore an individual file from the Manifest, click this icon. |
|
|
Restore: When you click to select a backup job or savepoint in the Working Repository pane, click this icon to open the Restore Wizard. |
|
|
Remove: To delete a savepoint that is selected in the Working Repository pane, click this command. |
|
|
Add: Use this command to add either a repository. |
|
|
Properties: This icon is the gateway to the connection information and repository credentials used to connect to the share. You can update credentials at any time. |
|
|
Remove: Click this icon to open the Repository Removal Confirmation dialog box. Before removing a repository, confirm that it is not needed to store current jobs. |
The Working Repository pane shows the configured repositories and the savepoints stored there. The data displayed in this pane can be filtered by inventory type and/or search criteria. Selecting the top-level vRanger Repositories node will display savepoint contents for all repositories. Selecting a specific repository displays only the contents of that repository.
|
|
Search: Free-form search that filters displayed machine names based on characters entered into the search form. | ||||||||
|
|
Machine type: Toggles the display of savepoints based on machine type. Machine types can be selected in any combination. Options are:
| ||||||||
|
|
Expand All: Expand all machine entries to view savepoints. | ||||||||
|
|
CollapseAll: Collapse all machine entries to hide savepoints. |
|
|
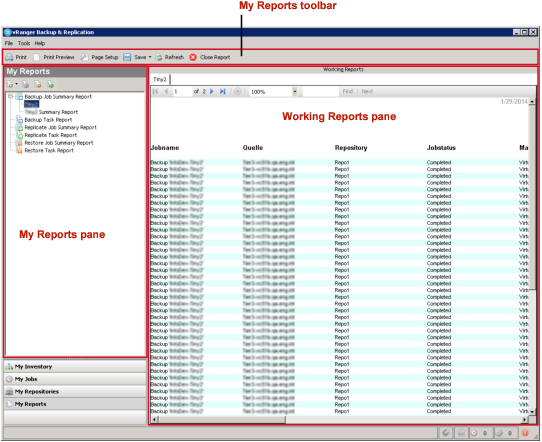
Print: Use this icon to print the report displayed in the Working Reports pane. |
|
|
Print Preview: Use this icon to review the report before printing it. |
|
|
Page Setup: Use this icon to adjust the report before printing it. |
|
|
Save: Use this icon to save your report as a PDF or Excel file. |
|
|
Refresh: Use this icon to refresh the selected report. |
|
|
Close: Use this icon to close the selected report. |
The Reports pane includes nodes for the following types of reports:
You can also create a report or work with existing reports through the Reports pane toolbar icons. For more information, see Reports.
|
|
Add: Use this icon to start the process of creating a backup or restore report. This icon lets you add any of the six reports types using the Restore Wizard: When you first open the My Reports view, this icon is the only one that is enabled. |
|
|
Edit: Click this icon to open the Report Wizard and change the selected report’s configuration. Enabled only when a job is selected in My Jobs. |
|
|
Remove: Click this icon to delete the selected report. Enabled only when a job is selected in My Jobs. |
|
|
Run: Click this icon to run the selected report. Enabled only when a job is selected in My Jobs. |