Before you begin the installation process, please review the following requirements:
Review the following to select the installation type.
| Feature | Local | Remote |
|---|---|---|
| Installs on multiple nodes at once | Yes* | Yes |
| Installs on multiple instances on those nodes | Yes | Yes |
| Automatically upgrades LiteSpeed during install | Yes | Yes |
| Requires logging into the cluster node | Yes | No |
| Requires running the .msi on each node | Yes** | Yes |
|
*—To the other cluster nodes. **—Install LiteSpeed to the active node first. That should install LiteSpeed to all nodes. If there are problems with the automatic installation to remote nodes, then install to the remaining nodes for the local cluster installations. | ||
Use the following installation instructions for both active-passive and active-active Microsoft Cluster Service or Failover installations.
To install LiteSpeed on a cluster
Launch the .msi file on one node in the cluster. This node must have an install of each SQL Server instance on which you want to install LiteSpeed.
Choose “Install LiteSpeed to all nodes automatically” which is the default option. This is the recommended option for doing an initial installation to the cluster configuration.
To install LiteSpeed on a node only
If you have added a new node to an existing cluster configuration and want to install LiteSpeed to this new node only, run .msi on this particular node and use the “Install LiteSpeed to this node only” option.
Instance Configuration uses WMI to deploy the .msi file to all nodes. You do not need to run the installation from the passive nodes or failover any nodes of the cluster during the installation process. This process automatically upgrades any old version of LiteSpeed on any node.
If you have issues while running the Instance Configuration Wizard during installation, cancel out of the wizard and complete the installation without it. After the installation completes run the Instance Configuration Wizard from the Start menu and complete it.
You can install LiteSpeed on clustered instances with the Remote Deploy tool. LiteSpeed automatically installs on the selected server instances. For more information, see Install LiteSpeed on Remote Server Instances.
NOTES:
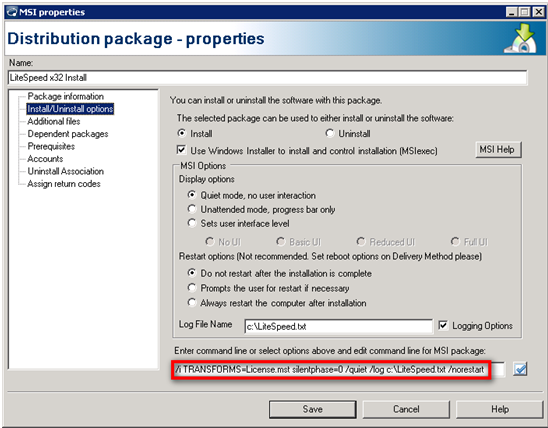
LiteSpeed can also be deployed silently via a deployment tool such as SCCM or LANDesk. In a mass deployment, the steps are as follows:
To setup the package for deployment create a distribution package in your deployment tool.
In the command line, specify "silentphase=0" to cause Instance Configuration not to be run. You can customize the installation by creating an MSI transform and by using the TRANSFORMS=MyTransformName.mst command-line parameter for MSI package.
The package should be set to run in silent mode with no user interaction and to suppress any reboot. Separate packages need to be set up for x32, and x64 systems.

Once the package is setup create a distribution task and deploy the .msi to the cluster nodes.
Use the Remote Deploy Configuration wizard to create the .xml files. For more information, see Install LiteSpeed on Remote Server Instances.
You can configure LiteSpeed on the remote server instances using the Remote Deploy wizard, or by logging into the server and manually running Instance Configuration.
|
Tips:
|
If you purchased LiteSpeed and have a valid license, you can register LiteSpeed during the installation or upgrade, or any time:
Using the LiteSpeed UI Console (Help | License...)
|
note: This will only register a local copy of LiteSpeed |
Using xp_sqllitespeed_licenseinfo
Using the LicenseInfoCmd command-line utility
|
note: |
If you want to purchase LiteSpeed or require a trial extension or have any other licensing questions related to your purchase please contact your sales representative or go to https://www.quest.com/company/contact-us.aspx.