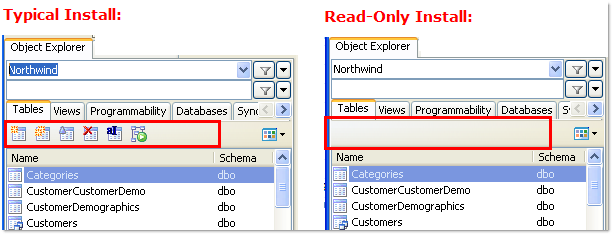
During installation, you can select an option to install Toad as a read-only application. This lets you query data and view objects using Toad, but all actions that can impact the database (Create, Alter, Drop, Insert, Update, etc.) are disabled or hidden. This ensures that you can use Toad without worrying about committing a change to a sensitive production instance. The following image shows an example of the differences between a typical and a read-only installation:

To install a read-only version of Toad Data Point
During installation, select the Read-only option.

To change an existing installation to read-only
Review the following additional considerations/limitations before using a Toad read-only installation.
| Consideration/Limitation | |
|---|---|
| Additional limitations for IBM DB2 z/OS connections |
When using an IBM DB2 z/OS connection in a read-only install of Toad, please note the following additional limitations:
|
Silent installation provides a convenient method for deploying Toad to multiple machines. With some customization, you can also deploy the license key and settings at the same time.
Use a stand-alone installer to perform a silent install. Obtain your installer files at https://support.quest.com/.
Before you can perform a silent installation, the following software must be installed on every computer where you are installing Toad:
Use the executable file to perform a silent install to the default directory (or to a different directory) and to specify options such as logging installation messages.
To perform a silent install using the executable file
For a standard installation with all features enabled, enter the following command:
“ToadInstaller.exe” /S
You can customize MSIEXEC command-line options and overrides for your installation similar to the following command:
“ToadInstaller.exe” /S /Lx “C:\temp\installLog.txt” INSTALLDIR=”Drive:\your_install_path” USERNAME=”some_user” COMPANYNAME=”your_company” ALLUSERS=1
Use the following descriptions to customize the command-line options and overrides for your installation.
Command-Line Options
The following MSIEXEC command-line options are used in this example:
|
Option |
Description |
|---|---|
|
/L “C:\temp\installLog.txt” |
(Optional) Write installation messages to the specified log file. Substitute “C:\temp\installLog.txt” in the example with the fully qualified name of the log file. Enclose this value in double quotations. The installation process creates this file if it does not exist. Otherwise, the existing file is overwritten. You can add additional parameters to the logging option to indicate what type of information to log.
See the log section at http://msdn2.microsoft.com/en-us/library/aa367988.aspx for more information about additional logging parameters. |
|
License="full_path" |
Specify the full path to a license file, e.g. License="C:\ProgramData\Quest Software\Toad for SAP Solutions". Toad for SAP Solutions to use Toad with the desired license. |
Toad Default Installation Option Overrides
You can specify the following values to override Toad’s default installation options. Enclose each value in double quotations.
|
Option |
Description |
|---|---|
|
INSTALLDIR |
(Optional) Specify the absolute path for the directory in which you want to install Toad. If you do not include this path, the installation program defaults to: |
|
ALLUSERS |
(Optional) Specify one of the following:
Note: If you do not specify this property, the installation program defaults to a per-user installation. |
|
USERNAME |
(Optional) Specify the user that intends to use Toad on the target computer. Notes:
|
|
COMPANYNAME |
(Optional) Specify the name of the company that owns this installation. |
| ALLOWPASSWORDS=FALSE |
(Optional) Set in order to prohibit users from saving their passwords in Toad. |
| OPTIONSTEMPLATE | (Optional) Enter a full path to the Options Template that you generated in Tools | Options | General. |
|
Notes:
| |
Toad must be installed on the Citrix server by the Citrix administrator. Users then connect to this instance through their Citrix login.
To install Toad on a Citrix system
Connect to the Citrix Environment as an administrator.
Copy Toad to the Citrix server, if needed.
Start the Toad installation process.
Repeat steps 2 through 4 for each server in the Citrix farm.
Note: Although you must install Toad on every server in the Citrix farm, you only need to publish Toad once.
Review the following considerations regarding licensing:
To upgrade Toad
If you are upgrading from a previous version of Toad, you are prompted to migrate your settings the first time you start Toad. The settings files include database connections, layout customizations, shortcut keys, and options customized in the Options pages.
To migrate the settings again, remove or rename the current version's Application Data folder and migrate the files from the previous version's Application Data folder.