Setting up data collection agents
Foglight™ for Citrix XenDesktop and XenApp relies on XenDesktop and NetScaler Agents to collect data from the monitored system. When you install Foglight for Citrix XenDesktop and XenApp, you need to create appropriate agent instance to collect performance information from your environment.
Foglight for Citrix XenDesktop and XenApp includes a set of dashboards that allow you to monitor your XenDesktop® or XenApp® environment and manage monitoring agents. The XenDesktop Environment dashboard consists of several tabs, each focusing on a specific aspect of your monitoring needs.
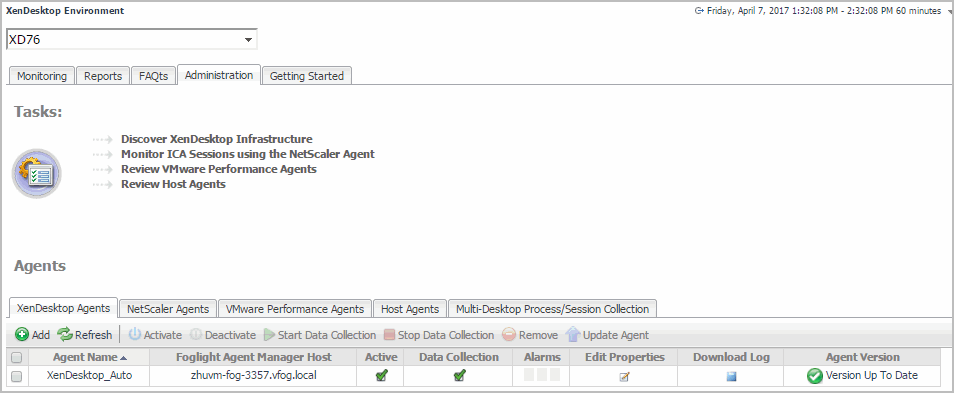
The Administration tab allows you to create and manage monitoring agents. To access this tab, on the navigation panel, under Dashboards, choose XenDesktop > XenDesktop Environment, and then open the Administration tab.
Exploring administration tasks
On the Administration tab, the Tasks area contains links to several administrative tasks that you can initiate from this tab.
|
• |
Discover XenDesktop Infrastructure: Run the XenDesktop Discovery Wizard to locate a XenDesktop® environment and create and configure a monitoring agent. This wizard automatically discovers your XenDesktop infrastructure, and creates the following agents: |
|
• |
Monitor ICA Sessions using the NetScaler Agent: Run the NetScaler Discovery Wizard to locate a NetScaler® gateway and configure a monitoring agent. This task is only required if your XenDesktop environment has a NetScaler installer. For more information, see Creating NetScaler Agent instances. |
|
• |
Review VMware Performance Agents: Review the list of monitored XenDesktop sites in the Review VMware Agents dialog box that appears when you click this link. |
|
• |
Review Host Agents: Review the list of the hosts associated with the monitored XenDesktop sites in the Review Host Agents dialog box that appears when you click this link. |
Discovering XenDesktop sites
A XenDesktop® environment contains one or more License Servers and delivery Controllers, and can be associated with a vCenter® server. Given a XenDesktop domain and host names, the XenDesktop Discovery Wizard allows you to locate these components and to create monitoring agents.
|
NOTE: Unlike the Create XenDesktop Agent wizard, the Discover XenDesktop Wizard offers to create VMware Performance agents for the detected vCenters, or Windows or Unix agents for the discovered servers, in addition to creating a XenDesktop Agent instance. For more information about the Create XenDesktop Agent wizard, see Creating XenDesktop Agent instances . |
This results in two or more agent instances: a XenDesktop Agent (to monitor the XenDesktop server), one or more VMware Performance agents (to monitor the associated vCenters), and one or more Windows® or UNIX® agents (available with Foglight™ for Infrastructure, to monitor OS-level resources).
|
NOTE: The VMware Performance Agent is provided with Foglight for VMware. The Windows and Unix agents are provided with the Foglight for Infrastructure. Ensure these components are installed and enabled in your environment before running the XenDesktop Discovery Wizard. For complete information, see the Foglight for VMware and Foglight for Infrastructure documentation. |
|
2 |
|
3 |
Open the Administration tab. |
|
4 |
|
5 |
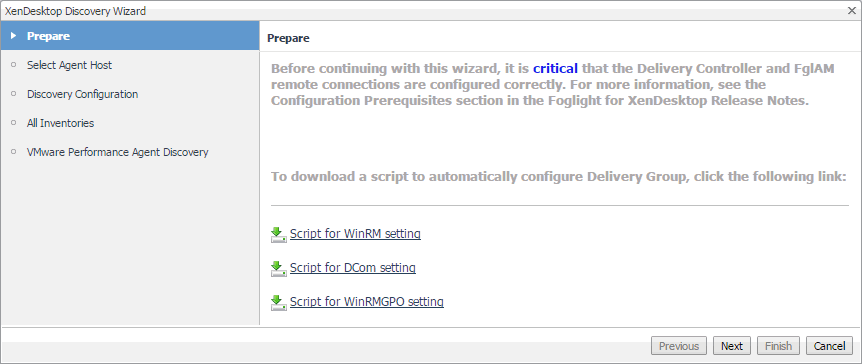
Review the information on the Prepare page. |
|
• |
If you want to configure these settings manually, see the Agent Manager Guide for guidelines. |
|
6 |
On the Select Agent Host page, select the running Agent Manager that you want to manage the monitoring agent that you are about to create, and click Next. |
|
7 |
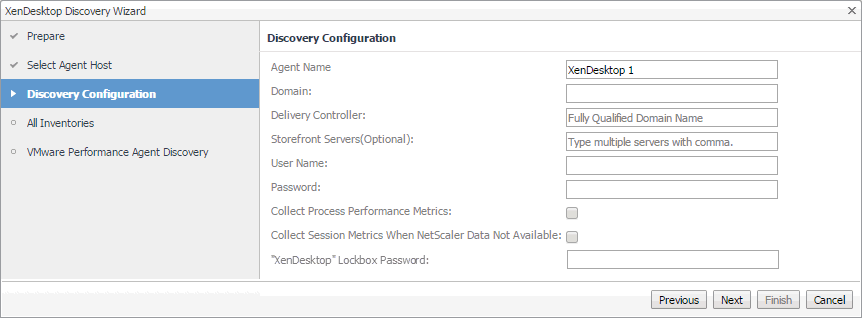
On the Discovery Configuration page, provide the following information needed to connect to the XenDesktop environment: |
|
• |
Agent Name: Specify the name of the XenDesktop agent. If you want to specify a different name than the default name already provided (for example, XenDesktop 1), type it in this box. |
|
• |
Domain: Type the name of the domain to which the XenDesktop host belongs. |
|
• |
Delivery Controller: Type the name of the XenDesktop host. This value must include a fully qualified domain name. |
|
• |
Storefront Servers (Optional): Type a comma-separated list containing the names of StoreFront servers that provide access to desktops and applications. This step is optional. |
|
• |
User Name: Type the user name of the XenDesktop Delivery Controller login domain account (or the XenDesktop management account). |
|
• |
Password: Type the password associated with the above user name. |
|
• |
Collect Process Performance Metrics: Select this check box if you want the XenDesktop agent to collect virtual machine process metrics from the host. |
|
• |
Collect Session metrics when NetScaler data not available: Select this check box if you want the XenDesktop agent to collect session metrics when NetScaler data is not available. If you select this option and NetScaler data becomes available, the NetScaler data is displayed. |
|
• |
XenDesktop Lockbox Password: Type the password of the XenDesktop lockbox. This box only appears if your XenDesktop lockbox is protected with a password. This lockbox stores your XenDesktop credentials. For more information about credentials, see the Administration and Configuration Help. |
|
8 |
|
9 |
On the Discovery VMware Agent page, the top table shows the vCenters that are not currently monitored. For each vCenter in that table, click the Configure Agent column to set up a VMware Performance agent for the vCenter. |
Creating NetScaler Agent instances
NetScaler Agents collect ICA (Independent Computing Architecture) session information from monitored Citrix® NetScaler® gateways using Citrix® AppFlow®. When the NetScaler Agent package is successfully deployed, you can create one or more NetScaler agent instances, activate them, and start their data collection. To perform these steps in a single operation, use the NetScaler Discovery wizard, accessible from the Tasks area on the Administration tab of the XenDesktop Environment dashboard.
|
2 |
|
3 |
|
4 |
In the Tasks area, click Monitor ICA Sessions using the NetScaler Agent to launch the NetScaler Discovery Wizard. |
|
5 |
In the NetScaler Discovery Wizard, on the Select FglAM page, select the host running the Agent Manager that you want to use to manage the agent instance you are about to create, and click Next. |
|
6 |
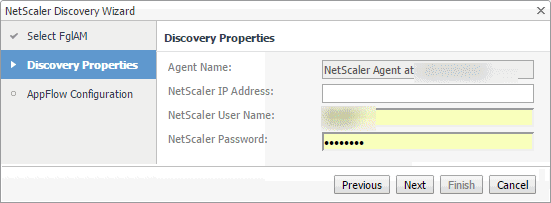
On the Discovery Properties page, provide the following information. |
|
• |
NetScaler IP Address: The NetScaler IP address. |
|
• |
NetScaler User Name: The user name required to access NetScaler. |
|
• |
NetScaler Password: The password of the user account required to access NetScaler. |
|
7 |
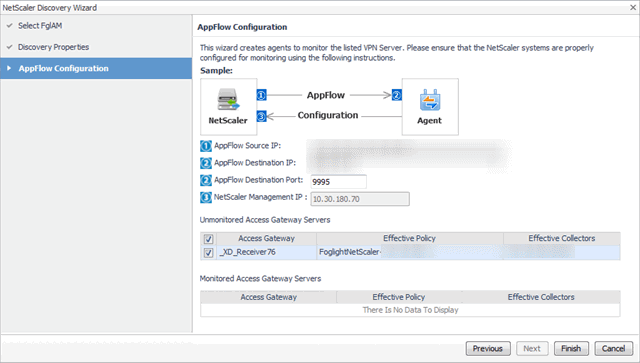
On the AppFlow Configuration page, observe and configure the following parameters, as required. The NetScaler Agent needs this information to collect AppFlow data. |
|
• |
(1) AppFlow Source IP: Shows the AppFlow Source IP that NetScaler uses to send NetFlow packets. The agent can handle multiple IPs automatically. |
|
• |
(2) AppFlow Destination IP, (2) AppFlow Destination Port: Provide the IP address and port number the Agent Manager can use to receive AppFlow data sent by NetScaler. |
|
• |
(3) NetScaler Management IP: Shows the NetScaler IP address. |
|
• |
Unmonitored Access Gateway Servers: Select one or more NetScaler Gateway Servers that you want to monitor. |
|
• |
Monitored Access Gateway Servers: If any NetScaler Gateway Servers are already monitored, they appear listed here. |

