The steps listed below will allow you to enable SAML on the Kace SMA and configure it to work with Azure as the IdP. We need to do some changes on the SMA and on Azure.
Steps on the Kace SMA
- Enable SAML
- Go to Settings | SAML Settings.
- Select “Enable SAML Service Provider”.
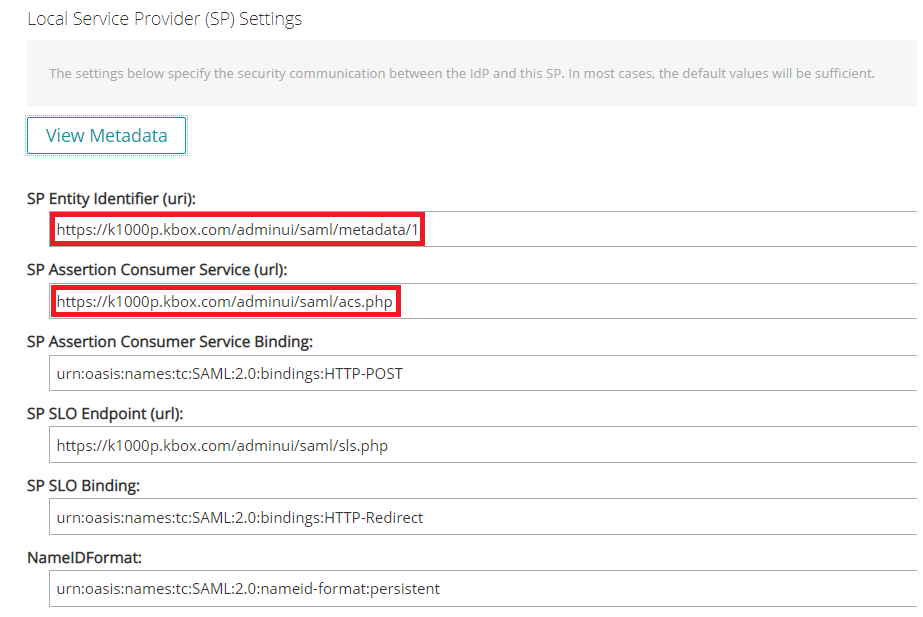
- Scroll Down to “Local Service (SP) Settings” and select “View Metadata”.
- Copy the link below “SP Assertion Consumer Service (url)” and “SP Entity Identifier (uri)” you will need these links on the Next steps on Azure. Make sure that all the links are "secure" shown as “https”. Add the “s” manually if link shown as “http”.
- For now, do not save the changes, proceed to "Steps on Azure".

Steps on Azure
- Go to Microsoft Azure portal and login with your account.
- Select “Sign in” above.
- On Azure portal, open "Azure Active Directory".
- Select “App registrations” on the left panel.
- Select “New registration”.
- Assign the name of your preference to the app.
- Select who can us the application or access to the API.
- On “Redirect URI (optional)”, paste the “SP Assertion Consumer Service (url)” that you got from the SMA and select “Register” below.
- Select the app created and then Select “Expose an API” on the left panel.
- Select “Application ID URI – Set”.
- Paste the “SP Entity Identifier (uri)” that you got from the Kace SMA, select “Save”.
- Go back to the app overview. Select “Overview” above on the left panel.
- Select “Endpoints”.
- Copy the link under “Federation metadata document”.
- Go back to the Kace SMA | SAML Settings.
Back on the Kace SMA | SAML Settings.
- Select “Get Metadata From IdP”, paste “Federation metadata document” link from Azure on the field below "IdP Metadata URL" and select “Import IdP Metadata”.
- This will generate all the info from the IdP by itself below.

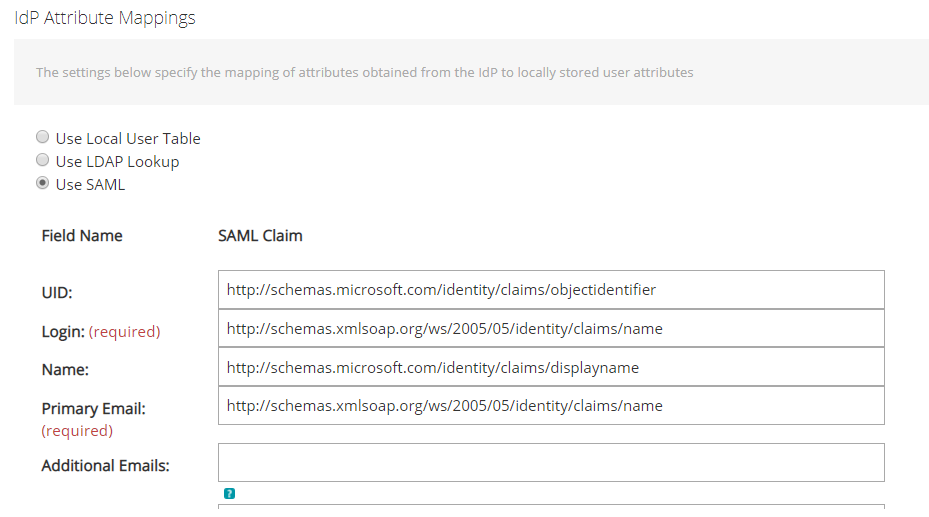
- Go to “IdP Attribute Mappings” Select “Use SAML”.
Note: On version 10.0 and 10.1 of the Kace SMA, the “Login” attribute is the primary key for any user that logs in to the Kace SMA using SAML. The login id from Azure should match the login id from LDAP authentication if we want to keep using the same users that are already on the SMA and just allow them to login using SAML too. If these values are different, a new user is going to be created on the Kace SMA when someone logs in using SAML.
- Paste the attributes as shown on the Kace SMA Admin guide.

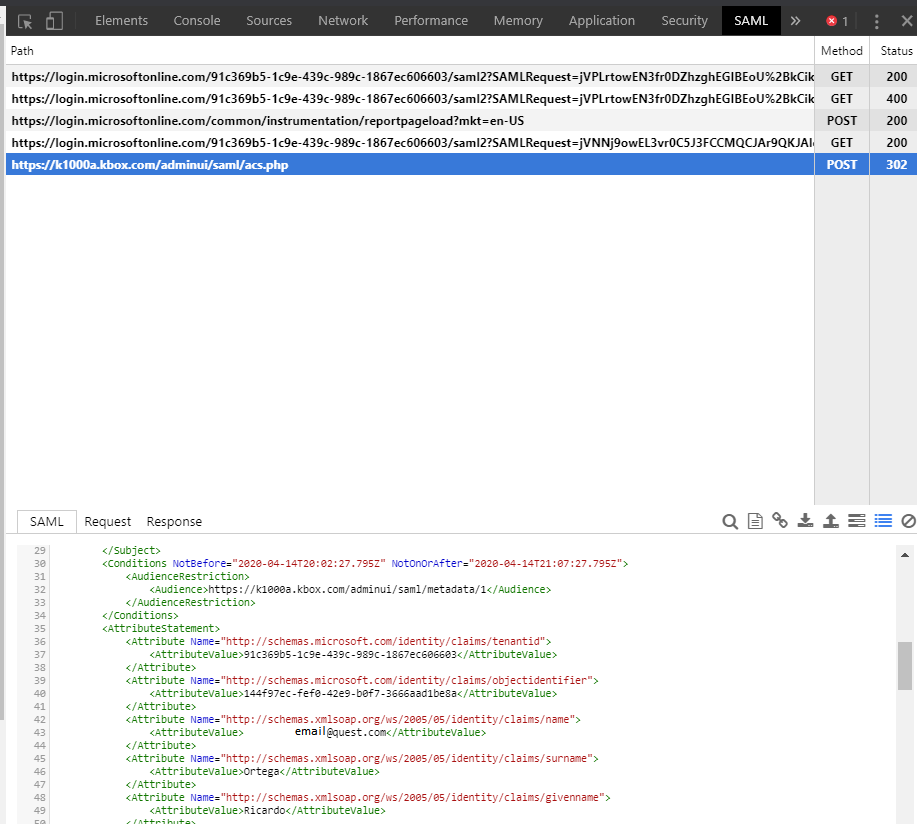
- If a different attribute is required, there is a SAML add-on available for Google Chrome (SAML Chrome Panel) to confirm what attributes are been sent from Azure to the SMA.
- Under "Role Mapping" since this is just for testing, keep everything in blank and set “Default Role for Unmatched Users” to “Administrator”. Not recommended for a production environment, (This is a basic configuration just to confirm that SAML is working properly) proper roles must be assigned according to your needs once we confirm that SAML is working.
- Save the changes. Logout from the SMA and try to login again with a Microsoft account.
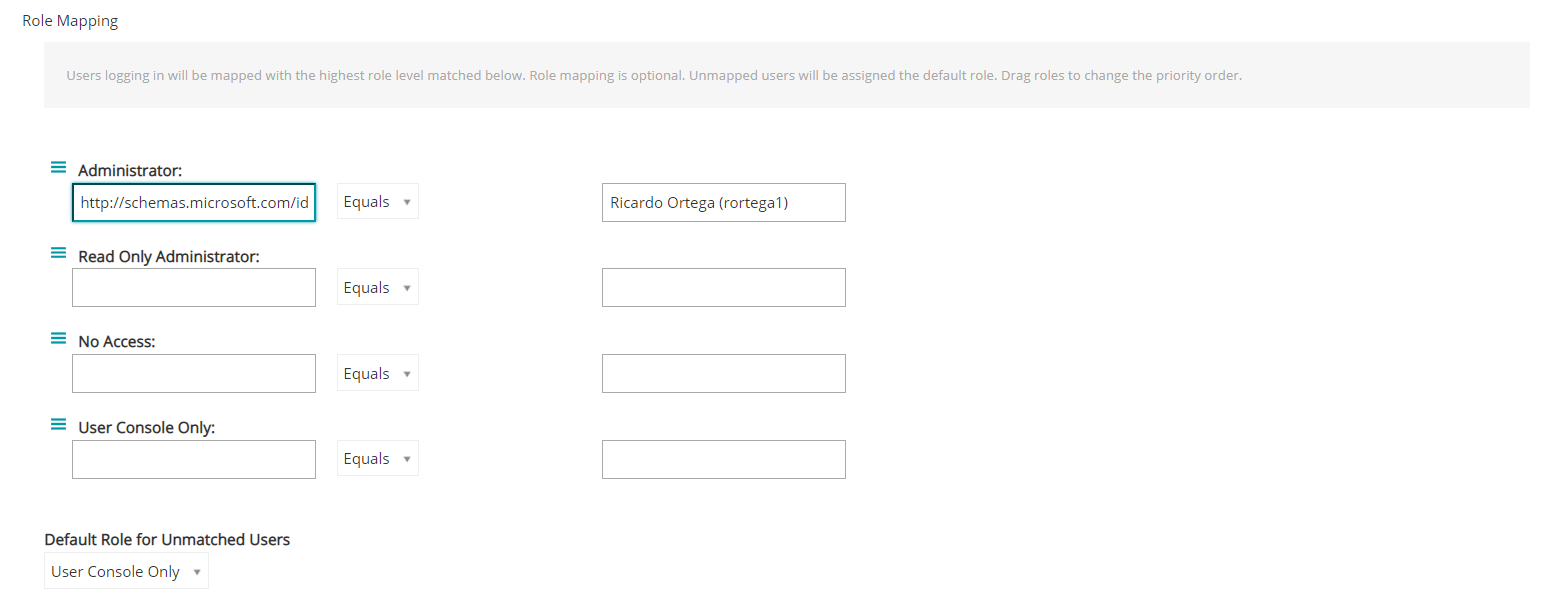
“Role Mapping” to limit access to other users to your Kace SMA.
- In your Kace SMA go to Settings | SAML Settings.
- Scroll down to “Role Mapping”.
- The SAML attributes from Azure go on the fields to the left, assign them accordingly to match to the role required. (groups, displayname, objectidenfitier, etc.)
- The fields on the right will have the value for that attribute.
Example: Using “displayname” as the attribute for “Role Mapping” to map a user as an Administrator on the Kace SMA.

- We can see what attributes are been sent to the Kace SMA from Azure using Google Chrome with "SAML Chrome Panel extension". This allows access to a new section called "SAML" on developer tools. Hit (F12) to access to Google Chrome developer tools.
- Now that we have the attributes and their values in place, save the changes and try to login again to confirm that the Role Mapping is working fine.
Troubleshooting
If you followed the instructions above, and you are still unable to login to the Kace SMA with your IdP using SAML.
- Go to Settings | SAML Settings.
- Scroll down to Local Service Provider (SP) Settings.
- Select “View Metadata”.
- Make sure that SP Entity Identifier (uri), SP Assertion Consumer Service (url) and SP SLO Endpoint (url) are "secure" (https://). You can modify the links on the SMA, just add the “s” manually and save the changes.
- Apply the same change on these links on Azure if they are not "secure" and test again. .
- All these URLs must be in lower case (On the Kace SMA and Azure). Any upper case on the link could cause issues.
- Verify what attributes are been sent from de IdP to the Kace SMA.
- You can see what attributes SAML is sending to the SMA if you are using chrome with the SAML Chrome Panel extension. This allows you to go to developer tools (F12) and get a SAML section.
SAML Chrome Panel
