
Install the Application Features
For the HSM and Search server (AMFHSM)
The installations steps described in this topic includes the the installation of the Archive Manager Post-processing feature.
Install HSM and Archive Manager Search
For the Archive Manager for Files server (AMFSERVER)
The installations steps described in this topic includes the the installation of all sub-features.
Install the Archive Manager for Files server
Install HSM and Archive Manager Search
In this topic:
·Worksheet for this installation
·Steps to install HSM and Archive Manager Search
·Steps to verify the installation
Worksheet for this installation
The following information will be required through the installation process. Sample values are provided here as a guidance.
|
Item |
Description |
Example |
|
HSM server |
The server where the HSM and Archive Manager Search will be installed. |
AMFHSM |
|
Administrator |
Windows account that is used to install the application. This is usually the enterprise administrator. |
username: democorp\domadmin password: ************** |
|
Media Folder |
Full path of the folder where the media files are extracted |
C:\Metalogix |
|
Installation folder |
Full path of the folder where the application files will be installed |
C:\Program Files (x86)\Metalogix |
|
HSM Store folder |
Full path of the folder that will contain the archived files. |
C:\HSM The local hard drive folder is used as the default media store. Use of other media storage systems are described in the Media Store Administration Guide. |
|
Store name |
Name of the media store on a hard drive. With the Advanced Installation option of the installer wizard, only a local hard drive can be setup as a media store. |
FilesStore |
|
Schema name |
Name of a schema in a hard drive media store. |
FilesSchema |
|
Database Authentication method |
Type of database authentication: Integrated Windows Authentication or SQL Authentication |
Integrated Windows Authentication |
|
UserLogin |
Username if SQL Authentication is selected |
dbadmin |
|
Password |
Database password if SQL Authentication is selected |
************** |
|
Database server |
The database server instance name where the databases for Archive Manager for Files will be installed. |
AMFDB |
Steps to install HSM and Archive Manager Search
1.Log in to the server with the credentials of the Administrator account (eg. democorp\domadmin).
2.Run the Metalogix Archive Manager Installation Package to extract the files to a local folder.
3.If the installer does not start immediately, run the MAMInstaller.exe from your install media folder. The Welcome window opens.
4.From the navigation panel on the left, click PLANNING. The Planning window opens. Review the requirements and release notes. If necessary, visit the Quest website for more information.
5.From the navigation panel on the left, click INSTALLATION. The Server Installation window opens. Read the Software Transaction Agreement. If you wish to proceed, select the I accept the terms of the license agreement check box.
6.Click Next. The Installation Mode window opens. Select the Advanced installation option.
7.Click Next. The Installation Components window opens. Select HSM and Archive Manager Search.
8.Click Next. The Database Engine selection window opens. Select either Microsoft SQL Server (for on-premise MS SQL Database Server or Azure SQL Database) or Oracle.
9.Click Next. The Checking Prerequisites window opens with database-specific prerequisites. If one or more prerequisites are missing, the Next button is deactivated. Click Install to install each prerequisite.
10.Click Next. The Superuser Account window opens. Specify the Superuser name and Password. Enter the password again in the Retype password field.
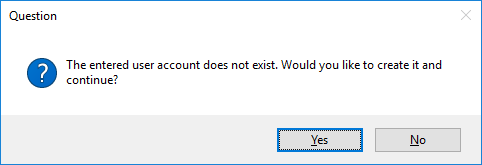
If the superuser does not exist, the wizard will request permission to create the superuser account in the Active Directory and grant the necessary permissions on this server to work with the installed features. If the superuser exists, the dialog shown below does not appear. If the permissions dialog appears, click Yes.
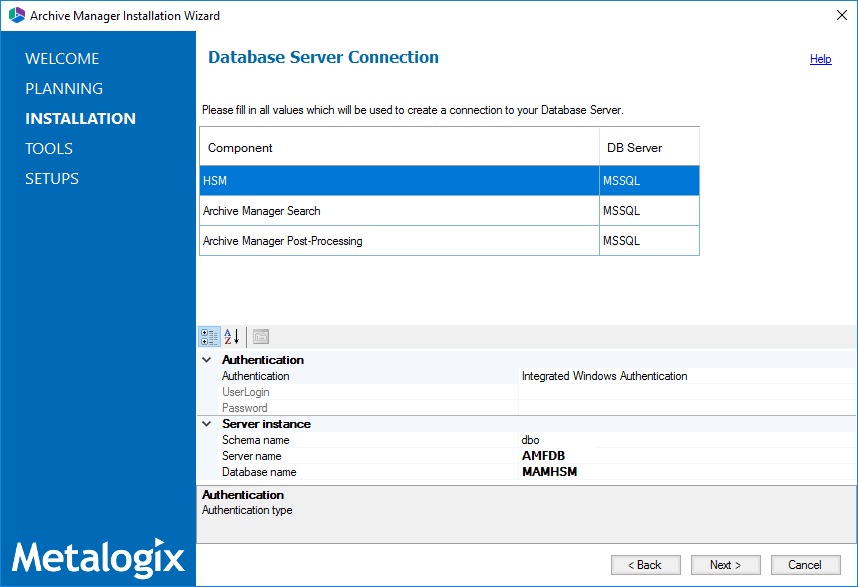
11.Click Next. The Database Server Connection window opens.
12.From the Component column, select HSM.
|
|
NOTE: If you selected Oracle as your database engine, then the the Database Server Connection window for Oracle opens. |

Enter the database parameter values described below:
For Microsoft SQL Server
a.Authentication - database authentication method.
b.UserLogin - Username if SQL Authentication or Oracle client is selected. Otherwise this field is deactivated.
c.Password - Database password if SQL Authentication or Oracle client is selected. Otherwise this field is deactivated.
d.Schema name - Username of the installer account without the domain prefix. For example dbo.
e.Server name - The name of the server where you are installing the HSM and Archive Manager Search.
f.Database name - The name of the database that will contain the HSM metadata. The default name is MAMHSM.
For Oracle
a.Oracle net name - net service name that describes the network address of the database server in your tnsnames.ora file.
b.Schema - name of the Oracle schema from your tnsnames.ora file.
c.User name - database login user name.
d.Password - password of the database user.
13.From the Component column, select Archive Manager Search and verify the database parameter values.
14.From the Component column, select Archive Manager Post-Processing and verify the database parameter values.
|
|
NOTE: When you specify the HSM database parameter values, they are carried over to the database specification for each feature in the list. While the features will be installed on the same server, the database to host the metadata for each feature can be on a different server and the database specifications section for each feature can be customized accordingly. |
15.Click Next. The Hierarchical Storage Manager Settings window opens.
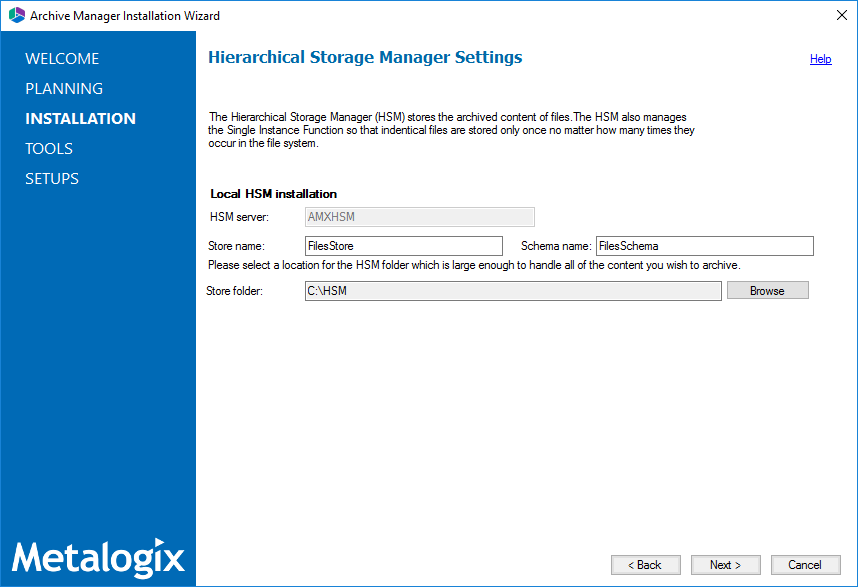
16.Specify the parameter values as described below:
a.Store name - Name of the media store. The default value is FilesStore.
b.Schema name - name of a schema in the media store. The default value is FilesSchema.
17.Click Next. The Please select the type of installation window opens.
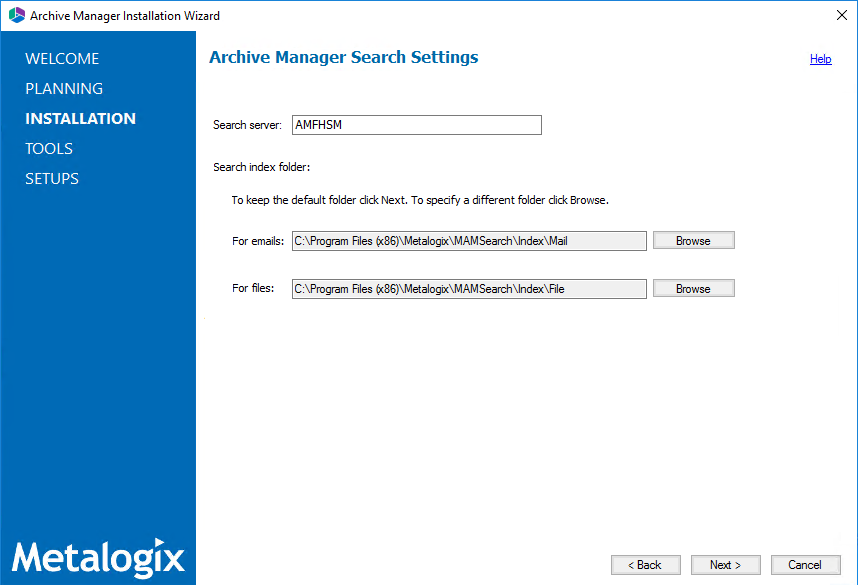
Specify the parameter values as described below:
a.Search server - name of the server where the Archive Manager Search feature is installed. For example AMFHSM.
18.Click Next. The Firewall Settings window opens. Select the Allow installation package to change the firewall settings check box. Metalogix Archive Manager for Files features will be then able to communicate through the firewall.
19.Click Next. The Summary Installation window opens. The installation summary displays settings you have specified in previous steps.
20.Click Install to start the installation.
21.The installer proceeds to install all the features. If a feature installation fails or completes with a warning, expand the row to view and address the problem.
22.Click Finish to complete the installation step.
Steps to verify the installation
1.Open Start > Metalogix > Archive Manager Configuration. The Configuration wizard opens.
2.From the navigation panel, click HSM. The Configure HSM widow opens and the Database tab is displayed by default. Verify that the values are as expected.
3.Click the Stores tab to display information about the media store. Verify that the values in the Stores and Schemas sections are as expected.
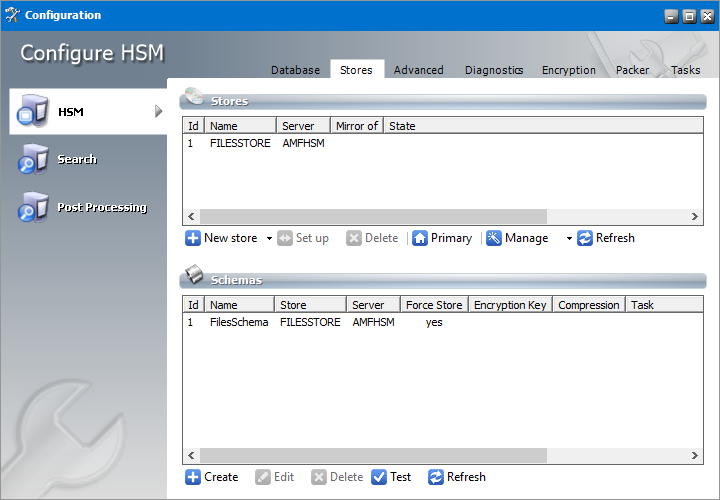
4.From the navigation panel, click Search. The Configure Search window opens. Verify that the values are as expected.
5.From the navigation panel, click Post Processing. The Configure Post Processing window opens. Verify that the values are as expected.
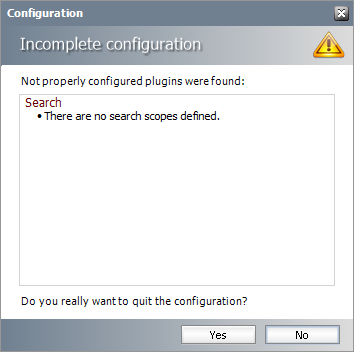
6.Close the Configuration wizard. If the Incomplete configuration dialog opens, click Yes to dismiss the window and close the wizard.
Install Archive Manager for Files
In this topic:
·Worksheet for this installation
·Steps to install Metalogix Archive Manager for Exchange
·Steps to configure and verify the Archive server
Worksheet for this installation
The following information will be required through the installation process. Sample values are provided here as a guidance.
|
Item |
Description |
Example |
|
License Key |
The license key that you received from Quest. If you don't have a license key, contact your Quest representative. |
894K5-3M448-M544E-A594A-7K8Z7 (Sample only. This key is neither an active nor an expired license key) |
|
Archive Manager for Files server |
The server where the Archive Manager for Files will be installed. |
AMFSERVER |
|
Installer account |
Windows account that is used to install the application. This is usually the enterprise administrator. |
username: democorp\domadmin password: ************** |
|
Superuser account |
Windows account that is used to run the application and run the Archive Manager for Files services. |
username: democorp\mamadmin password: ************** |
|
Media Folder |
Full path of the folder where the media files are extracted |
C:\Metalogix |
|
Installation folder |
Full path of the folder where the application files will be installed |
C:\Program Files (x86)\Metalogix |
|
Database Authentication method |
Type of database authentication: Integrated Windows Authentication or SQL Authentication |
Integrated Windows Authentication |
|
UserLogin |
Username if SQL Authentication is selected |
dbadmin |
|
Password |
Database password if SQL Authentication is selected |
************** |
|
Database server |
The database server instance name where the databases for Archive Manager for Files will be installed. |
AMFDB |
|
HSM server |
The server where HSM is installed. |
AMFHSM |
|
Search server |
The server where the Archive Manager Search is installed. |
AMFHSM |
Steps to install Metalogix Archive Manager for Exchange
1.Log in to the server with the credentials of the enterprise administrator (eg. democorp\domadmin).
2.Run the Metalogix Archive Manager Installation Package to extract the files to a local folder.
3.If the installer does not start immediately, run the MAMInstaller.exe from your install media folder. The Welcome window opens.
4.From the navigation panel on the left, click PLANNING. The Planning window opens. Review the requirements and release notes. If necessary, visit the Quest website for more information.
5.From the navigation panel on the left, click INSTALLATION. The Server Installation window opens. Read the Software Transaction Agreement. If you wish to proceed, select the I accept the terms of the license agreement check box.
6.Click Next. The Installation Mode window opens. Select the Advanced installation option
7.Click Next. The Installation Components window opens.
Select Archive Manager for Files.
|
|
NOTE: Archive Manager for Exchange could be installed on the same server. Installation of Archive Manager for Exchange is described in the Metalogix® Archive Manager for Exchange Advanced Installation Guide. ArchiveWeb is an enhancement. Installation of ArchiveWeb is described in the Metalogix® Archive Manager for Files ArchiveWeb Guide. |
8.Click Next. The Database Engine selection window opens.
Select either Microsoft SQL Server (for on-premise MS SQL Database Server or Azure SQL Database) or Oracle.
9.Click Next. The Checking Prerequisites window opens. If one or more prerequisites are missing, the Next button will appear deactivated. Click Install for each prerequisite to install the missing features. Scroll down to expose and install all the prerequisites.
10.Scroll down to the bottom of the window. Click Validate your license. The Activate License Key dialog opens.
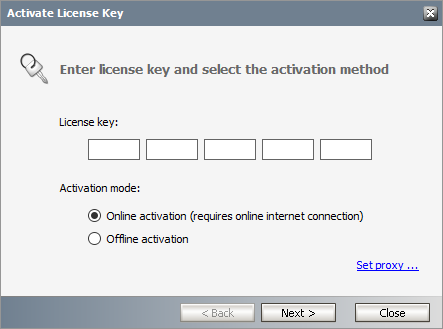
If you are connected to the internet, select Online activation or see License Activation for more options. Click Next. When your license is activated, you will see a confirmation message and the license details. Click Finish to close the Activate License Key dialog.
11. In the Checking Prerequisites window, click Next. The Superuser Account window opens.
Specify the Superuser name and Password. Enter the password again in the Retype password field.
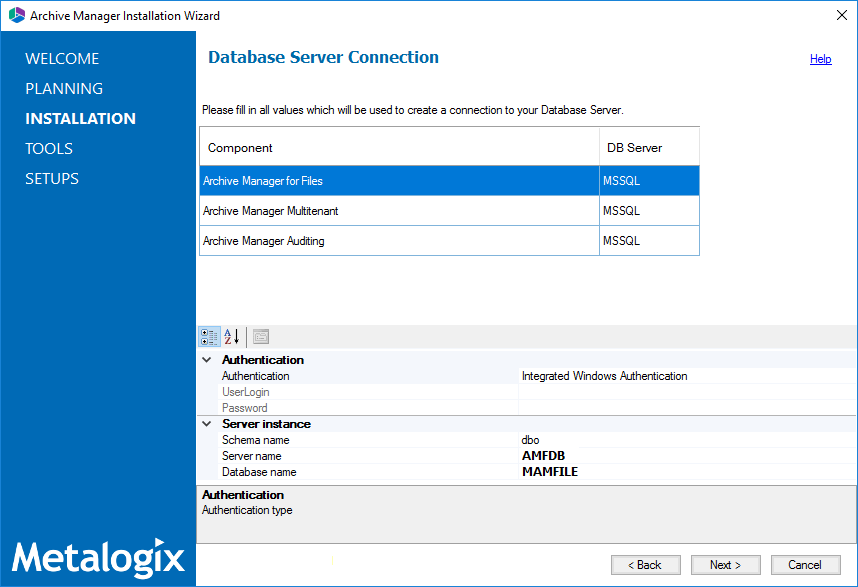
12.Click Next. The Database Server Connection window opens.
|
|
NOTE: If you selected Oracle as your database engine, then the the Database Server Connection window for Oracle opens. |
Enter the database parameter values described below:
For Microsoft SQL Server
a.Authentication - database authentication method.
b.UserLogin - Username if SQL Authentication or Oracle client is selected. Otherwise this field is deactivated.
c.Password - Database password if SQL Authentication or Oracle client is selected. Otherwise this field is deactivated.
d.Schema name - Username of the installer account without the domain prefix. For example dbo.
e.Server name - The name of the server where you are installing the HSM and Archive Manager Search.
f.Database name - The name of the database that will contain the HSM metadata. The default name is MAMHSM.
For Oracle
a.Oracle net name - net service name that describes the network address of the database server in your tnsnames.ora file.
b.Schema - name of the Oracle schema from your tnsnames.ora file.
c.User name - database login user name.
d.Password - password of the database user.
13.Click Next. The Hierarchical Storage Manager Settings window opens. In the HSM server name field enter the name of the server where the HSM application feature is installed. For example AMFHSM.
14.Click Next. The Please select the type of installation window opens. In the Search server field enter the name of the server where the Archive Manager Search feature is installed. For example AMFHSM.
15.Click Next. The Firewall Settings window opens. Select the Allow programs to communicate through Windows Firewall check box. Metalogix Archive Manager for Files features will be then able to communicate through the firewall.
16.Click Next. The Summary Installation window opens. The installation summary displays settings you have specified in previous steps.
a.Select Manage the Organizational Forms Library if your organization uses this public folder to share email templates. Otherwise, clear the check box.
b.Select the check box Start Metalogix Archive Manager for Files to open the Archive Manager for Files Administration Center (AMAC) when the installation completes.
17.Click Install to start the installation.
18.Click Finish to complete the installation step.
19.The Archive Manager for Files Administration Center (AMAC) should open automatically if the check box Start Metalogix Archive Manager for Files was checked in the Summary Installation step of the installation wizard.
Steps to configure and verify the Archive server
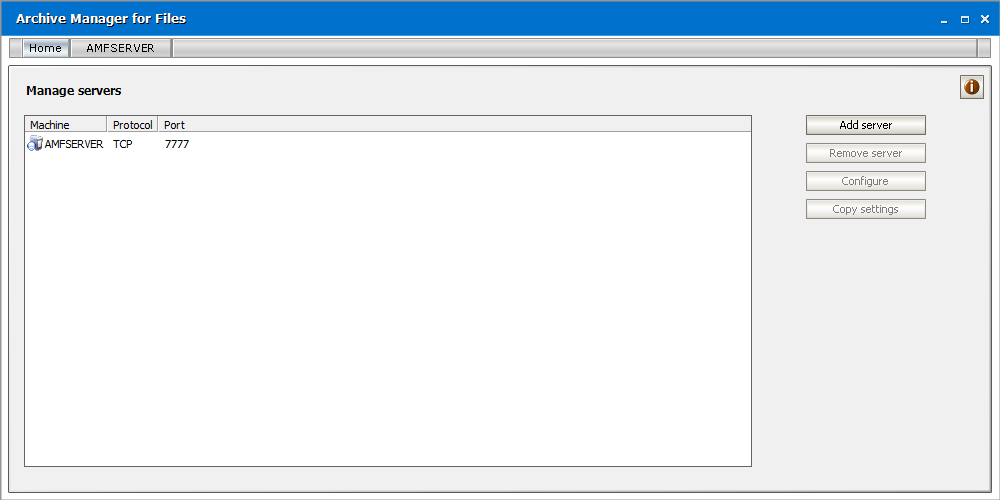
1.If the AMAC is not already open, click Start > Metalogix > Archive Manager for Files. The AMAC opens. The Home tab displays the Archive Manager for Files server where the software was installed (AMFSERVER)
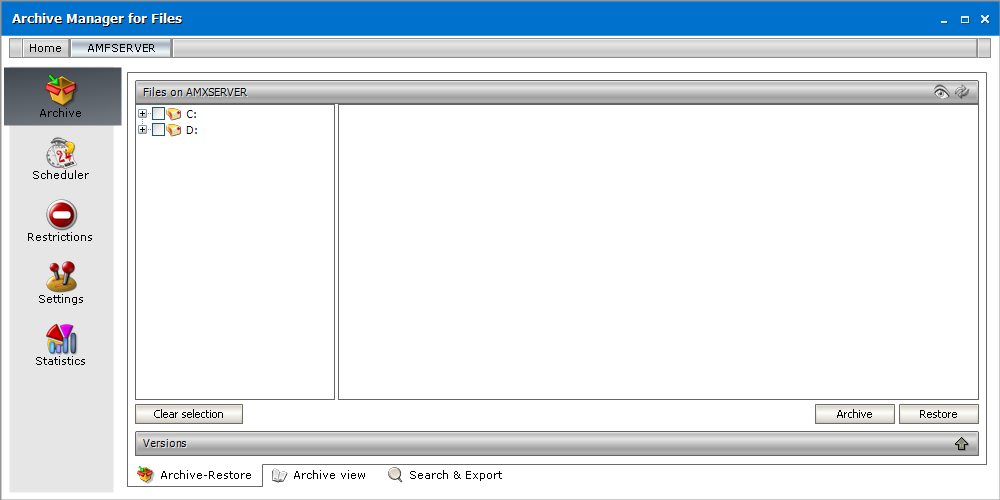
2.Click the AMFSERVER tab. The Workspace for the server opens.
Manual Installation
In this chapter:
·Prepare the Application Servers
oSteps to install the prerequisites
oSteps to download the install media
·Install the Application Features
oInstall Archive Manager for Files