
Defining a Microsoft 365 (Tenant) Target Forest
If your target forest is in a local Exchange environment (not in Microsoft 365), see Defining a Local Exchange Target Forest.
If your target forest is in a local Exchange environment (not in Microsoft 365), see Defining a Local Exchange Target Forest.
For migration to Microsoft 365, you must register an application with the Microsoft Entra admin center to support Multi-Factor Authentication for PowerShell and Graph calls from Migrator Pro for Exchange. Follow the directions from Microsoft Learn at App-only authentication for unattended scripts in Exchange Online PowerShell and Security & Compliance PowerShell.
After App registration is complete, note the following information from the Microsoft Entra admin center. You will need to enter this information later in this configuration process.
Tenant Domain Name: Your tenant’s primary domain name on the Microsoft Entra admin center. For example, sitraka.onmicrosoft.com.
Tenant ID: Your tenant’s ID, found on the Home page of the Microsoft Entra admin center.
Registered App Client ID: The Application ID created with application permissions after the application is registered in the Microsoft Entra admin center.
Registered App Client Secret: The Application Secret created after the application is registered in the Microsoft Entra admin center.
 |
Show App Client Secret: When the check box is selected, the App Client Secret value is displayed unmasked, so that you can make note of the client secret value. |
To find your Microsoft 365 tenant’s primary domain name, log in into Microsoft 365 Admin Center as an administrator. Under Settings, click Domains and find a domain which ends in .onmicrosoft.com. This is your Microsoft 365 tenant domain name, for example sitraka.onmicrosoft.com.
The process of registering an application with the Microsoft Azure portal is also described in the Microsoft Learn topic Register an application with the Microsoft identity platform.
| |
If you are connecting to Microsoft Azure China portal, you can use the same manual procedure to register an application with Azure China. You can find the Azure China portal at: https://portal.azure.cn |
Depending on the region from which you are accessing the Microsoft portal site, the user interface can differ.
To manually register the Migrator Pro for Exchange application:
Sign in to the Microsoft Entra admin center. (https://entra.microsoft.com/)
| |
IMPORTANT: You must have global admin rights to register this application. |
Search for App registrations in the search box at the top.
-OR-
In the left navigation pane, choose Applications, choose App registrations. From the Navigation bar, choose New registration.
On the Register an application page, enter the application registration information.
Name: For example, Quest Migrator Pro for Exchange
Supported account types: Select Accounts in this Organization Only (Tenant name – Single tenant)
Enter a URI: ms-appx-web://microsoft.aad.brokerplugin/ef8638f2-41c2-48ae-98b7-e87fac30b8ee
Redirect URI:
Click Register:
The newly registered application is displayed and the following application details become available.
Application (client) ID: The Application ID created after the application is registered in the Microsoft Entra admin center. You must copy this ID and use it later to complete the App Registration.
Enable additional redirect URLs
While on the Overview page, under Essentials, click the link next to “Redirect URIs”
Under Mobile and Desktop Applications, enable the checkboxes next to the 3 default URLs.
Choose Save.
Return to the Overview. Under Manage in the left side menu, choose API permissions.
Under Configured permissions choose Add a permission. The Request API permissions panel opens on the right.
Under Microsoft APIs, choose Microsoft Graph.
Select Application permissions. From the Select permissions list:
Filter on Sites, then expand Sites and select Sites.FullControl.All,
Filter on User, then Expand User, select User.Read.All and click Add permissions to grant application permission.
Choose Add permissions to grant application permission. The Request API permissions panel will close.
Verify that the new permissions appear in the Configured permissions table.
Verify that the default User.Read Delegated permission also appears. If not, follow the same process to add this Microsoft.Graph Delegated permission.
Under Configured permissions choose Add a permission. The Request API permissions panel opens on the right.
Under APIs my organization uses, choose Office 365 Exchange Online.
Select Application permissions. From the Select permissions list, select Exchange.ManageAsApp under Exchange. Choose Add permissions to grant this application permission.
Choose Grant admin consent for (your company name).
A confirmation message appears on the top. Click Yes.
Under App registrations, on the left side menu for your application, under Manage, choose Certificates & secrets.
Under Client secrets, choose New client secret.
Enter a description and specify an expiration for the client secret (for example, In 2 years).
Choose Add to generate the client secret.
Copy the new client secret value and keep it safe as you need it to complete the application registration in Migrator Pro for Exchange. You cannot retrieve a client secret after you perform another operation or leave this resource management view (blade).
Optionally, create a Certificate. Using “Certificate based authentication (CBA)” a self signed certificate can be created and uploaded to secure the connection. Please refer to this Microsoft Learn document for additional information.
On the left side menu for your application, under Manage, choose API permissions.
Under App registrations, on the left side menu for your application, under Manage, choose Authentication.
Under Advanced settings, click Yes next to Treat application as a public client and click Save.
In the Microsoft Entra admin center’s left side pane, select Roles & admins. On the Roles and administrators | All roles page,
Enter Exchange Administrator in the search box. Click anywhere (except the check box) in the resulting Exchange Administrator row to select it. The Exchange Administrator | Assignments page opens.
Choose Add Assignments. Once the page fully loads, a clickable link (“x Member(s) selected”) appears under Select Members. Select this link.
A Select a member page opens. In the Search box, enter either the name you chose for your Migrator Pro for Exchange application or the Application (client) ID. Select the corresponding row on the table, then choose Select.
Select Next. Enter a justification, such as “Quest Migrator Pro for Exchange requires this permission.” and choose Assign.
Close the Exchange Administrator | Assignments page.
Repeat this process for the License Administrator role.
Your Migrator Pro for Exchange app registration is complete.
Continuing this procedure from the Office 365 Migration screen, where you clicked Yes to begin defining an Microsoft 365 Tenant forest:

Enter the domain name of the tenant target forest. Use your tenant’s primary domain name as shown on the Microsoft Entra admin center, for example, sitraka.onmicrosoft.com. Do not use a vanity or brand top-level domain.
Click Next.

These Exchange Online settings are required for Migrator Pro for Exchange program access to Microsoft 365.
Enter the User Name and Password for the account Migrator Pro for Exchange should use to access Microsoft 365.
Specify a Public Folders Migration Mode from the drop-down list. PowerShell and MAPI are the two available methods. If the Migration Mode is not specified here, Migrator Pro for Exchange will use the MAPI migration method by default.
For Msol PowerShell Host Name, enter the Office 365 endpoint URL. The default Msol Host Name value is outlook.office365.com. Refer to this Microsoft Learn link for hostname information regarding Microsoft 365 GCC/DOD, 21Vianet or Office 365 Germany dedicated tenants.
When you have entered the requested information, click Next.

Enter the information you recorded during the Entra ID App Registration step.
Enter the Client ID, Tenant ID, and either the Certificate Thumbprint or the Client Secret from your App Registration. (If you like, you may enter both a Thumbprint and Secret.)

The Exchange (MAPI) settings are required if you selected MAPI public folder migration.
Enter the User Name, Password , Email Address, and the Outlook Profile for the account that Migrator Pro for Exchange should use for program calls to Exchange (MAPI).
When you have entered the requested information, click Next.
|
|
Caution: Unlike older versions of Migrator Pro for Exchange, you must use an Outlook Profile for MAPI public folder migration. |

The Summary screen shows the settings and choices you have entered to configure your tenant target forest. Review the settings to make sure they are correct for the designated tenant forest. (If you want to change anything you can click Previous to return to an earlier screen.)
When these Summary screen values appear as they should, click Finish to save the forest configuration information. Key properties and connectivity to the Microsoft 365 tenant will be validated before the configuration is saved, and any errors will be displayed.
When the forest configuration is saved, it appears on the Configuration Settings screen of the Migrator Pro for Exchange Admin Console.
This section applies if your target forest is in a local Exchange environment (not in Microsoft 365). A local Exchange target forest is defined when migrating Intra-org (no other forests would be needed), or when migrating Inter-org (a source forest would be defined).

Continuing this procedure from the Office 365 Migration screen, where you clicked No (as shown here) to begin defining a target forest in your local Exchange environment.
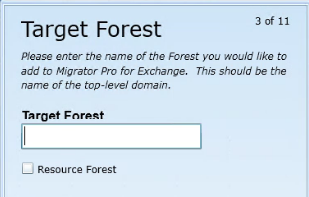
The first screen in this sequence to define a local target forest is this Target Forest screen. Enter the name of the Target Forest (top-level domain).
If the target forest you specify is configured as an Exchange Resource Forest environment, select the Resource Forest check box to create a “Linked User” relationship between the source and target account. This option applies only for an inter-org migration where the target Exchange environment is located in a resource forest. For more information about resource forests, see Microsoft's article http://technet.microsoft.com/en-us/library/aa998031.aspx and other Microsoft resources.
Click Next.

In this Active Directory screen: Enter the User Name (in Domain\Username format) and Password of the account to use for Active Directory calls.
You can either automatically select a global catalog by selecting the Auto-Detect a Global Catalog for this Forest checkbox, or manually specify one in the Global Catalog field.
Click Next.

In this PowerShell screen: Enter the User Name and Password of the account to use for PowerShell calls. By default, the program sets these values to the User Name and Password specified on the previous Active Directory screen, but you can change them here.
You can either automatically select the PowerShell hosts by keeping the Auto-detect the PowerShell Hosts checkbox selected, or deselect it to manually specify the Exchange 2010 Host, Exchange 2013 Host, Exchange 2016 Host, and Exchange 2019 Host. If specifying the hosts manually, click the Verify PowerShell Host(s) button to validate connectivity to the PowerShell host servers.
Click Next.
|
|
NOTE: When specifying a PowerShell Host manually, you must use a Fully Qualified Domain Name (FQDN). If you use an IP address, it will generate an SSL certificate error. |

In this Exchange (MAPI) screen: Enter the User Name, Password and Email Address, and specify the Outlook Profile of the account to use for Exchange (MAPI) calls.
Click Next.
|
|
NOTE: If Outlook is installed on the Migrator Pro for Exchange Server, an Outlook Profile should be used. |

In this SMTP screen: Enter the User Principal Name, Password, Reply Email Address (e.g., user@domain.com), SMTP Server, and SMTP Port of the account to use for SMTP calls.
Click Next.
|
|
NOTE: Specifying SMTP information is not required at the time of configuration. You must specify the User Principal Name (user@domain.com) and Password for the account that will be used to send email communications to end users. By default, the Exchange 2010/2013 Simple Mail Transfer Protocol (SMTP) receives connector rejects mail from any “well known accounts” such as Administrator. We recommend you designate a different account for this purpose. Make sure the service account being used has access to the specified SMTP servers. |

On this Staged Migrations screen: Specify the Exchange 2010 or Exchange 2013 staging server/database that Migrator Pro for Exchange should use when migrating from Exchange 2003 to Exchange 2013, or from Exchange 2007 to Exchange 2016.
Click Next.
|
|
NOTE: Staged migrations are no longer enabled by default. This feature will be removed in a future update of Migrator Pro for Exchange. |

On this Mailboxes screen: Select the sites, servers, and databases to search for mailboxes. All content is selected by default. Right-click in the list area to select options to expand/collapse the list or select/deselect all items.
Click Next.
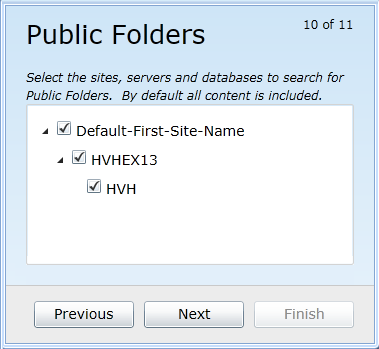
In this Public Folders screen: Select the sites, servers, and databases to search for Public Folders. All content is selected by default. Right-click in the list area to select options to expand/collapse the list or select/deselect all items.
Click Next.

The Summary screen shows the settings and choices you have entered to configure your local target forest. Review the settings to make sure they are correct for the designated forest. (If you want to change anything you can click Previous to return to an earlier screen.)
When these Summary screen values appear as they should, click Finish to save the forest configuration information.
| |
NOTE: In a non-English locale, the date-time format of the operating system must be set to mmddyyyy (rather than ddmmyyyy) for Migrator Pro for Exchange to rationalize Office 365 mailboxes |
When the forest configuration is saved, it appears on the Configuration Settings screen of the Migrator Pro for Exchange Admin Console.
