Use this section to troubleshoot publishing errors.
To troubleshoot issues when publishing an Automation script, see Troubleshoot Scripts on Intelligence Central.
| Issue or Error Message | Solution or Workaround |
|---|---|
| Google Analytics or Salesforce - expired access/refresh token |
Error Msg: "Invalid data source definition: 400 Bad Request: Invalid_grant (expired access/refresh token)" This error may occur if the connection's authentication token is expired. Solution: In the Publishing dialog, click the Authentication link, then click Reauthorize to re-enter your credentials and grant access to Toad. |
|
"Data source name not found" error msg when using ODBC connectivity |
Error Msg: "Invalid data source definition: Data source name not found and no default driver specified" Solution 1: TIC uses only System DSNs. Make sure that you have specified a System DSN and not a User DSN. Solution 2: The DSN on the TIC server must match the DSN you are using. Ensure that the DSN installed on the TIC server is the same as the one you are using to publish. Note: This only applies when the connection you are publishing from uses ODBC connectivity. |
| missing MySQL ODBC driver on TIC |
You are missing the MySQL ODBC driver. You can download the driver from the following site: http://dev.mysql.com/downloads. Use MySQL ODBC driver versions 3.51 or 5.0. |
| missing Teradata ODBC driver on TIC |
You are missing the Teradata ODBC driver. You can download the driver from the following site: http://www.teradata.com. In addition to the Teradata ODBC driver, you must also install the Teradata .Net Provider. |
| missing driver on TIC |
The Intelligence Central server you are publishing to is missing the matching ODBC driver. Install the required ODBC driver listed in the error message, or contact the administrator responsible for the Intelligence Central server. You might also want to specify an ODBC driver to use when publishing from this database type to this particular TIC server. To specify an ODBC driver
Note: Specify an ODBC driver to use only if you are having difficulty publishing from that particular database to the TIC instance. |
| General problems publishing from an Oracle connection |
General issue: The Microsoft-supplied ODBC driver for Oracle is included in a standard Windows install and has limited functionality. To insure that the TIC server is using the Oracle ODBC driver instead of the Microsoft-supplied driver, you can specify a driver to use when publishing to that TIC instance. Suggestion: Specify driver to use when publishing.
|
| ORA: 1242 |
General issue: The TIC TNS names file may have a data service name that does not match the name in the TNS names file on the publishing workstation. Suggestion: Modify one of the files to ensure the names match. |
| "The ODBC driver does not support the data type." |
The Oracle ODBC driver does not support subtracting from TIMESTAMP. This is a known Oracle ODBC issue. If attempting to publish SQL such as the following: Select Date_Col, Timestamp_Col - sysdate from Table remove "Timestamp_Col - sysdate." |
| "Out of sort memory" error |
Error Msg: "Out of sort memory, consider increasing server sort buffer size." This error might be encountered when attempting to publish a query or when querying a published snapshot/view containing a GROUP BY or ORDER BY clause. Solution 1: Add “ORDER BY NULL” to the end of the query. Solution 2: Increase the value of the sort_buffer_size variable by adding "sort_buffer_size=2M" to the Intelligence Central configuration file found here: C:\Program Files\Quest Software\Toad Intelligence Central\datahub.cnf |
| Columns with the same name |
Error Msg: "Duplicate column name '<column name>'. Add a differentiating column alias." Your query includes two columns with the same name and the columns do not have unique aliases. Solution: Add unique alias names for the columns. |
| "Incorrect key file" error msg |
Error Msg: "Incorrect key file for table 'C:\WINDOWS\TEMP\<myi file name>'; try to repair it." Solution: The server is low on disk space. Increase available disk space. |
| Specified key was too long |
Error Msg: "Specified key was too long; max key length is 1000 bytes" This error may occur if you selected columns to index on the Indexing Options tab (applies to snapshots and datasets only). There is a limitation in the TIC database: The maximum index size (key length) is 1000 bytes. |
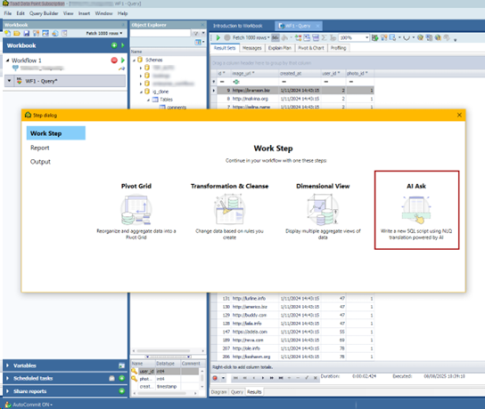
AI Ask is available to users with a Toad Data Point Pro AI Subscription license. This feature streamlines data querying within Toad Workbook by allowing users to submit questions in natural language, automatically generating the corresponding SQL and displaying the results.
AI Ask is accessible as a Work Step only after Query step within Toad Workbook.
Overview
With AI Ask, users can type questions about their data in plain English. The tool automatically interprets these questions, generates the relevant SQL, and returns the results, making data analysis more intuitive—even for users with limited SQL experience.

Note:For instructions on enabling this feature, refer to the Knowledge Base.
Use the Data Report Designer to design reports visually. Stored in .tdr files, data reports are "live" reports that can be refreshed dynamically. What makes them dynamic is that they contain the underlying queries for report data sets. Each time a data report is opened, its query runs and the latest data is retrieved. The dynamic nature of data reports makes them ideal for distribution to users who need to see changes to data without waiting for scheduled updates or for new reports to be distributed.
The process of creating a data report has the following steps:
Note: This procedure does not cover all of the possible steps of creating a data report. It only covers the steps required to create a report for the scenario.
|
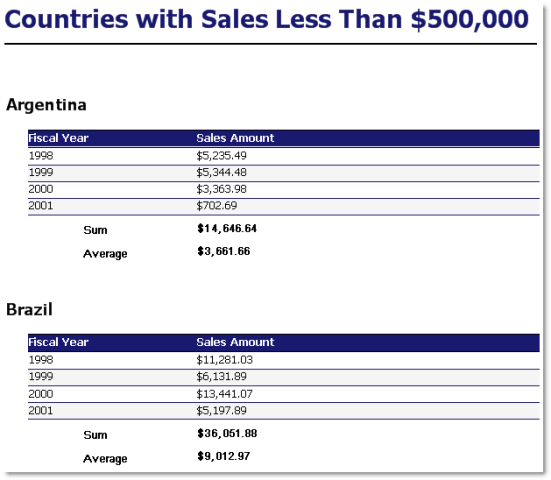
Scenario Your company wants to improve its global sales, starting with countries where it has a customer base but averages low sales. You created a query that displays countries with less than $500,000 in sales per fiscal year, but now you need to create a report to help represent and evaluate the results. The data should be grouped per country and show the total and average sales for each country. In addition, you want the report to look similar to the rest of the company's documents, which use specific colors and fonts. Note: This scenario uses the data generated in Visually Build a Query. |
The Toad Data Report wizard creates an initial layout of the report based on options you select, including what columns to include, whether to group data, and the basic style.
To run the wizard
 to include all columns in the report and click Next.
Select COUNTRY_NAME and click 
Tip: You can create a secondary group by selecting another column and clicking
Select Outline 1 and click Next.
Tip: The Outline and Align Left options are good choices if you grouped the data.
You can move, rename, and update the category of a field.
To update the fields
Click 
 by the Format String field.
|
Field |
Band |
Name |
|---|---|---|
| FISCAL YEAR | groupHeaderBand2 | Fiscal Year |
| SUM(SALES.AMOUNT_SOLD) | groupHeaderBand2 | Sales Amount |
| Avg | groupFooterBand1 | Average |
Right-click the COUNTRY NAME field (not the COUNTRY_NAME field on the right) in groupHeaderBand1 and select Delete.
Note: The COUNTRY NAME field is a label that precedes the COUNTRY_NAME field value. If you preview the report before you delete the COUNTRY NAME field, the country displays as 'COUNTRY NAME Argentina'. It is clear that Argentina is the country name, so this field is redundant.
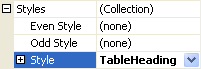
The Data Report Designer uses styles to format different objects and kinds of data. Once you define a style, you can apply it to similar fields to create a consistent and easy-to-update design.
To create, update, and apply styles
. The Styles Editor window displays.
Select the Foreground Color field, and then select MidnightBlue in the Web tab.
Note: All colors in this scenario are from the Web tab.
. The Font window displays.
 four times in the Styles Editor window to create four new styles.
Set the following properties for the new styles:
|
First Style |
Properties |
|
Name |
OddRow |
|
Background Color |
WhiteSmoke |
|
Border Color |
MidnightBlue |
|
Borders |
Bottom |
|
Font |
Tahoma, 10pt |
|
Second Style |
Properties |
|
Name |
EvenRow |
|
Border Color |
MidnightBlue |
|
Borders |
Bottom |
|
Font |
Tahoma, 10pt |
|
Third Style |
Properties |
|
Name |
TableHeading |
|
Background Color |
MidnightBlue |
|
Font |
Tahoma, 10pt, bold |
|
Foreground Color |
White |
|
Fourth Style |
Properties |
|
Name |
CountryName |
|
Font |
Tahoma, 14pt, bold |
|
Foreground Color |
Black |
Select TableHeading in the Style field (under Styles) for the Fiscal Year and Sales Amount fields in groupHeaderBand2.
|
Field |
Property |
|---|---|
| Even Style | EvenRow |
| Odd Style | OddRow |
Bands group the information layout in the report and you can add controls to include additional tables, images, fields, and other items in the report.
Select the groupHeaderBand1 and move it down half an inch.
Tip: It is helpful to expand a band before adding controls to give you plenty of room in which to work.
 Click here to see the Data Report Designer layout.
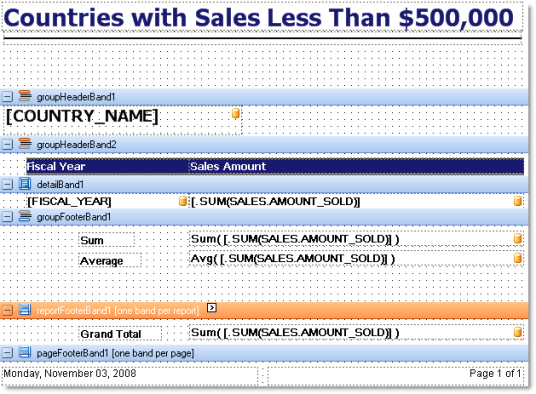
Click here to see the report preview.