Review this topic to learn about open database connections in Toad.
For information about switching the current connection in Toad, see Switching Connections in Toad.
In Toad, an open connection in the Connection/Navigation Manager represents one or more actual connections to the database
Toad also creates a separate database connection for each Editor (the first time you execute a statement) and for each Data tab in the Database Explorer (the first time you select the tab and query data).
The connection associated with the window (or tab) remains open until you close the window. If a window has an associated connection, but a statement is not currently executing, the connection is in an inactive state.
To view information for an open connection
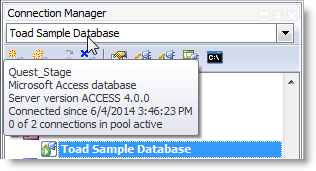
To view the number of actual database connections that exist for a Toad connection, including the number of active connections, place the cursor over the connection in the Connection/Navigation Manager pane or in the connection drop-down list.

To use the Background Processes pane
To cancel statement execution, use the Background Processes pane.
Note: It is recommended that you cancel only your own processes, because terminating Toad activities could cause unexpected behavior.
You can instruct Toad to share an open connection among windows. In this way, the Editor windows and Data tabs can share the same connection when the connection is inactive.
To share a database connection among windows in Toad
Clear the checkbox for the Use individual connection for each open editor option.
When this option is not selected, Toad attempts to use a single connection for any new windows or query execution. For example, if you share a database connection, you can execute a query in the Editor, execute another query in a new Editor, and then select the Data tab from the same connection.
If the single connection is in use when Toad attempts to execute it, the following occurs:
Note: Although you can share a database connection, any commits apply to the selected window only.
Although this connection uses the ODBC driver, it is easier and faster to connect using this method. See Troubleshoot Access Issues for more information about troubleshooting connection issues.
Notes:
The Toad Sample Database and established connection that comes pre-loaded in Toad Data Point is an Access database. The connection information for this database is:
Database file = C:\Program Files\Quest Software\ToadInstallDirectory\Plugins\Odbc\Sample Database\Quest_Stage.mdb
Additional sample files for this database are available in the Project Manager.
To create an Access connection
Click 
Select Access from the Group list box.
Review the following for additional information:
|
Database file |
Select the database to use when connecting. |
|
MDW file |
Select the MDW file that is linked to the database. |
|
Password |
Enter the password to use when connecting. Tip: After connecting, you can set a master password to further secure your connection in Tools | Options| Environment | Security. |
| Category |
Select or create a category if you want to color code Editor tabs for a specific connection. This can help differentiate between development and production databases. You can also set an option to color code the Object Explorer pane and object editor windows (Create, Alter, Drop, etc.).
|
Click Connect to connect immediately while saving the connection information. Optionally, click Save to save the connection without connecting.
| Consideration/Limitation | Description |
|---|---|
|
Microsoft Access 2016 64-bit Office 365 64-bit |
To successfully create a connection to an Access database using Microsoft Access 2016 64-bit, the Microsoft Access Database Engine is required and might not have been included in the Access installation. In addition, the architecture (bitness) of the engine must match the bitness of Toad. If using 64-bit Toad, the 64-bit version of Microsoft Access Database Engine is required. If using 32-bit Toad, the 32-bit version of Microsoft Access Database Engine is required.
|
Tip: Connections are stored in the connections.xml file and can be found by clicking the Application Data Directory link in Help | About.

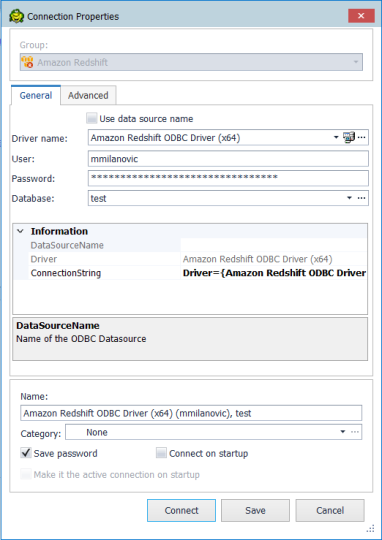
Toad Data Point allows you to create a connection to an Amazon Redshift database using ODBC connectivity.
Note: You must have Amazon Redshift ODBC driver 1.3.1.1000 (or later) installed before a native connection is created.
To install the Amazon Redshift ODBC Driver
Download and install the ODBC Driver from the Amazon Redshift Web site.
Click 
In the Create New Connection window configure the connection parameters.
| General Tab | Description |
|
Driver name |
Uncheck the Use data source name checkbox and select Amazon Redshift (x64) Driver or Amazon Redshift ODBC Driver (x64) depending on the installed version. |
|
User |
Enter the username for your Amazon Redshift account. |
|
Password |
Enter the password for your Amazon Redshift account. |
|
Database |
Enter the name of the Database you would like to connect to or choose from the drop-down list. |
|
ConnectionString |
Add the connection string for the Redshift cluster in the ConnectionString field. Add the password string to the PWD= setting in the ODBC URL and paste the ODBC URL to the ConnectionString field: Driver={Amazon Redshift ODBC Driver (x64)};Server=<server>;Database=<database>;UID=<user>;PWD=<password>;Port=5439 |
Click Connect to save the connection and immediately connect to the database or click Save to save the connection without connecting to the database.

Tip: Connections are stored in the connections.xml file and can be found by clicking the Application Data Directory link in Help | About.