
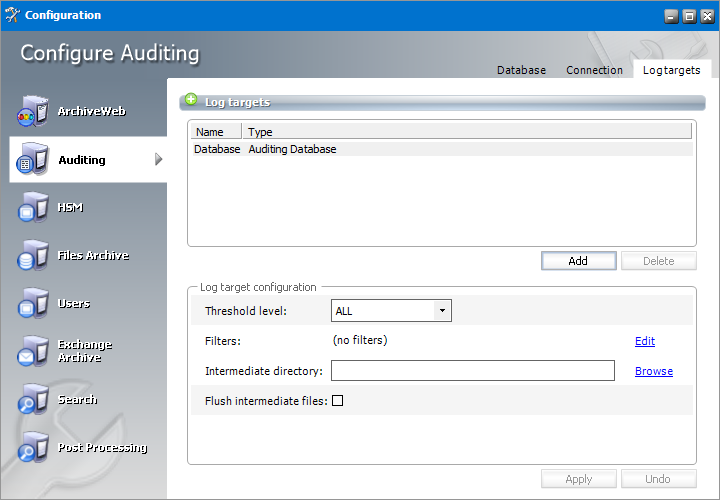
Configure Log targets
In the Log targets tab you can configure multiple types of log targets. The default and mandatory log target is the log database. Other targets are optional, depending on administrators needs. Multiple log targets can be defined and their usage can be conditional. Logging events of different severity can be logged to different targets or entries containing a specific string can be omitted.
Steps to add a new log target
1.Click Add. The Add log target window opens.
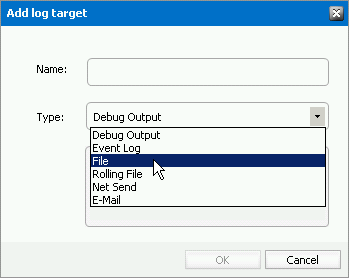
Enter the information as described below:
a.Name - name of the log target.
b.Type - type of the log target. Choose from one of the following options:
·Debug Output - writes log entries into the debug output; it can be used only for debugging purposes, since it does not keep the entries
·Event log - writes log entries into the system event log; it is recommended to use this target for critical errors and events only
·File - writes log entries into the specified file
·Rolling File - Writes log entries into files and rolls log files based on size or date or both
·Net Send - sends log entries as network messages; it can be used for notification purposes in case of critical errors
·Email - sends log entries as e-mails; it can be used for notification purposes in case of critical errors
2.Click OK to add the new log target to the Log targets list view.
Steps to configure log targets
The target selected in the Log targets list can be configured in the Log target configuration section. You can configure it in the Log target configuration section. For each log target you can define:
·Threshold level
·Filters
·Layout (not applicable for database)
Additionally, every log target has its specific properties as described further.
Threshold Level
Threshold level specifies the threshold level for the selected log target. All logging events with lower level than the threshold level are ignored. If Off is selected, nothing will be logged for the selected target.
Filters
User can define a set of filters for each logging target. Filters form a chain that the logging event has to pass through. Any filter along the way can accept the event and stop processing, deny the event and stop processing, or allow the event on to the next filter. If the event gets to the end of the filter chain without being denied it is implicitly accepted and will be logged.
The available filter types are:
·StringMatchFilter matches a string (or regular expression) in the rendered message
·PropertyMatchFilter matches a string (or regular expression) in the value for a specific event property
·DenyAllFilter this filter drops all logging events
To define a filter for a log target:
1.Select the log target in the Log targets list view.
2.In the Filters section click Edit.
3.In the Edit filters dialog double-click the filter type.
4.In the filters options specify filter settings.
5.Click Apply.
Example:
If you want to allow through only messages that have a specific substring (e.g. 'database') then you need to specify the following filters:
·StringMatchFilter, String to match: database, Accept on match: true
·DenyAllFilter
If you do not want to log events having substring debug, you need to specify the following filter:
·StringMatchFilter, String to match: debug, Accept on match: false
Layout
User can define the layout of a log entry (line) for log targets, except of the Auditing Database. The layout is the sequence of property values separated by arbitrary characters. The available properties are:
·Product product generating the logging event
·Category category of the logging event
·Level level of the logging event
·Message application supplied message associated with the logging event
·Method method name where the logging request was issued
·Data data associated with the logging event
·Computer name of the computer where the logging request was issued
·User name of the user generating the logging request
·Date date of the logging event
·Newline platform dependent line separator character or characters
Specific Log target Properties
|
Auditing database | |
|---|---|
|
Intermediate directory |
For minimizing the logging overhead, this log target operates in asynchronous mode, i.e. the entries are not written into the database directly, but they are held in an internal list and continually written into the database. In case of crash or other unpredictable situations the entries from the memory are lost, so there is an option to persist them to a file. By specifying the intermediate directory the intermediate file creation is activated. For each logging event a file is created, holding the event data. These files are deleted after the log entry was written to the database. |
|
Flush intermediate files |
Determines whether to flush the intermediate files immediately. If this option is set to false, then the underlying stream can defer persisting the entry to a later time, so it is likely that not the whole log entry will be written to the disk when the application exits, thus becoming the entry unusable and lost. |
|
Event log | |
|---|---|
|
Application name |
Specifies the Application name. This appears in the event logs when logging. |
|
Log name |
Specifies the name of the log where log entries will be stored. This is the name of the log as it appears in the Event Viewer tree. The default value is to log into the Application log, this is where most applications write their events. However if you need a separate log for your application (or applications) then you should specify the log name. |
|
Level mapping |
Specifies the mapping between a logging level (severity) and an event log entry type. |
|
File | |
|---|---|
|
Log file |
Specifies the path to the file that logging will be written to. |
|
File creation |
Indicates whether the file should be appended to or overwritten. |
|
Locking model |
Specifies the locking model used to handle locking of the file. When minimal locking is set, the system locks the file only for the minimal amount of time when logging each message. The exclusive locking locks the file from the start of logging to the end. |
|
Immediate flush |
Specifies whether to flush the log file immediately. Avoiding the flush operation at the end of each log writing results in a performance gain of 10 to 20 percent. However, there is safety trade-off involved in skipping flushing. Indeed, when flushing is skipped, then it is likely that the last few log events will not be recorded on disk when the application exits. |
|
Rolling File | |
|---|---|
|
Log file |
Specifies the path to the file that logging will be written to. |
|
Backup file count |
Specifies the maximum number of backup files that are kept before the oldest is erased |
|
Rolling style |
Specifies the rolling style; the possible values are the following: ·Once - roll files once per program run ·Size - roll files based only on the size of the file ·Date - roll files based only on the date ·Composite - roll files based on both the size and date of the file |
|
Roll log files by size |
Specifies the maximum size in bytes that the output file is allowed to reach before being rolled over to backup files. |
|
Roll log files every |
Specifies the interval when a log file is being rolled over to backup files. |
|
File creation |
Indicates whether the file should be appended to or overwritten. |
|
Locking model |
Specifies the locking model used to handle locking of the file. When minimal locking is set, the system locks the file only for the minimal amount of time when logging each message. The exclusive locking locks the file from the start of logging to the end. |
|
Immediate flush |
Specifies whether to flush the log file immediately. Avoiding the flush operation at the end of each log writing results in a performance gain of 10 to 20 percent. However, there is safety trade-off involved in skipping flushing. Indeed, when flushing is skipped, then it is likely that the last few log events will not be recorded on disk when the application exits. |
|
Net Send | |
|---|---|
|
Server |
Specifies the DNS or NetBIOS name of the remote server on which the Net Send to run. |
|
Recipient |
Specifies the message alias to which the message should be sent. |
|
| |
|---|---|
|
To |
Specifies the e-mail address of the message recipient by semicolon-separated list of e-mail addresses. |
|
From |
Specifies the e-mail address of the sender. |
|
Subject |
Specifies the subject line of the e-mail message. |
|
Smtp host |
Specifies the name of the SMTP relay mail server to use to send the e-mail messages. |
|
Buffer size |
Specifies the size of the cyclic buffer used to hold the logging events. When the specified buffer size is reached, oldest events are deleted as new events are added to the buffer. The buffer is used to keep the logging context; when a message is sent, the whole content of the buffer is included. If the buffer size is set to a value less than or equal to 1 then no buffering will occur and the messages are sent immediately. |
Activate auditing
1.Open the Settings tab.
2.Check Audit log check box.
3.In the Auditing Server field enter the name of the computer where Auditing is installed.
4.Specify a Port number or leave the default.

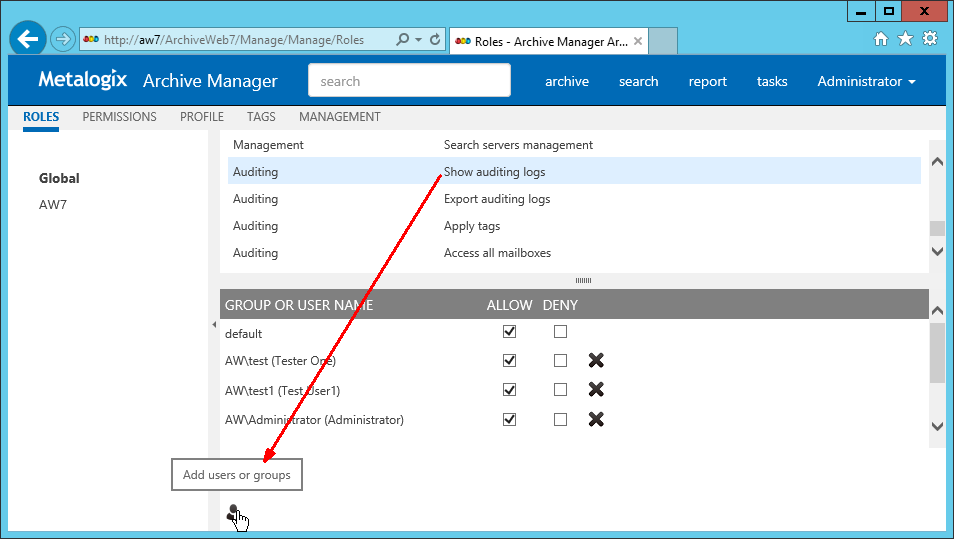
Add audit users
As the default, only the super-user has auditing rights, i.e. only the super-user can browse the auditing logs in ArchiveWeb. If you want other users to have access to auditing logs in ArchiveWeb, specific auditing roles must be granted.
1.Log on to ArchiveWeb with the super-user credentials.
2.Click the logged on user name in the right upper corner. From the dropdown menu select Manage settings. Then click Roles on the grey sub-bar.

3.In the left pane select the server for which the roles should apply. Or select Global option. ArchiveWeb roles appear in the main pane. List of roles is split into sections Exchange Archive features are listed under Exchange roles, search features under Search roles etc. The Auditing roles are listed at the end.
4.Select the Show auditing logs role. All users with this role are displayed under the list. In case the desired user is not visible, click the Add users and groups icon (
Configure auditing service
Finally you need to make sure that the Auditing service is correctly configured. As default it can be found under
<Common Files>\PAM\Services\PAMAuditing\PAMAuditingSv.exe.config
Ensure that the service is using secure channels:
<channels>
<channel ref="tcp" name="PamAuditing" port="7783" secure="true" />
</channels>