
Restoring lost items
Users may have deleted the shortcut of an archived item simply by pressing the SHIFT key along with the Delete key on the keyboard or by clicking on the Delete icon on the Outlook toolbar and not by clicking on the Delete archived messages icon and selecting Delete from archive option, which is an Archive Manager Client AddIn feature.
In such cases those archived items are lost for the user. They cannot be reached by the user, but they still reside in the HSM store at least until their retention time expires. They can be recovered manually by the administrator only. Such lost items have a blue icon on the Public Folder Archive tab.
On this tab the administrator can restore:
·one lost item
·all lost items of a folder
·all lost items of a sub-folder
To restore one or more lost items:
1.Click View on the Archive Manager for Exchange menu bar. Select Archive. Then switch to the Public Folder Archive tab.
2.In the left pane find the desired public folder whose lost item(s) you want to restore.
3.To restore ONE LOST ITEM, open the public folder in which the shortcut to this item was originally kept. A list of all items of the public folder will be displayed in the right pane. Right-click the desired lost item (blue icon). In the context menu select Restore lost item option.
To restore ALL LOST ITEMS OF A PUBLIC FOLDER right-click that folder in the left pane. In the context menu select Restore lost folder items option.
|
|
NOTE: If you want to display lost items only, right-click in the right pane and, in the context menu, click Show only lost items. |

4.In the pop-up Restore options window choose between two options:
a.Delete all versions of the document check box all versions of the lost item(s) will be marked for deletion in the archive, just the latest one(s) will be displayed in the public folder as non-archived
b.Restore shortcut only check box shortcut of the item(s) will be displayed in the public folder and all versions will be accessible
|
|
NOTE: If none of the options is checked, email is returned to the public folder as non-archived and its versions, if any, are displayed as lost in Archive Manager for Exchange. |
5.Click Accept. The respective archived item will be restored to the folder its shortcut had been deleted from.
6.When restoring is over, in the Processing result window click OK.
Restoring public folders
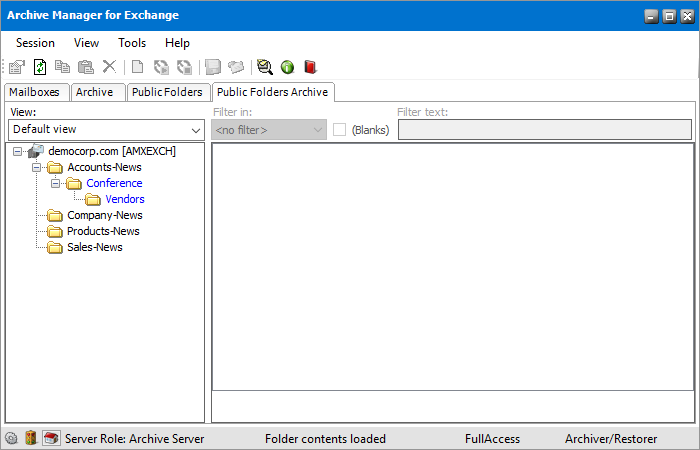
When public folders or sub-folders with archived items are deleted, the information about the folder structure is available to Archive Manager. The entire folder structure can be restored. For example, the image below indicates that the sub-folder tree Conference > Vendors was deleted. Deleted folder names appear in blue color.
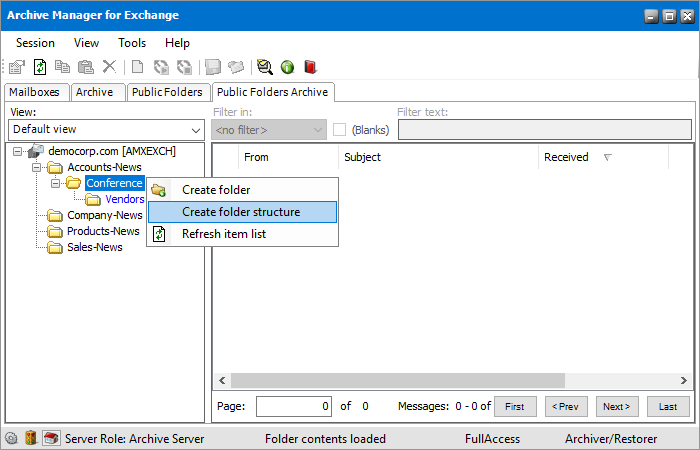
To restore the folder structure
1.Select the root node of the deleted folder structure.
2.Right click and select Create folder structure. The folder structure will be restored along with any archived items in those folders and the folder names will be displayed in normal black color.
Post Processing
Post Processing is a service which allows running customer specific tasks over archived emails and their attachments across selected mailboxes. So those clients who are using other software programs and wish to process within those software programs archived emails and their attachments may do so via the Post Processing service.
How to use post processing
To use the Post Processing service, the user must use the Archive Manager Configuration tool.
Upon receiving a plugin, take the following steps:
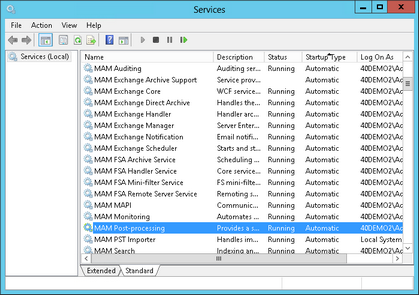
1.Make sure that the Post Processing service has started.
|
|
NOTE: Without the Post Processing service started any plugin even the active ones will not run and therefore no post processing will be performed. |
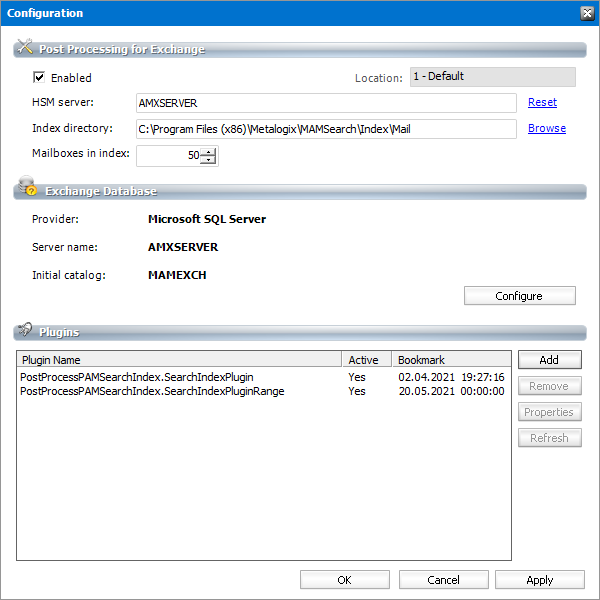
2.Add the plugin to the Post Processing for Exchange scope.
3.Select all mailboxes to which post processing is to be applied.
4.Define the initial bookmark date for the plugin if necessary.
|
|
NOTE: A bookmark indicates the date and time where the the indexing process has reached. All emails and their attachments that are archived after this bookmark date will be processed unless they have already been indexed. There can be several plugins running in parallel, each with a different bookmark date. However, do not start post processing service on multiple servers for the same database. Running the post processing service on multiple servers is not recommended since that can cause conflicts in bookmarking. The same database should not be indexed by more than one post processing service. |
The Post Processing service manages (starts and stops) the plugins at regular intervals. Advanced Post Processing settings can be configured after clicking the General Settings tab on the Post processing tab.
Each plugin is loaded by default with the date and time (initial bookmark date). This means that the plugin processes emails and their attachments having been archived after this initial bookmark date. If post processing should begin from some other bookmark date, then make sure to reset the initial bookmark date.
Enhance your ArchiveWeb search by a new search option. Besides Subject and From text boxes in the Exchange Archive search a brand new searching option can be added to the search query To field. In this way user can search for items sent to specific recipient.
To activate the above mentioned searching by recipients, a post processing plugin must be installed. This plugin indexes mail recipients.
Steps to install the SearchIndexPluginRange post processing plugin
1.Open Archive Manager Configuration Tool from <installdir>\Program Files (x86)\Common Files\PAM\PAMConfig\PamConfig.exe.
2.Open the Post Processing tab.
3.Open the Post Processing Scopes tab.
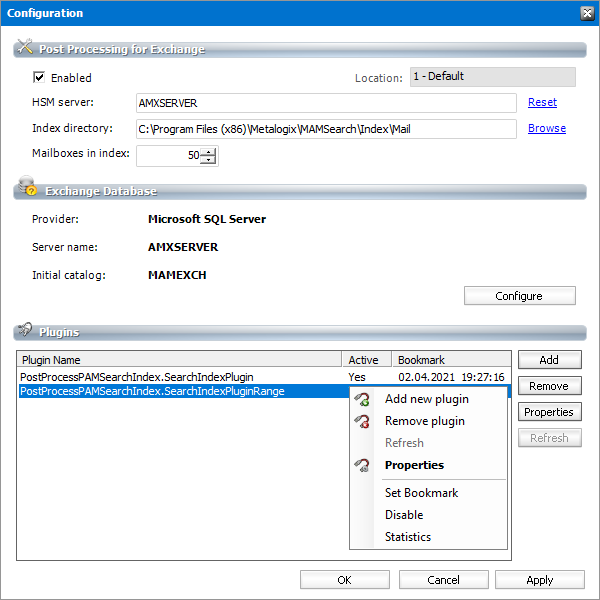
4.Right-click on the desired scope and from the context menu and select Configure.
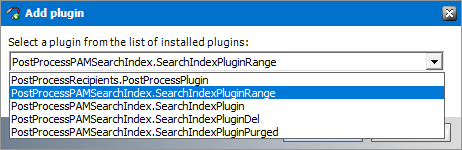
5.Click Add.
6.Installed plugins will be loaded in the Add Plugin pop-up window. Select PostProcessPAMsearchIndex.SearchIndexPluginRange from the drop-down box and click Add.
7.The plugin is listed in the Plugins list in Configuration tab. By default it is active.
Steps to Configure a Plugin
When a new plugin is added to the Plugins list, there are no mailboxes specified by default. You must specify the mailboxes as well as the Bookmark Date. If no mailboxes are selected then post processing will not process any archived emails and attachments.
1.From the Plugins list, select the PostProcessPAMsearchIndex.SearchIndexPluginRange plugin. Either click the Properties button or right-click the selected plugin and click Properties from the context menu.
2.In the Post Processing plugin properties window set the properties as described below.
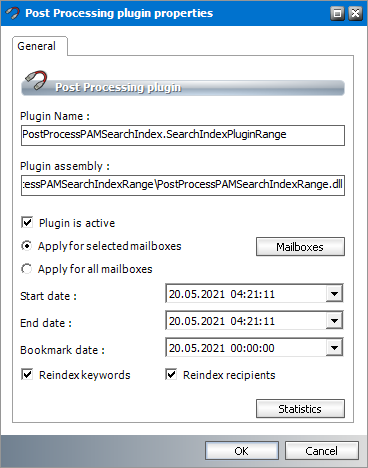
The plugin properties are as follows;
a.Plugin is active - select this check box to activate the plugin.
b.Apply for selected mailboxes - the plugin scope is determined by the mailboxes that you can select when you click Mailboxes.
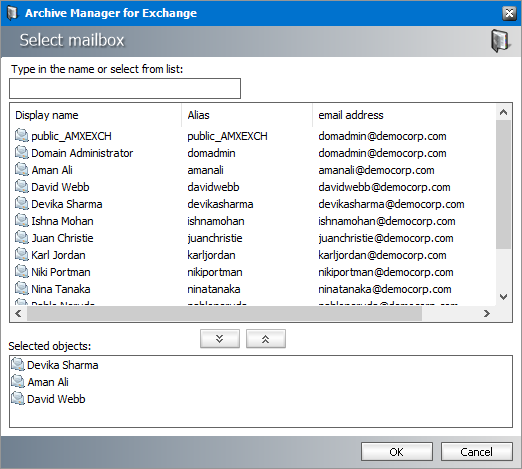
i.In the Plugin mailboxes window click Add to add mailboxes.
ii.In the Select mailbox enter the name of a mailbox in the text box to search for the mailbox. Double-click the desired mailbox in the list to transfer it to the Selected objects section. In the Selected objects section you can check which users you have selected.
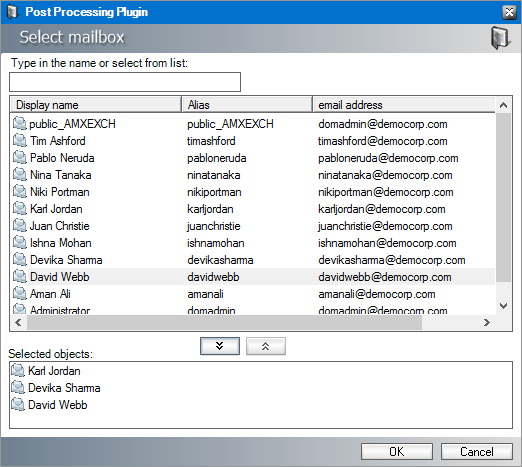
iii.Confirm by clicking OK. The selected mailboxes appear in the Plugin mailboxes window.
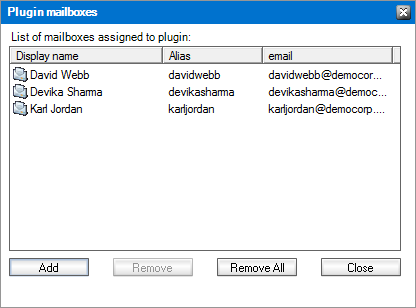
iv.Click Close.
c.Apply for all mailboxes - the plugin scope is across all mailboxes.
d.Start Date - indicates the date when email indexing starts. Click the drop down to set the date from the calendar popup.
e.End Date - indicates the date when email indexing ends. Click the drop down to set the date from the calendar popup.
f.Bookmark Date - indicates the most recent index date and time. Click the drop down to set the date from the calendar popup. When the plugin is installed, the Bookmark Date should be the same as the Start Date. If you want to index old email items, set the Start Date and the Bookmark Date to the same date in the past from where you would want the indexing to begin.
g.Reindex keywords - select this check box if keywords should be re-indexed within the specified data range.
h.Reindex recipients - select this check box if email recipeinets should be re-indexed within the specified data range.
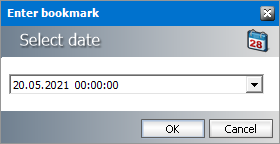
Steps to specify a bookmark date and time
1.Right-click the plugin and click Set Bookmark from the context menu.
2.In the Enter bookmark window specify the desired time. Click OK.
|
|
NOTE: The bookmark date is displayed in the Plugins list in the Configuration tab. If you reset the bookmark date, the change takes effect immediately, and there is no need to deactivate and activate the plugin again. If you remove a plugin using the Remove button, it will stop entirely without remembering where it stopped. You must reconfigure the plugin if you reload it. |
Advanced Search
The Advanced Search feature helps an administrator to search for archive items. It cannot be used to search non-archived items. This feature is a component of Archive Manager and is installed by default. Advanced Archive Search has some special capabilities:
·It can search for emails in the archive that are marked for deletion. Items that are marked for deletion are not visible in the Archive tab but they still reside in the archive until their retention time expires.
·It can perform an OCR search in attachments that contain scanned content. However, characters that are too small may not be correctly recognized. This capability must be activated in the Configuration tool > Post Processing > OCR Engine tab.
Steps to search for archived emails
1.Click the Advanced Search icon 
2.Click the Messages tab.
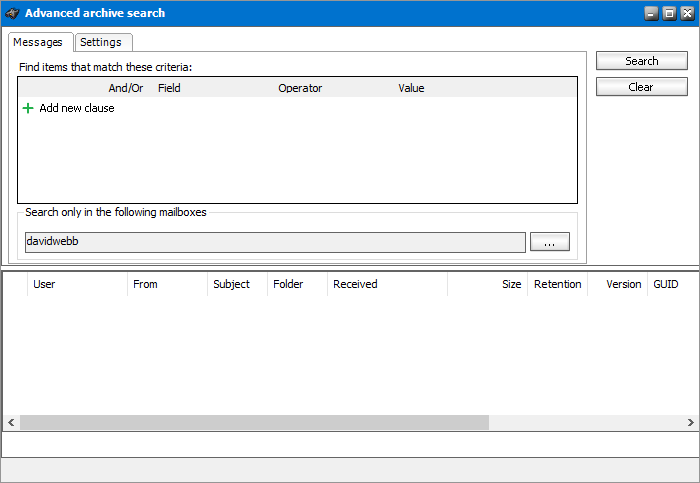
3.Click Add new clause and enter the search criteria using the fields as described below:
a.Field - click the drop down to select the property of the email to be searched. For example, select Subject as the field to search.
b.Operator - click the drop down and select a search operator.
c.Value - Specify the search text. If the selected Field requires a date value, a date picker icon appears to help you choose a date. This field supports wildcard characters as described in the table below:
|
Wildcard |
Description |
Example |
|
* |
A substitute for zero or more characters |
|
|
? |
A substitute for a single character to match |
Sales201?.pdf |
4.To add more criteria, click Add new clause again. When you add more than one search clause, the logical operator drop down box appears. You can select either the And or the Or operator. The default operator is And. You can even group clauses to create nested search criteria by selecting consecutive check boxes and clicking the 
5.To restrict your search to one or more mailboxes, click the button with the three dots in the Search only in the following mailboxes section.
6.From the Select mailbox window that opens, select one or more mailboxes and then click 

7.Click OK to close the window. The selected mailboxes will appear in the Search only in the following mailboxes field.
8.Click the Settings tab.
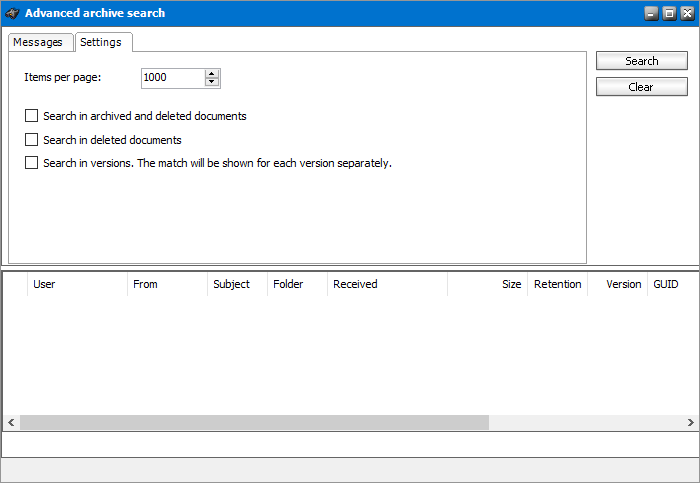
9.Configure the settings if needed, as described below:
a.Items per page - restricts the number of emails that can be displayed in the search result list.
b.Search options allow you to specify the category of documents to search.
·No selection - only archived documents are searched. Previous versions of these documents are not included.
Select one of the following options:
·Search in archived and deleted documents - all documents will be searched. Previous versions of these documents are not included.
·Search in deleted documents - deleted documents and documents that are marked for deletion will be searched. All other archived documents will be ignored. Previous versions of these documents are not included.
Add an additional criteria:
·Search in versions - Previous versions will be included for the document category specified. The match will be shown for each version separately.
10.Click Search to search for archived emails based on the selection criteria, the mailboxes specified and the settings that are applied. Items marked for deletion are displayed with a blue icon in the search result list.
Example of a nested search query
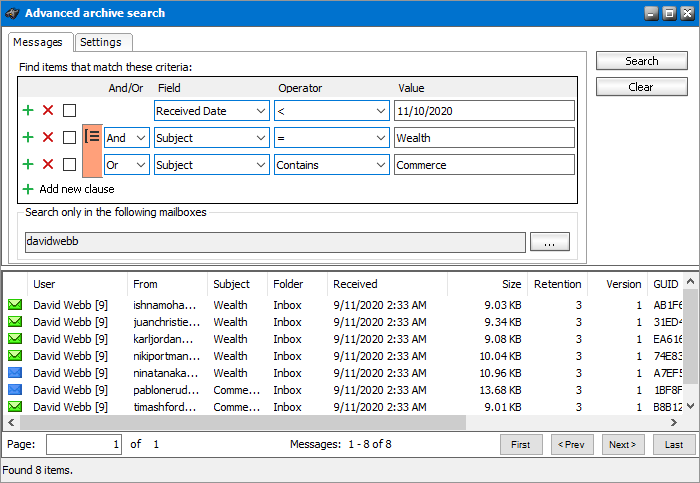
Consider the following search request: All email items that were received by David Webb before 10th November 2020 and the subject contains either the words Wealth or Commerce.
Search criteria contains only email properties. Therefore the nested search criteria can be written as follows:
Received Date < 11/10/2020 AND (Subject contains Wealth OR Subject contains Commerce)
The context of the search query is restricted to a single mailbox called David Webb, but there are no restrictions to the scope since All items are required to be searched in the specified mailbox.
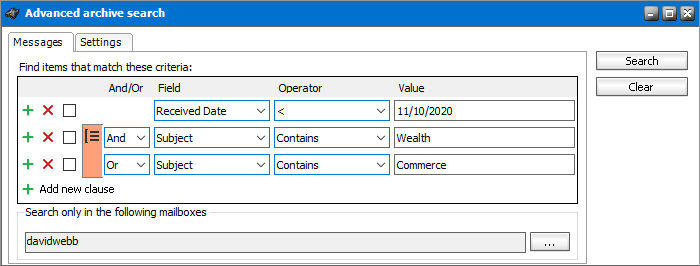
To define the query in the Advanced archive search window, follow the steps described below:
1.Click the Advanced Search icon
2.Click the Messages tab.
3.Click Add new clause and enter the search criteria using the fields as described below:
a.Field: Received Date
b.Operator: <
c.Value: 11/10/2020
4.Click Add new clause and enter the search criteria using the fields as described below:
a.And/Or: And
b.Field: Subject
c.Operator: Contains
d.Value: Wealth
5.Click Add new clause and enter the search criteria using the fields as described below:
a.And/Or: Or
b.Field: Subject
c.Operator: Contains
d.Value: Commerce
6.Since Subject Contains Wealth Or Subject Contains Commerce are nested criteria, select the two check boxes where the Field value is Subject. Then click the
|
|
NOTE: If there are nested criteria within a nested criteria, start the grouping with the innermost nest. When the grouping is successfully applied, the checked boxes are cleared and the group icon disappears. |
7.Click the button with the three dots in the Search only in the following mailboxes section.
8.From the Select mailbox window that opens, select David Webb and then click
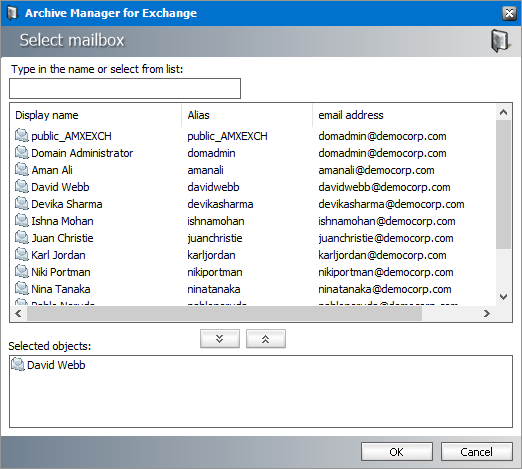
9.Click OK to close the window. The selected mailboxes will appear in the Search only in the following mailboxes field.
10.Since the scope of the search is All items, there is no need to change any properties in the Settings tab.
11.Click Search to search for archived emails based on the selection criteria, the mailboxes specified and the settings that are applied.