
Step 1: Use Diagnostic Data Collector to automatically gather data
To automatically gather diagnostic data
-
In the Forest Recovery Console, open the recovery project for which you want to collect diagnostic data.
-
Make sure you specify credentials to access each domain controller in the project. To check whether you specified access credentials for a particular domain controller, do the following:
-
Select that domain controller in the list of domain controllers.
-
Open the General tab.
-
Make sure you specify the correct credentials in the Domain Controller Access option.
The Forest Recovery Console will use the specified credentials to access the domain controller and gather diagnostic data from it.
-
-
From the menu bar, select Tools | Diagnose | Collect Diagnostic Data.
-
Use the Drop folder text box to specify the local or UNC path to the folder where you want to save the diagnostic data to be collected. The collected data is saved to a .zip, e.g. CollectedLogs_10_20_2015 07_23_25.zip
-
You can change credentials to access the domain controllers that were specified on the step 2.
-
Select the Delete collected logs from domain controllers option to delete collected RMAD\RMADFE logs from domain controllers.
-
Click the Collect button and wait for the operation to complete.
If you successfully collected data from all the domain controllers in this step, you can submit the .zip file to Quest technical support. Otherwise, complete Step 2: Gather remaining data manually.
Step 2: Gather remaining data manually
Perform the next steps for each domain controller from which you could not successfully collect data in Step 1: Use Diagnostic Data Collector to automatically gather data.
To gather diagnostic data manually
-
Create a temporary folder on the local disk of the target domain controller.
-
Copy Collectdcdata.cmd from the Recovery Manager for Active Directory installation folder to the folder you created in step 1 of this procedure.
-
Run the Collectdcdata.cmd file in the location to which you copied it and wait for the script to complete.
The collected diagnostic data is saved to the CollectedData folder created in the location where you ran the Collectdcdata.cmd file.
-
Rename the CollectedData folder so that its name reflects the name of the domain controller from which you collected data.
-
Add the folder to the .zip file created in Step 1: Use Diagnostic Data Collector to automatically gather data.
Now you can submit the .zip file to Quest technical support.
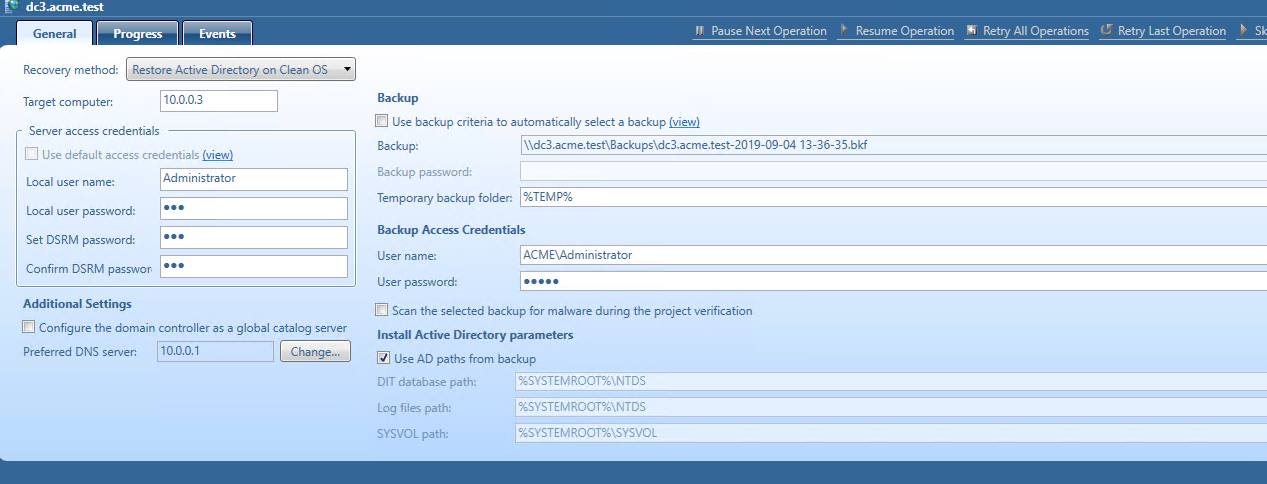
Restore Active Directory on Clean OS
Using the Restore Active Directory on Clean OS method you can restore the entire forest or any of its parts on the freshly installed Windows machines. This recovery method can be used, for example, when existing BMR backups contain the infected OS image. In this case, Active Directory backups can be used due to they do not contain binaries (except Sysvol files). Active Directory backups can be also checked for viruses.
Domain controllers that are running on virtual machines in Amazon Web Services (AWS) or Microsoft Azure can be restored with the Restore Active Directory on Clean OS method.
| NOTE |
The first step of the Restore Active Directory on Clean OS recovery method is to promote the selected Windows server to a domain controller. This operation cannot be performed for Windows Server 2012 R2 or higher machines with FRS replication. So, Restore Active Directory on Clean OS is supported only for Windows Server 2012 R2 or higher with DFS Replication. |
At the first stage of the Restore Active Directory on Clean OS recovery method, the DNS server role is installed on a domain controller. For this reason, it is recommended to use a backup that was made on the AD-integrated DNS server for Clean OS recovery. You can still use backups that were made on the non-AD-integrated DNS server but in this case you should not use Automatic DNS selection option on any domain controller in such a domain.
If your domain has AD-integrated DNS servers restored from backup, you need to specify the DNS settings manually. After recovery, the domain controller that was restored by the Restore Active Directory on Clean OS recovery method synchronizes DNS partitions and continues to be a DNS server.
If your domain uses external DNS, you need to specify the DNS settings manually for every domain controller in the domain. After recovery, the domain controller restored by the Restore Active Directory on Clean OS recovery method will run a non-functional DNS server so you can uninstall it.
If you are testing Forest Recovery in the lab environment and your production forest uses an external (non-AD integrated) DNS server.
-
You can prepare the lab by installing a new DNS server (e.g. on the RMAD server).
-
Create empty DNS zones on this server in accordance with your production DNS configuration.
-
Ensure that SOA and NS records created in the empty zone have the FQDN DNS name corresponding to this DNS server.
-
Create an A record pointing to this server IP address in each zone.
-
Ensure that non-secure DNS dynamic updates are enabled.
Recovery steps
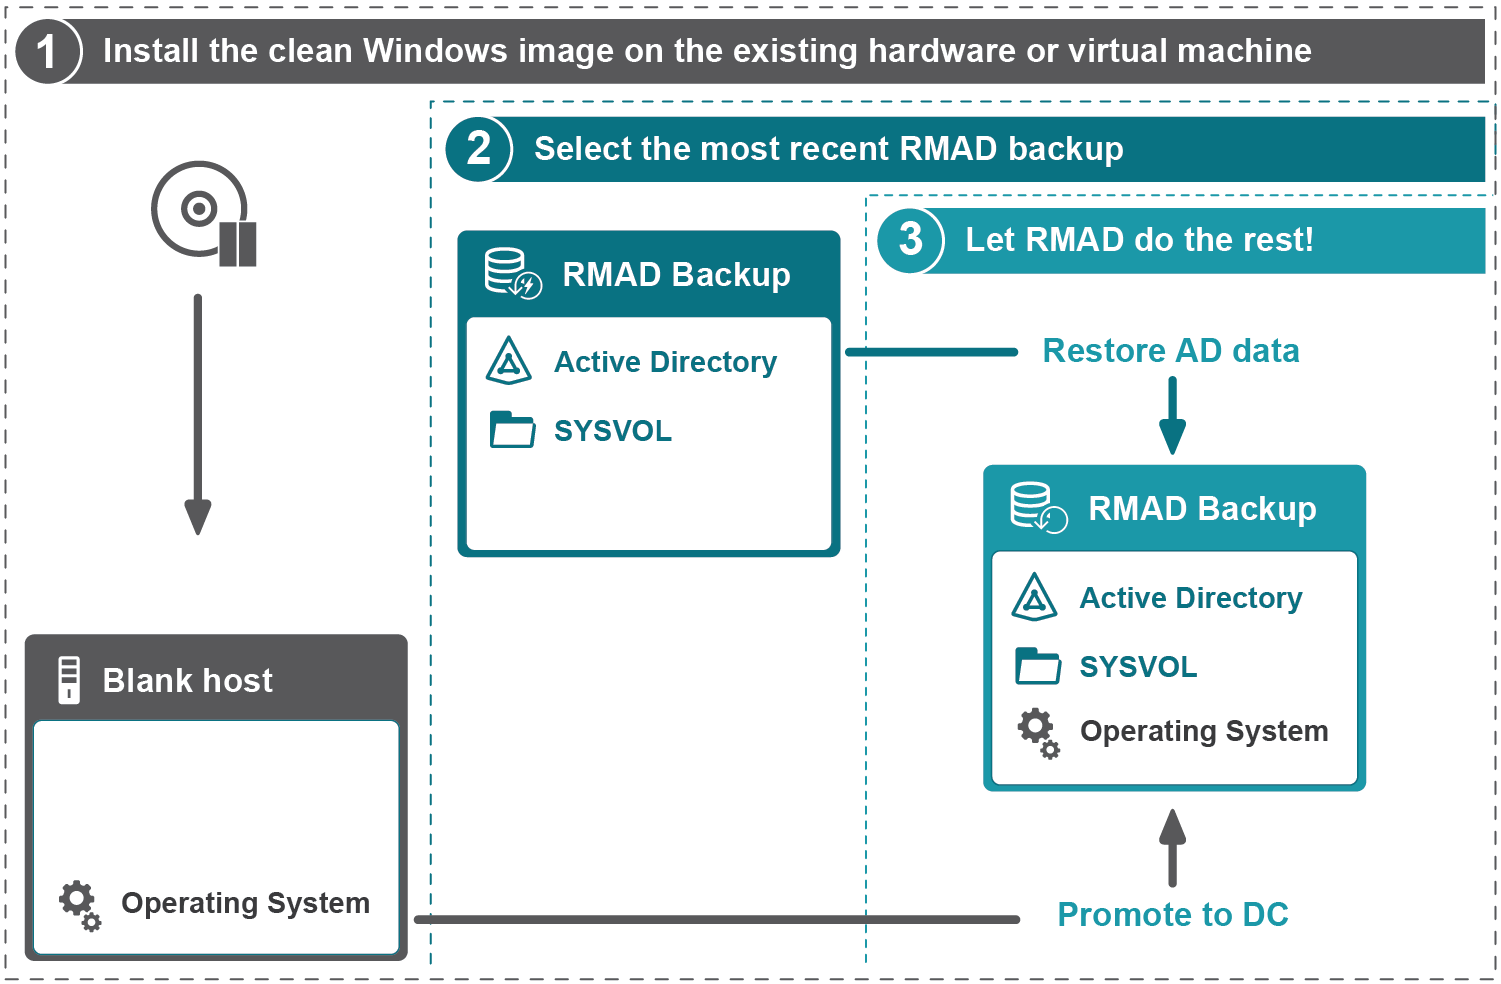
Step 1. Install the clean Windows image on the existing hardware or virtual machine
A blank host should comply with the following requirements:
-
The version of the Windows operating system must match the version deployed on the failed domain controller.
-
A blank host must have the same drive letters as the source domain controller if the Use AD paths from backup check box is selected or the drive letters must match the custom paths specified in the project.
-
A blank host should have enough free space for AD and SYSVOL data.
-
The account that is specified in Forest Recovery Console to access the target blank host should be the local Administrator on this machine.
Step 2. Select any appropriate Active Directory backup
Step 3. Use the Restore Active Directory on Clean OS recovery method
Recovery Manager for Active Directory promotes the selected Windows server to a domain controller and then restores Active Directory data.
Create virtual machines in Microsoft Azure
You can use the Forest Recovery Console to create a virtual machine in Microsoft Azure Active Directory. You can then use the Restore Active Directory to Clean OS recovery method to restore Active Directory on the virtual machine.
Prerequisites
To create a virtual machine in Microsoft Azure
-
In the Forest Recovery Console, create a new project or select an existing recovery project.
-
Select the Domain Controller to be created as a virtual machine in Azure.
-
From the Recovery Method drop-down list, select Restore Active Directory on Clean OS.
-
In the Server access credentials section, type the user name and password that you want to be created as a local account on the new virtual machine in Azure. These credentials are used during the Forest Recovery process.
| note |
You cannot use 'Administrator' in the Local user name field as this name is reserved in Azure. |
-
In the Backup Access Credentials section, type the user name and password to access the selected backup file. The backup file must be accessible from the Forest Recovery Console and from the newly created DCs in Azure. For example, if your backup is located on a file share in Azure, supply credentials with access to the file share.
-
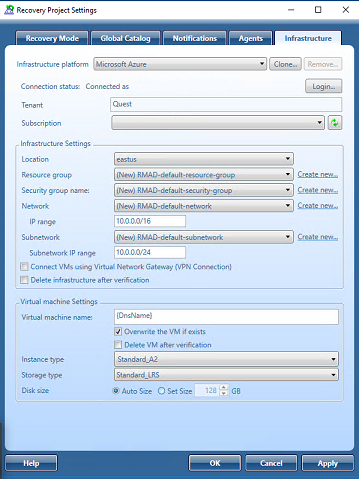
On the Infrastructure tab, from the Infrastructure drop-down list, select Microsoft Azure.
-
Click View to configure the infrastructure template and virtual machine settings.
-
In the Recovery Project Settings window, on the Infrastructure tab, click Login to sign in to the Azure tenant. Provide a user account that is assigned an Azure role with create and write permissions for the required resource group and all other virtual machine resources. The Azure built-in role of Owner or User Access Administrator on the subscription is recommended.
The fields on the Infrastructure tab are populated with information retrieved from the tenant. -
From the Subscription drop-down list, select the subscription to be used by the infrastructure template.
-
In the Infrastructure Settings section, configure the following settings:
- Location: Select the location where the virtual machine will be created.
- Resource group: Select an existing resource group for the virtual machine or click Create new to create a new resource group.
- Security group: Select the Network security group or click Create new to create a new Network security group within the selected Resource group.
- Network: Select the virtual network where the virtual machine will reside or click Create new to add a new virtual network.
- IP range: Specify a custom private IP address space using public and private (RFC 1918) addresses. Azure assigns resources in a virtual network a private IP address from the address space that you assign.
- Subnetwork: Select an existing subnetwork or click Create new to create a new one.
- Subnetwork IP range: Specify a subnetwork address range in CIDR notation (for example, 192.168.1.0/24) and it must be contained by the address space of the virtual network.
-
If the Forest Recovery Console is not already connected to the Azure network, select the Connect VMs using Virtual Network Gateway (VPN Connection) check box to automatically create a Virtual network gateway in Azure. The new Virtual network gateway is assigned to the Resource group. A VPN connection to Azure is configured automatically on the Forest Recovery console machine for communication. Next, complete one of the following steps:
- From the Virtual network gateway drop-down list, select an existing Virtual network gateway or click Create new to create a new Virtual network gateway.
- In the Address Pool field, an IP address received from the client address pool is listed for VPN clients that connect to the virtual network using this point-to-site connection.
-
To remove all resources created by the Verify Settings process, select the Delete infrastructure after verification check box. After the Verify Settings process is complete, all resources within the Resource group will be removed except the Resource group. This is useful for testing purposes or to manage cost. During recovery, the required Azure resource will be created. If the Delete infrastructure after verification check box is not selected, resources created by the Verify Settings will remain and will be used for future verifications and recoveries.
| note |
If unused resources are not deleted, this may incur additional cost for your tenant. |
-
In the Virtual machine Settings section, configure the following settings:
-
Virtual machine name: Type a name for the virtual machine or use the {DnsName} template.
-
Overwrite the VM if exists: Select this check box if you want the new VM to overwrite an existing one with the same name.
-
Delete VM after verification: Select this check box to delete the virtual machine after the Verify Settings process is complete. This is useful for testing purposes or if the machine is expected to be unused and to manage cost. The check box is automatically selected when the Delete infrastructure after verification is selected. If a recovery process is started, the machine is recreated.
-
Instance type: Select the instance type with the number of CPUs and amount of memory that you want.
-
Storage type: Select the storage type. This affects performance.
-
Disk size: Select Use Original Sizes for the disk size to be determined by the size of the Active Directory data size (DIT, LOGS, SYSVOL) in the back up. Select Set Size to customize the size of the disk for the virtual machine.
^{note} The disk will have a minimum size (128 GB for an operating system disk and 8 GB for a data disk). If the selected disk size is not large enough for the restored data, the system will use the required size and this setting will be ignored.
-
-
Click Apply then click OK.
| note |
If the signed in user does not have sufficient permissions to create or write the resource group and resources, an error message will be displayed. If the user was recently granted permissions for the resource group, please refresh the credentials in the Recovery Project Settings window. |
A service principal containing the settings you configured is created for the connection to Azure.
| note |
After you have configured the default infrastructure template named "Microsoft Azure", you can then clone the default template. That is, you can create a new template based on the Azure template and apply it to other DCs in the Forest Recovery project. |
To start recovery of Active Directory to Microsoft Azure virtual machines
- Click Verify Settings to start the project verification. During verification, resources will be created in Microsoft Azure based on the infrastructure template assigned to the Domain controller(s) in the project.
- After Verify Settings has successfully completed, click Start Recovery.
During recovery, the Active Directory backups of the domain controllers defined in the recovery project will be restored to newly created virtual machines in Microsoft Azure.