
5.2 Migrating a User
After you have resolved users and assigned a migration profile to them, they are ready to be migrated.

|
|
Make sure that user mailboxes have been created in Microsoft Exchange Online prior to migration and your Outlook Migration account or group has Full Access to the mailboxes. If you are using AWD, be sure to close your migration worker application on the migration control center by right-clicking the application in the system tray and selecting Exit. This will allow your migrations to submit to the migration workstation. It is recommended to use AWD with at least one migration worker as migrating on the migration control center can interrupt the use of the Migrator for Notes application for migration management. If you are migrating to a .pst file, users do not need to be matched and users’ mailboxes do not have to exist in Microsoft Exchange but an Internet Address is required on the accounts. |

To migrate users:
-
Expand the Migration | Migrate view in the Navigation Pane
-
Click the Refresh Migration Status button to show the most current and accurate migration status
-
Select user(s) that are ready for migration, and then click Migrate Users in the Data Pane
-
The Select migration priority dialog box appears:
The following table describes each option:

|
Option |
Description |
|
Add to migration queue (normal priority) |
Selected users are added to the bottom of the migration queue and will be migrated as soon as a migration workstation becomes available. |
|
Schedule migration on or after |
Selected users will be migrated on the specified date or time or later if there is heavy traffic. You can specify the exact time when you want the user mail migration to start. |
-
If prompted for a Notes password, specify the password to the HCL Notes login ID you are currently using. If you accidentally specify the wrong password, delete the password.txt file from C:\Program Files\Binary tree\CMT Exchange and then try again:

|
|
|
-
The CMT progress box displays the files being migrated on the workstation that the migration job was assigned to. This can be checked in the CMTMonitor web browser page on the migration control center. You can pause or cancel the migration by clicking the Pause and Cancel button, respectively. Depending on the amount of data for the user that is being migrated, the processing may take some time:

|
|
On migration workers the Connectivity Tester can be used to verify the Migration Outlook account and allows for changing the account and password that is stored on the worker. For Modern Authentication migrations, the Outlook ‘Migrate’ profile is used and the Connectivity Tester is not expected to function. To verify connectivity, Outlook can be opened to check the Migrate profile and verify access to Office 365. |
-
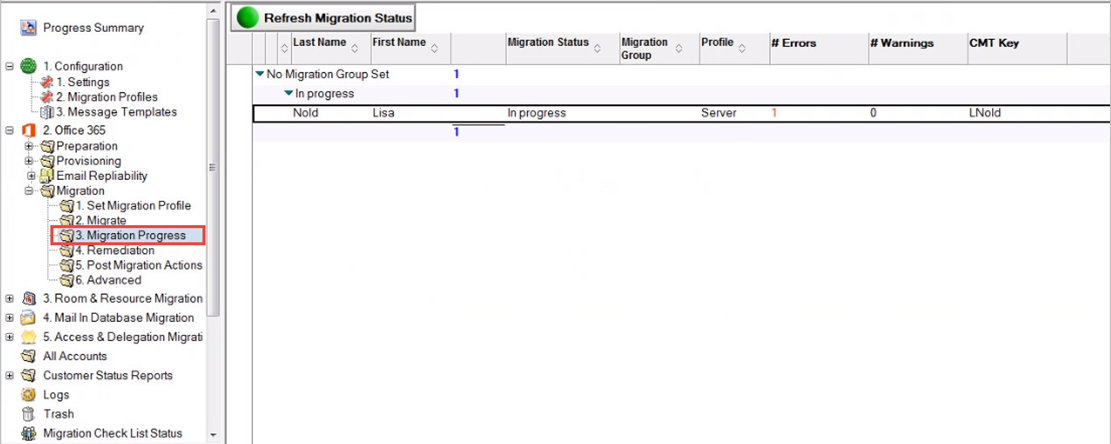
As migrations are submitted from the Migrate view, they will then be moved to the Migration Progress view and show as Pending. You can check the status on the Migration Progress view. The status of the accounts in the view can be updated by clicking the Refresh Migration Status button. When a migration workstation selects a user from a queue, the migration status changes to In Progress in the Data Pane.
-
Once the migration process is complete, the migration status of all users will be updated. For users that are migrated successfully these will be displayed on the Post Migration Actions view.
-
For users who have not completed successfully, these will be displayed on the Remediation view.
You can review the logs that are created during the migration process via links to the migration logs in the Person Document and also in the C:\Program Files\Binary Tree\CMT for Exchange\Logs directory on the Migration Control Center


5.3 Migrating User Local Archives to an Exchange Server
After you send the Archive Processing (Archive Migrator for Notes must be installed and configured for local archive replication and processing) message template to users, the end user clicks on the button to perform the copy/replicate their local archives to the Domino server. Once completed, a new archive Person document will be created for each archive database copied to the server and located in the Set Migration Profile view.
-
To view which archive database will be migrated, double-click and open the username archive Person document.
-
Assign a migration profile and the user will be promoted to the Migrate view to perform the migration.
-
Once users’ archive databases have been physically resolved and audited, they are migrated the same way as users’ mail files. They can be migrated to the Exchange Online mailbox, the Exchange online archive mailbox, or to a PST file.
|
|
|
|
|
5.4 Migrating User Mail Files to an Exchange Archive
Direct migrations of data from Domino production mail files (not source archives) to the Exchange Archive Mailboxes are supported for both on-premise and Office 365 versions of Exchange. If enabled, Exchange archive documents are created during the matching phase if an archive exists for the user in Exchange. Like other migrations, Exchange Archive migrations are managed by Migration Profiles.
-
Expand the Settings view and then click the Mail File Processing tab; in the Create Exchange Archive Documents field, select Yes. Then click Save & Close:

-
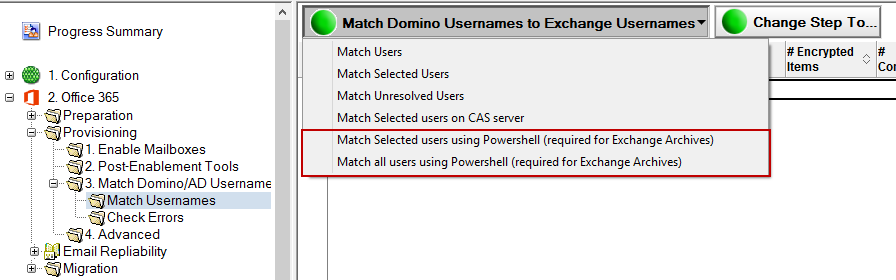
During Match Usernames step, select users and select the Match Selected users using PowerShell or Match all users using PowerShell option; the PowerShell matching method is required to generate the Exchange Archive documents:
-
During the matching process, an Exchange Archive document for each user is created in addition to the Exchange Mailbox document if an Exchange archive exists for the user. The Exchange Archive document can be identified by the appended “-EXArchive”.
|
|
|
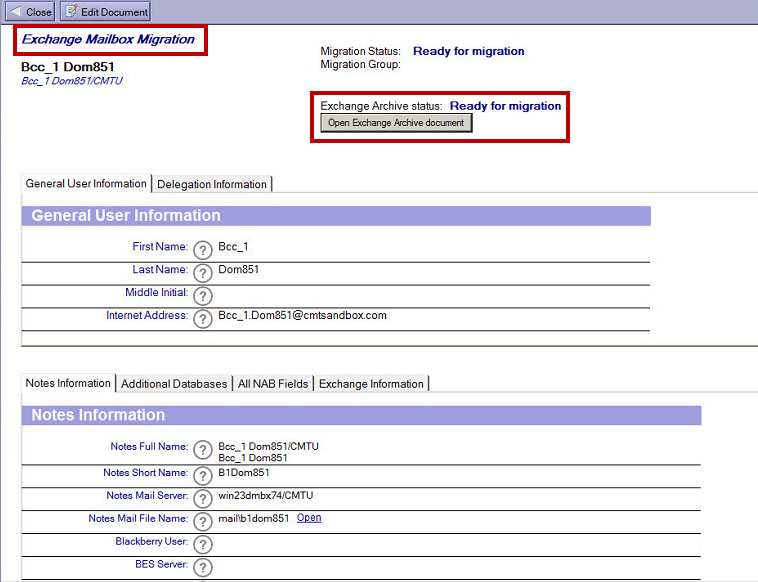
The Exchange Mailbox document and Exchange Archive document are linked in the Notes Migrator.nsf (EMM) database but are migrated as distinct documents as they do not share migration histories. The link between the two documents can be further seen when opened. The Exchange Mailbox document displays the status of Exchange Archive document and a button to open the Exchange Archive document. Likewise, the Exchange Archive document displays the status of the Exchange Mailbox document and a button to open it.

-
During the Set Migration Profile step, select one or more Exchange Archive document(s) and set a Migration Profile. Migration Profiles are created in the Configuration view.
-
During the Migrate step, select one or more Exchange Archive document(s) and click Migrate Users; the Exchange Archive documents are migrated to the Exchange archive; the View Mailboxes only and View Archives only buttons allow you to filter the displayed list
The option to create Exchange archive documents is necessary for the local archives (above) to be migrated to online Exchange archives; this requires PowerShell matching:
View Mailboxes only and View Archives only buttons


5.5 Performing Post Migration Actions
Once the migration is complete, you may want to send a notification to users informing them of the latest status. The Post Migration Actions view document contains some tools that allow you to do that.
-
Click Post Migration Actions in the Navigation Pane:
Post Migration Actions View
-
Select users and then click Send Post Migration Notifications in the Data Pane
-
The Message Templates dialog box appears; the Post Migration Message option is selected by default; click OK:
-
A message box appears to confirm that the post migration message has been sent to selected number of users; click OK to continue

If the Audit Exchange Migrated Data option is enabled in the Settings, an Audit Migrated Data button will appear in the Migration | Post Migration Actions view.

This is a post-migration validation process that indicates the state of documents which have been migrated by Migrator for Notes. This feature can be useful in environments as a validation check for data integrity.
In addition, this can be used to audit results to reduce the size of user Domino mail files or archive databases after the migration phase on the Domino servers and user's workstation replicas. For example, removing documents with a Migration Status of 1 would leave only non-migrated data or documents that could not be migrated completely due to malformation or size restrictions in Exchange from a source database.
Important: Consult your organizations data retention policies and regulatory compliance requirements before modifying source data. Full backups of the original source data may be required before modifying working replicas to ensure regulatory compliance. This particularly for cases where source data would be modified prior to migration (e.g. personal contacts or folders) or where data is modified during migration (e.g. To email address for repliability)
This agent audits the Exchange mailbox post-migration and creates two CSV files in the C:\Program Files\Binary Tree\CMT for Exchange\Logs directory of the workstation used to initiate the audit.
CMT Audit Date Time UserSMTPAddress.csv
The “CMT Audit Date Time UserSMTPAddress.csv” CSV file contains the following columns:
-
Source UNID
-
Source NoteID
-
Migration Status (0=Unknown Result Status, 1=Successful, 2= Partially Migrated - Encrypted Body, unable to migrate attachment, but part of the message was converted and is available in Outlook)
-
Message Subject
-
Source Server
-
Source Store
-
Message Class
-
Creation Date Time
-
(Destination) Folder
Sample:
2B18FF6499CECFA285257D7B005D0D60,6198,0,"Delegation 4l- Delegate a monthly meeting”,w28dom8mail,CN=w28dom8mail/O=CMTU!!mail\n8b2013,IPM.Appointment,9/29/2017 11:01:44 AM,Calendar
The CSV contains a header row to identify each column of data. The last line of the CSV file states “Audit Completed” when the agent completes. Contact and Group migrations are not included in the audit. Child documents that are integrated with the parent documents are not be listed in the CSV file.
SourceStoreAudit.csv
The “SourceStoreAudit.csv” CSV file is also created (if not present) and is appended to for each subsequent audit run. This file has no header row.
The “SourceStoreAudit.csv” CSV file contains the following columns:
-
User SMTP Address
-
User Distinguished Name
-
Number of Data Sources in the mailbox
-
A column for each of the unique sources founds. Each source column contains the Source Server, Source Store, Total Message Count from this source (all three items are in one column). The message count is enclosed in ( ).
Sample:
NotesUser8b2013@corp20.cmtsandbox.com,/o=First Organization/ou=Exchange Administrative Group (FYDIBOHF23SPDLT)/cn=Recipients/cn=ea0d95426dce42979e7c2b4746ed7ad2-Notes,1,W28DOM8MAIL!!CN=W28DOM8MAIL/O=CMTU!!MAIL\N8B2013 (186)
NotesUser8c2013@corp20.cmtsandbox.com,/o=First Organization/ou=Exchange Administrative Group (FYDIBOHF23SPDLT)/cn=Recipients/cn=2a83ac4e22ab4e4d961176b38362b245-Notes,3,W28DOM8MAIL!!CN=W28DOM8MAIL/O=CMTU!!MAIL\N8C2013 (198),W28DOM9MAIL!!CN=W28DOM9MAIL/O=CMTU!!AUDITTEST1 (5),W28DOM9MAIL!!CN=W28DOM9MAIL/O=CMTU!!AUDITTEST2 (10)
NotesUser8a2013@corp20.cmtsandbox.com,/o=First Organization/ou=Exchange Administrative Group (FYDIBOHF23SPDLT)/cn=Recipients/cn=33eca14b0ee644b5af8d8e2b0decbea3-Notes,0
This sample shows the results of three audit runs on the same workstation, reporting on three mailboxes NotesUser8b, NotesUser8c, NotesUser8a.
User 8b has 1 data source that resulted in 186 messages migrated.
User 8c has 3 data sources of 198, 5, 10 messages each.
User 8a has 0 data sources (indicating no data has been migrated to this mailbox)