
-
Title
NI: Manual Creation of Rooms and Resources In AD for O365 and Exchange -
Description
NI: Manual Creation of Rooms and Resources In AD for O365 and Exchange -
Resolution
Question
How do I manually create Rooms and Resources in Active Directory for O365 and Exchange?
Answer
The instructions below provide the steps necessary to manually create Rooms and Resources in AD for O365 and Exchange:
Settings Required for O365 and Exchange on Premises.
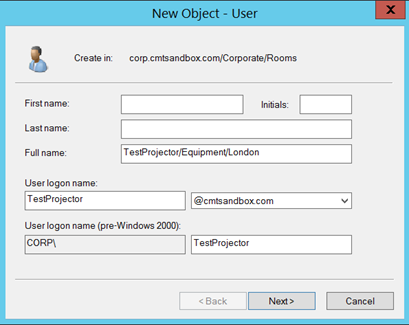
1. Create a new user in AD as shown. The “Full Name” attribute must match the “Resource Name” field in the Domino Directory. Click Next

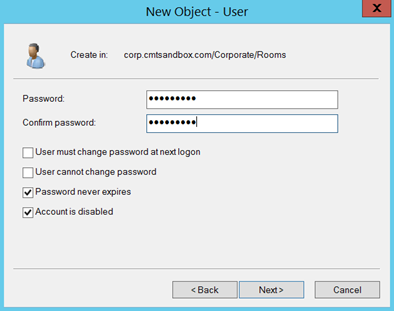
2. Set and confirm the Password. Place a tick in each of the boxes as shown. Click Next.Then click Finish.
3. Double click on the new user and assign an email address. Click apply.

4. Go to the Attribute Editor tab. All the following attributes must be set for both O365 and Exchange on premises environments:mail: TestProjector@cmtsandbox.com
mailNickname: TestProjector
Name: TestProjector/Equipment/London
proxyAddresses : smtp:testprojector@exchange.cmtsandbox.com
SMTP:TestProjector@cmtsandbox.com
SamAccountName: TestProjector
targetAddress: SMTP:TestProjector@domino.cmtsandbox.com
UserPrincipalName : TestProjector@cmtsandox.comNOTE: The following attributes must be set as follows, depending on whether you are creating a Room or a Resource:
For a Room:
msExchRecipientDisplayType: 7
msExchRecipientTypeDetails: 16
msExchResourceCapacity: (Set the room capacity)
msExchResourceDisplay: Room
msExchResourceMetaData: ResourceType:Room
msExchResourceSearchProperties: RoomFor a Resource:
msExchRecipientDisplayType: 8
msExchRecipientTypeDetails: 32
msExchResourceCapacity: 0
msExchResourceDisplay: Resource
msExchResourceMetaData: ResourceType:Equipment
msExchResourceSearchProperties: Equipment
Additional Setting for Exchange On Premise
For Exchange on Premise environments you may find that you receive and NDR when sending requests to the new Rooms and Resources.
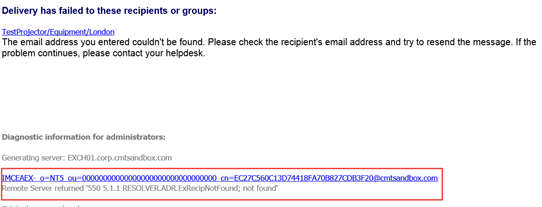
This is because the attribute legacyExchangeDN is not set. We can use the highlighted string to set the attribute.The easiest way to set this attribute is to find an existing user and copy the value in the legacyExchangeDN attribute to notepad.
Now, from the NDR, copy everything after between cn= and the @. Use this to replace the cn value you have in the notepad.
Next, copy everything from the notepad and update the legacyExchangeDN value for the new room or resource e.g.
legacyEchangeDN: /o=First Organization/ou=Exchange Administrative Group (FYDIBOHF23SPDLT)/cn=Recipients/cn= EC27C560C13D74418FA70B827CDB3F20
We can also use the legacyExchangeDN to set an X500 address in the proxyaddresses attribute. Copy the legacyExchangeDN value and add it to the proxyaddresses attribute with the prefix X500: e.g.
proxyaddresses: X500: /o=First Organization/ou=Exchange Administrative Group (FYDIBOHF23SPDLT)/cn=Recipients/cn= EC27C560C13D74418FA70B827CDB3F20
In addition to the legacyExchangeDN and proxyaddresses attributes the ShowInAddressBooks attributes must be set. The easiest way to set the values for this attribute is to copy it from at existing object. The values will be similar to the below:
CN=All Rooms,CN=All Address Lists,CN=Address Lists Container,CN=First Organization,CN=Microsoft Exchange,CN=Services,CN=Configuration,DC=corp,DC=cmtsandbox,DC=com
CN=All Users,CN=All Address Lists,CN=Address Lists Container,CN=First Organization,CN=Microsoft Exchange,CN=Services,CN=Configuration,DC=corp,DC=cmtsandbox,DC=com
CN=Default Global Address List,CN=All Global Address Lists,CN=Address Lists Container,CN=First Organization,CN=Microsoft Exchange,CN=Services,CN=Configuration,DC=corp,DC=cmtsandbox,DC=com
CN=Mailboxes(VLV),CN=All System Address Lists,CN=Address Lists Container,CN=First Organization,CN=Microsoft Exchange,CN=Services,CN=Configuration,DC=corp,DC=cmtsandbox,DC=com