From time to time, DBAs find themselves in a situation where a SQL Server database becomes too large for their production environment, and needs to be shrunk in size in order to free space and allocate it back to the system.
Before shrinking a SQL Server database or database files, it is very important to understand how the process works and what are the immediate consequences of the shrinking process.
Shrinking a SQL Server database is a process in which unused space that was previously in use at some point is being removed from the database. SQL Server performs this process by moving pages of data from the end of the database file to the front of it (as if in a book), filling up free space in the front pages and freeing pages closer to the end of the data file. With this, data pages at the end of the data file (that are now unused) can be reallocated back to the system, freeing the previously reserved space as a result. The shrinking process is always moving in that specific direction, from the end of the file towards the front.
Many SQL Server experts advise against SQL Server database shrinking, especially as a frequent and pre-scheduled maintenance action. Nevertheless, there are some critical situations where it is considered as the only valid or applicable solution:
In general, shrinking a SQL Server database is most effectively used to downsize a database file size after operations that have resulted with very large amount of unused space; such are DROP and TRUNCATE table operations.
In order to display the data and log files information for a SQL Server database and check the disk space information:
To check data and log space information for a database from SSMS, perform the following steps:
As an alternative to getting the data size information from SSMS, the information can be acquired by executing the ‘sp_spaceused’ stored procedure against the database
Running the stored procedure is a more convenient option, since it allows running the check against a specific table only
USE ApexSQL_Backup_Shrink;
GO

EXEC sp_spaceused N'Table_1';
GO
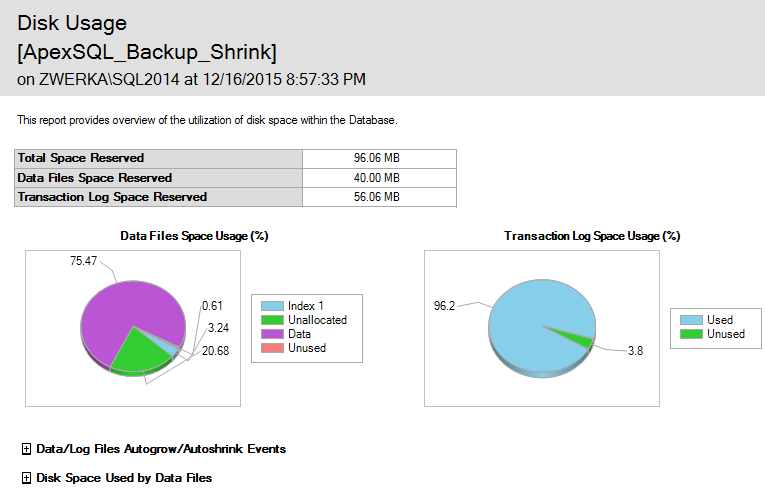
Here is an example of the results after executing specified stored procedure

Third option, as previously stated, is to execute the SELECT operation against the sys.database_files
USE ApexSQL_Backup_Shrink;
GO

SELECT file_id
	,NAME
	,type_desc
	,physical_name
	,size
	,max_size
FROM sys.database_files;
GO
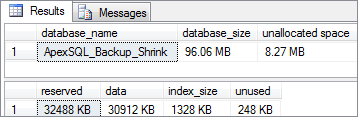
Here is an example of the results when executing specified SELECT statement

Before deciding to shrink a database, it is important to be aware of all limitations and restrictions of the database shrinking process, as well as possible negative impact on the database and SQL Server performance.
Limitations:
Cons:
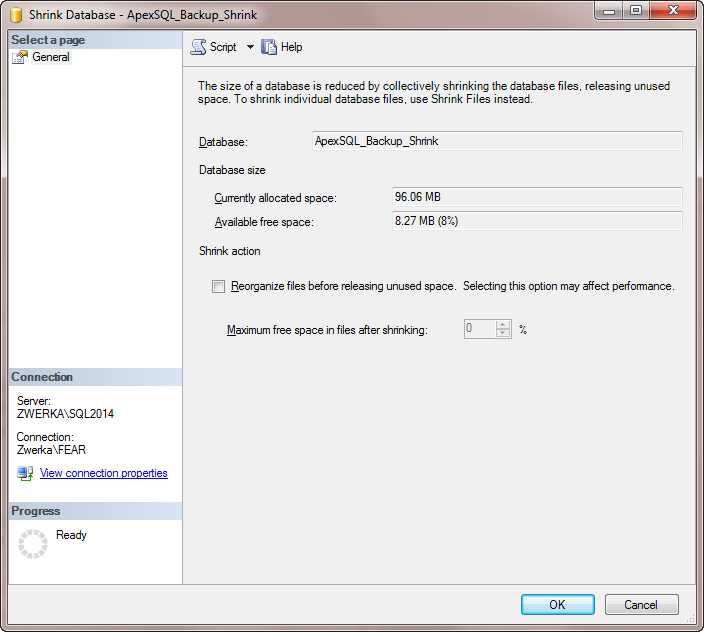
Note: to determine percent of maximum remaining free space in files after the shrinking process is finished, it is required to specify the % value.
e.g. Shrinking database ApexSQL_Backup_Shrink with maximum 25% remaining free space in files
DBCC SHRINKDATABASE (
		ApexSQL_Backup_Shrink
		,25
		);
Note: if Reorganize files before releasing unused space option is checked, it will be possible to choose percent of maximum remaining free space in files after the shrinking process is finished. When this option is selected, the result will be the same as when executing DBCC SHRINKDATABASE and specifying a target percent option. If this option is not selected, the result will be the same as when executing DBCC SHRINKDATABASE with TRUNCATEONLY option.
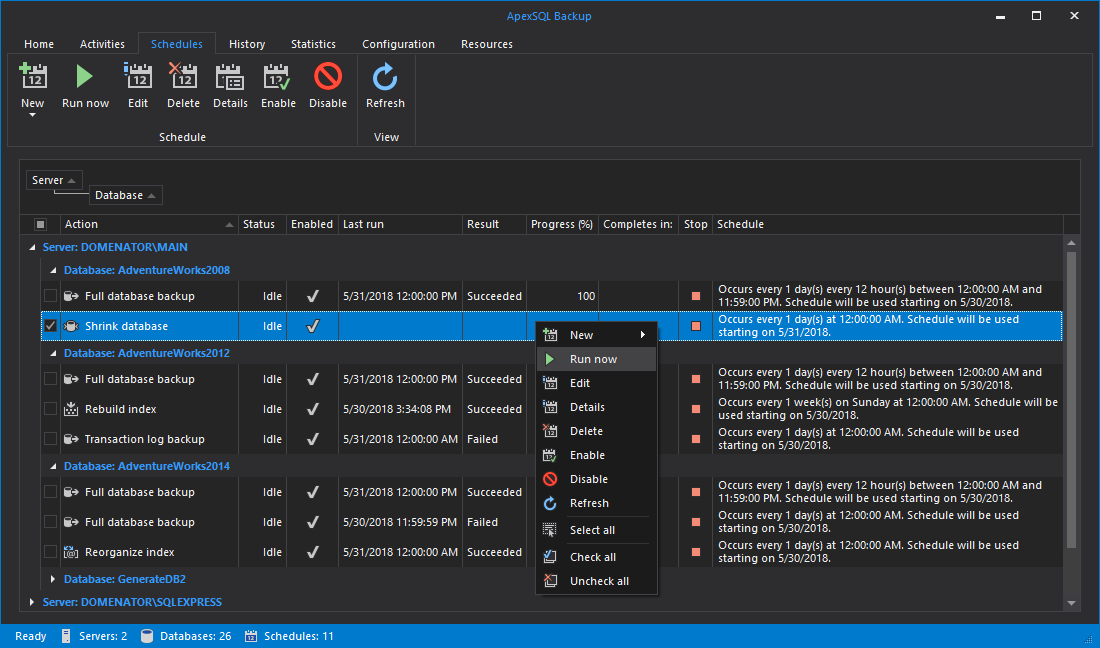
ApexSQL Backup is a SQL Server manager which provides quick and easy solution for automation and scheduling of SQL Server backup jobs and maintenance tasks across multiple servers. ApexSQL Backup is a tool that allows users to schedule different jobs and tasks, provide comprehensive display of all scheduled and completed jobs, or alert user upon job completion.
Here is how to schedule a database shrinking with ApexSQL Backup
Start ApexSQL Backup and click on the Shrink database button in the main ribbon

From SQL Server and Database drop menus choose SQL Server and database that will be shrunk
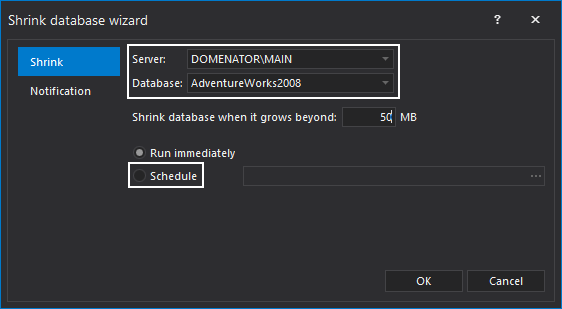
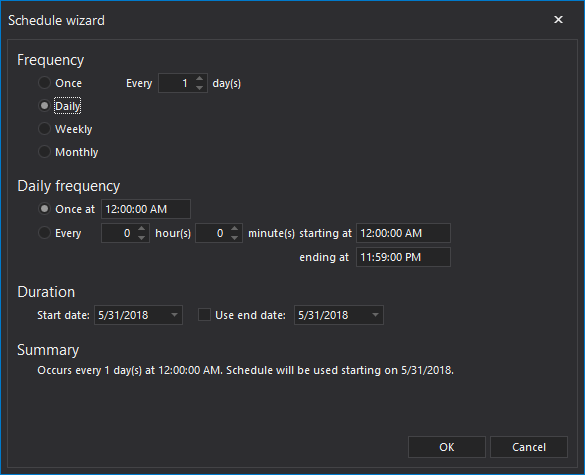
Choose Schedule radio button to bring up the dialog which allows user to select scheduling details by specifying frequency, duration and validity details, and click OK to close the scheduling dialog
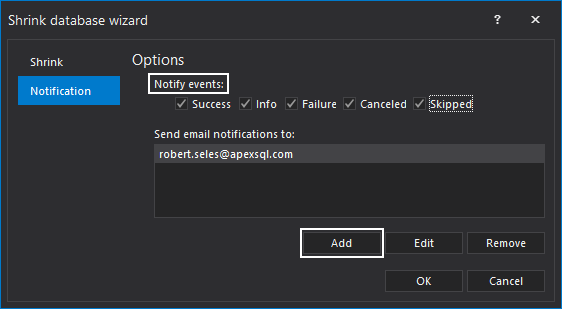
To choose if an email will be sent on job completion, navigate to Notification tab. Select whether to send notifications by checking the box in front of one or more job outcomes, and provide Email recipients
Click OK to complete the process.
With this, the shrinking process has been scheduled, and will be executed as per schedule details, clearing out unused pages from database files which results in freeing of disk space.
Furthermore, scheduled job can be viewed and changed or even executed earlier from the Schedules tab.