-
Title
How to back up a database without the index data -
Resolution
This article explains how to create filegroups and move indexes into a different file group, and how to backup a database without indexes with the purpose to reduce the amount of data required to perform backups thus reducing backup time and space required. We will also show how to use the ApexSQL Backup solution for filegroups backup as a first part of the series in which we will show how to backup and restore a database without indexes, and to recreate the indexes after a restore.
Why using this approach?
In database development a database backup is an often created for the purposes of backup verification and testing. Backing up a whole database requires both time and space. Also, when implementing log shipping the user has to do a database backup, transfer it over the network and perform a restore it, which is a time consuming process.
Backing up only data without the indexes would reduce the time and space amount required for a full back up significantly.
How to implement this approach?
To implement this approach the user should create new filegroups and store the data and indexes into a separate filegroups.
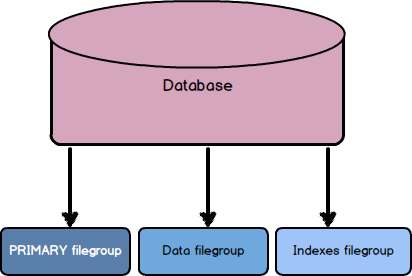
Every database has one PRIMARY filegoup that contains the primary data file (recommended primary file extension is .mdf ) and all other files that are not placed into other secondary filegroups.
Filegroups can be added either directly from the SQL Server Management Studio or by using the T-SQL scripts.
To create data and index filegroups run the following T-SQL script:
ALTER DATABASE AdventureWorks2014
ADD FILEGROUP IndexesFG
GO
To check created filegroups run the following T-SQL script:
USE AdventureWorks2014
SELECT name AS [Filegroups]
FROM sys.filegroups
WHERE type = 'FG'
Moving indexes into another Filegroup
To find all non – clustered indexes in a database use the following script:
SELECT
sys.tables.name AS TableName,
sys.indexes.name AS IndexName,
sys.indexes.is_primary_key AS PrimaryKey,
sys.indexes.type_desc AS IndexType
FROM sys.indexes, sys.tables
WHERE sys.indexes.object_id = sys.tables.object_id
AND sys.indexes.type = 2
ORDER BY TableName
To find all clustered indexes just change the AND sys.indexes.type = 2 value in AND sys.indexes.type = 1
Clustered indexes can/should be on a data filegroup and non-clustered on a separate if you want to separate data and indexes because if a table contains a clustered index, moving the clustered index to a new filegroup also moves the table to the same filegroup.
Other types of indexes are as follows:
3 - XML indexes
4 - Spatial indexes
5 - Clustered columnstore indexes, that applies only to SQL Server 2014 and SQL Server 2016
6 - Non- clustered columnstore indexes, applies to SQL Server 2012, SQL Server 2014, and SQL Server 2016.
7 - Non- clustered hash indexes, applies to SQL Server 2014 and 2016.
We will show an example of moving a non- clustered index to another filegroup, as there is not alternative other than to script the indexes, change the ON clause, drop indexes, and re-run the new script. There are a lot of free scripts available to achieve scripting all indexes and moving them to a specified filegoup and it is out of the scope of this article.
Example:
/*
Adds the IndexesFG file to the IndexesFG filegroup
*/

ALTER DATABASE AdventureWorks2014
ADD FILE
(
    NAME = TransIndexesFG,
    FILENAME = 'C:\Program Files\Microsoft SQL Server\MSSQL12.SPOCK2014\MSSQL\DATA\IndexesFG.ndf',
    SIZE = 5MB,
    MAXSIZE = 100MB,
    FILEGROWTH = 5MB
)
TO FILEGROUP IndexesFG;
GO

/*
Creates the IX_SpecialOfferProduct_ProductID index
on the IndexesFG filegroup and drops the original IX_SpecialOfferProduct_ProductID index
*/

CREATE NONCLUSTERED INDEX IX_SpecialOfferProduct_ProductID
    ON Sales.SpecialOfferProduct (ProductID)
    WITH (DROP_EXISTING = ON)
    ON IndexesFG;
GO
How to back up a database without the index data by using SQL Server Management Studio
SQL Server Management Studio allows backing up specified filegroups as an option in a regular database Backup task. To back up a database without the index data by using SQL Server Management Studio:
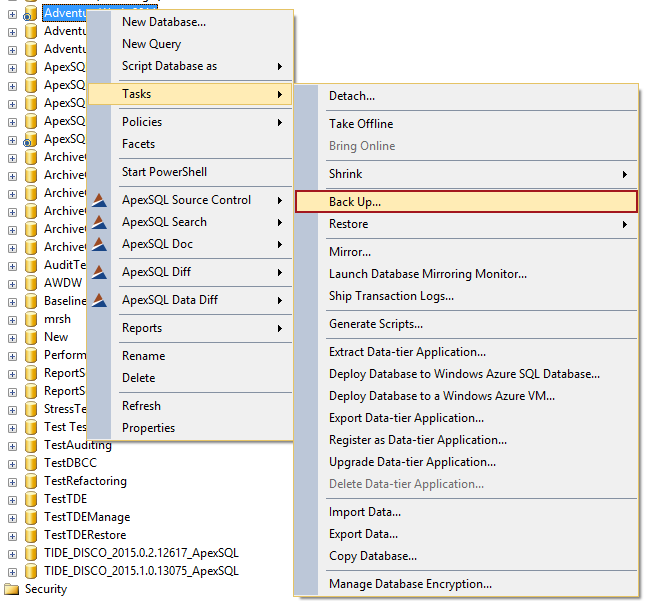
- Right click a database and select Tasks -> Backup:
In the Back Up Database dialog select the Files and filegroups option and specify a desired filegroup:

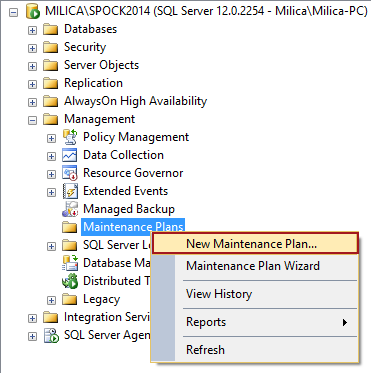
In the Object Explorer pane, right click the Management node and select the New Maintenance Plan option:
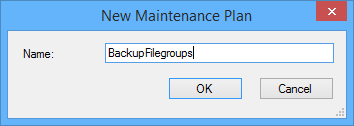
In the New Maintenance Plan dialog name a new plan:
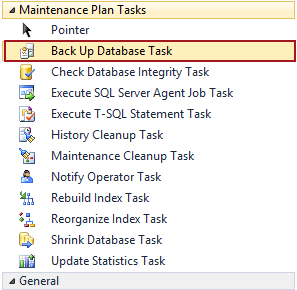
From the Maintenance Plan Tasks toolbar select Back Up Task:
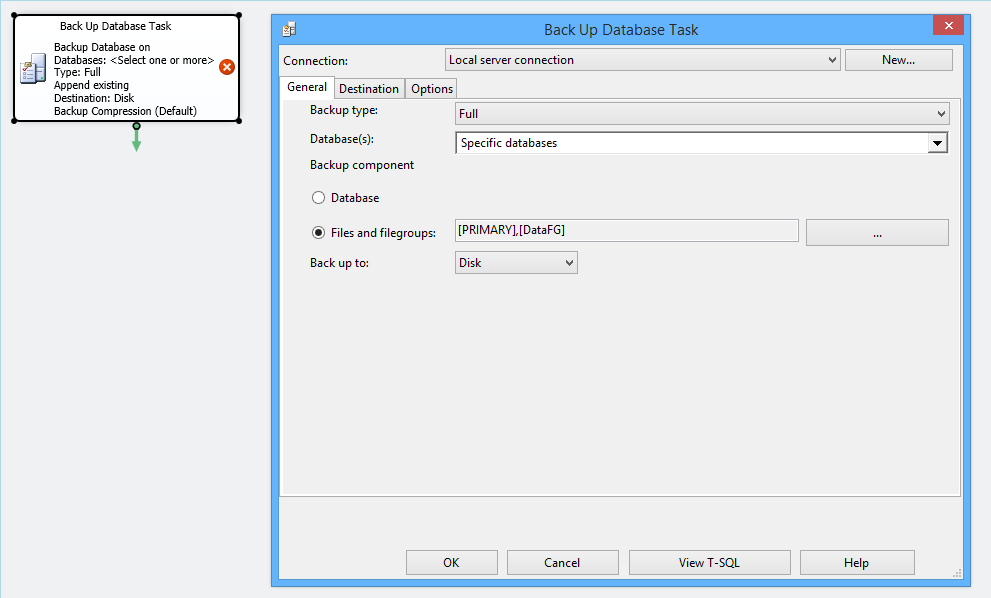
Double click on an added task, specify a database, check the Files and filegroups option, and specify the filegroups for back up:
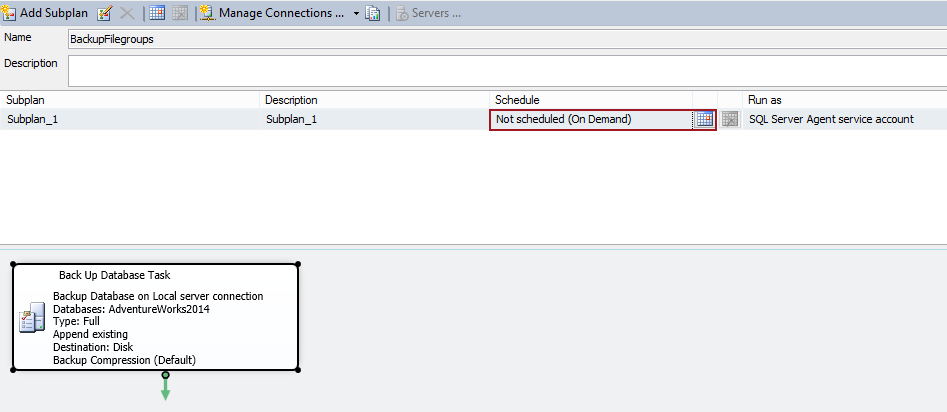
To schedule Back Up Database Task use the SQL Server Agent scheduler:
Select a Backup option from the main menu:
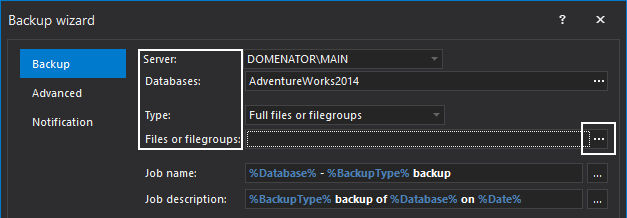
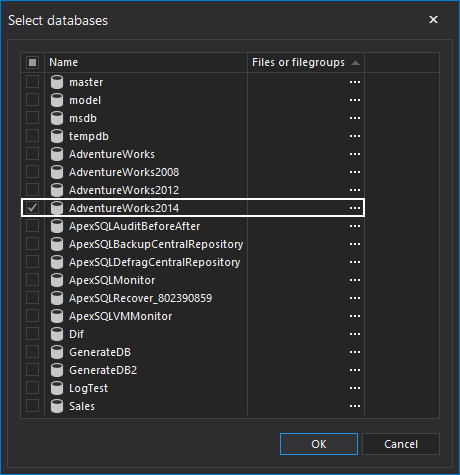
In the Backup Wizard dialog set the SQL Server instance and select a database to backup. In type drop menu, select the option Full files or filegroups. Click the browse button (…) in Files and filegroup box.
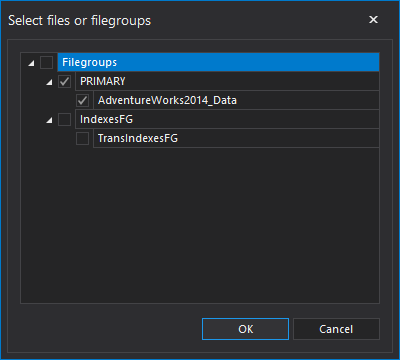
Check the database that the files belongs to, and click Browse button to specify which files will be backed up. To select the data files only, check the box for the Primary filegroup. Click OK on both forms to get back to backup wizard.
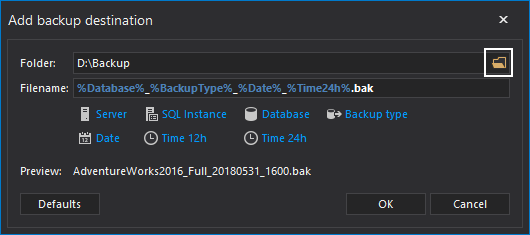
To .set the backup destination path and naming rules for the backup file, click on Add destination button. Paste the backup path in the Folder box or browse for the backup destination by clicking on folder button. Include any relevant tags or add custom string to Filename box if needed. Example of the filename is available at the page bottom. Click OK to return to backup wizard
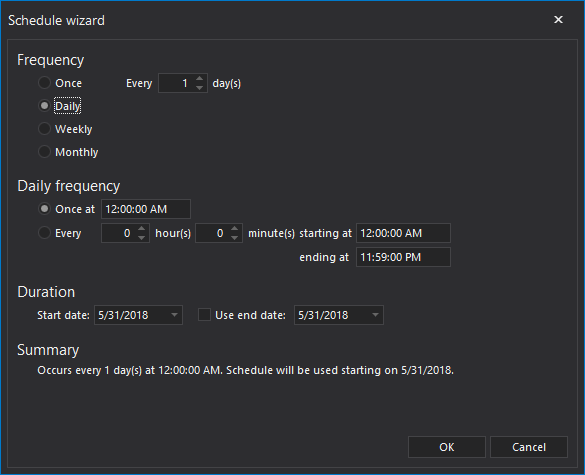
If backup needs to be executed in a regular manner, select the Schedule button at the bottom of the backup wizard and set the schedule frequency. Otherwise, leave the Run immediately option selected
In Advanced tab, set the desired options regarding media, verification, compression, encryption and cleanup
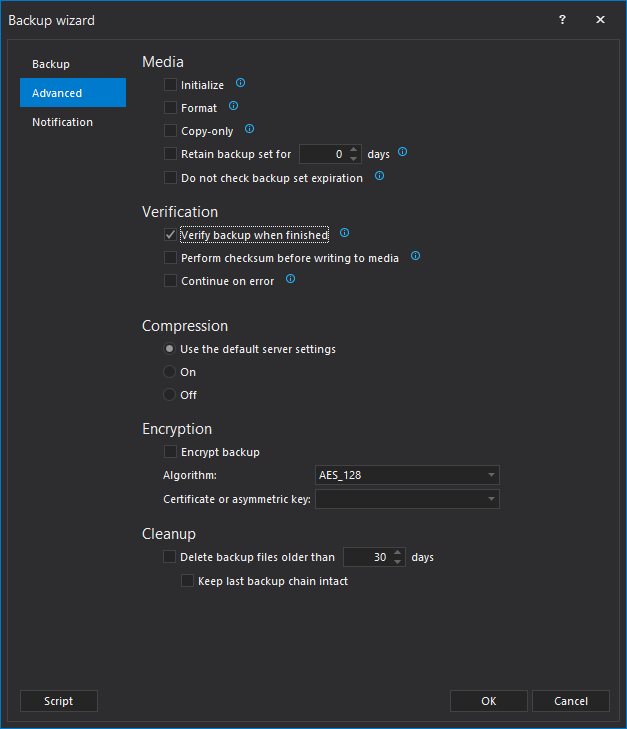
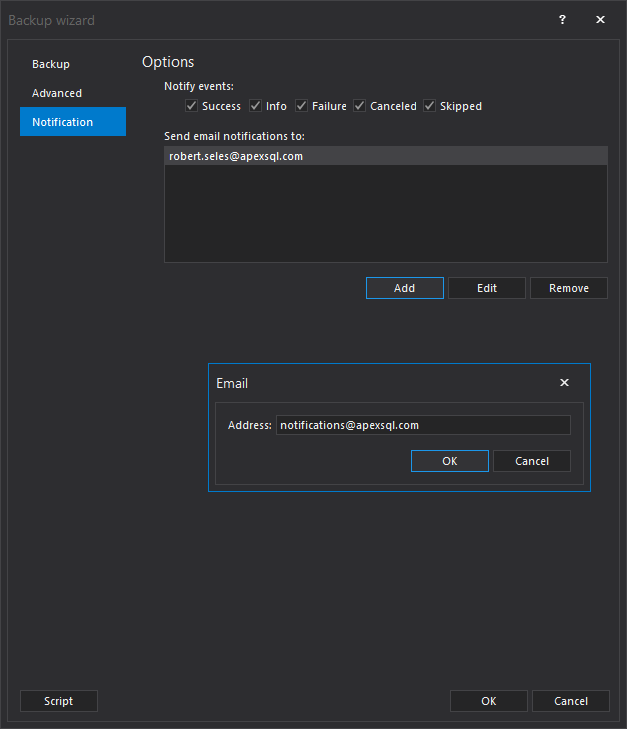
In Notification tab, check the job outcomes that should generate Email notification, and add one or more email addresses as recipients. Click OK to execute or schedule the backup job (depending on the option selected in step.
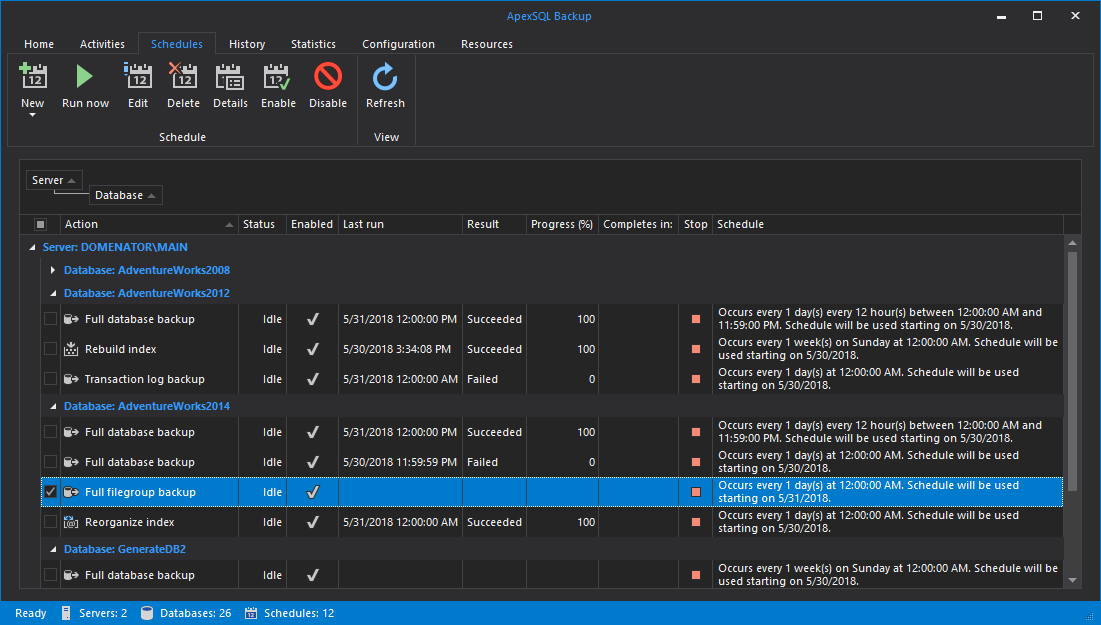
All scheduled activities will be shown in Schedules tab in main application window.
This approach is straight forward, but a downside is that is cannot be scheduled without creating a T-SQL script and scheduling it as a SQL Server Agent job.
How to back up a database without the index data by using Maintenance Plans
Backing up the desired files and filegroups can be achieved by using the Back Up Task.
To back up a database without the index data by using Maintenance Plans:
Although Maintenance Plans offer a scheduling option, the Maintenance Plan Tasks toolbar doesn’t contain a restore task, so having a complete solution would require using Execute T-SQL Statement Task.
How to back up a database without the index data by using ApexSQL Backup
To use a scheduling option without an additional coding, and be able to have a complete solution without additional complication when backing up and restoring filegroups which will be a topic of our next article, ApexSQL Backup a SQL backup management tool that enables managing and automating backup jobs in addition offers automation of Files and filegroups database back up’s.
To back up a database without the index data by using ApexSQL Backup: