
Duplicating List Properties
The Duplicate List Properties action lets you copy selected properties from a SharePoint list to one or more other lists.
You can, for example, set up and configure a single model list, then copy its settings to any number of other lists for which you want to use the same settings.
To duplicate list properties:
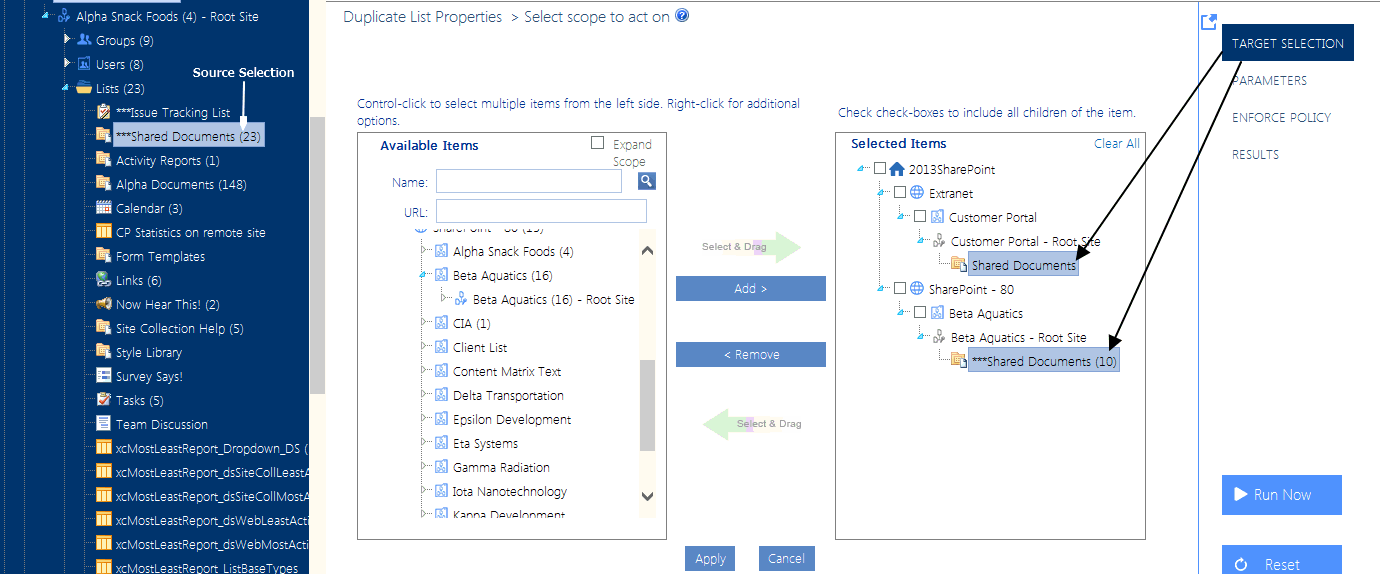
1Select the list whose properties you want to duplicate.
NOTE: Unlike many other ControlPoint operationswhich are initiated for target objects (that is, objects that you want to act on)you initiate the Duplicate List Properties operation by selecting the source list (that is, the list you want to copy from).
2Choose Configuration > Duplicate List Properties.
3In the Target Selection picker, select the object(s) that you want to copy list properties to.
NOTE: If you select an object above the list level, you will have the option of limiting the operation to one or more specific types of list within that scope.
4Click [Apply].
5In the Parameters section, check each box that corresponds to the property you want to copy to the target list(s).
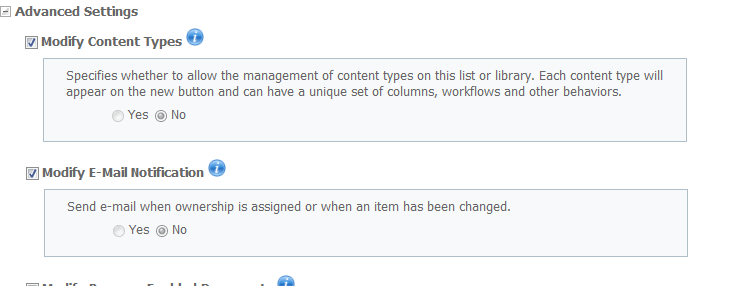
Note that:
§The Parameters section displays properties that are valid for the selected source list type.
§With the exception of Modify Retention Policy, each field pre-populate with the value currently assigned to the source list (that is, the value that will be applied to the target lists). These fields are not editable.
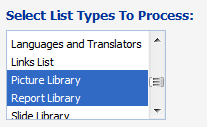
6If you want to limit the operation to specific types of lists, Select List Types to Process.
Now you can:
·run the operation immediately (by clicking the [Run Now] button)
OR
·complete the Enforce Policy section and schedule the operation to run at a later time.
OR
·save the operation as XML Instructions that can be run at a later time.
If you chose the Run Now, option, after the operation has been processed:
·a confirmation message displays at the top of the page, and
·a ControlPoint Task Audit is generated for the operation and displays in the Results section.
If you schedule the operation, a link to the Task Audit is included in the scheduled action notification email.
See also The ControlPoint Task Audit.
If you schedule the action, ControlPoint will use the settings that exist for the source object at the time the job is run (not at the time the job was created).
Managing Site Collection and Site Features
Manage Site Collection Features and Manage Site Features are ControlPoint actions that enable you to activate or deactivate features across one or more SharePoint site collections or sites. In addition to managing features that can be activated/deactivated via the SharePoint user interface, you can also activate/deactivate hidden features. (In SharePoint, hidden features must be activated/deactivated using a command line, custom code, or through dependency of another feature.)
You can use these actions in conjunction with the Site Collection Property Report and Site Property Report to manage the configuration of SharePoint features throughout your farm.
In a multi-farm environment, features can be managed across multiple farms; the user interface is populated with features that have been deployed on the home farm. Therefore, if your multi-farm installation includes different SharePoint versions (for example, both 2013 and 2016) or variations (for example, Foundation and Server), which necessitates differences in the user interface, some options may be missingor not validfor the remote farm. For example, if a feature is selected that has not been deployed on a remote farm, the activation or deactivation of the feature will be skipped for that farm.
To manage site collection or site features:
1Select the object(s) for which you want to manage features.
2Choose the appropriate option:
§Configuration > Manage Site Collection Features.
OR
§Configuration > Manage Site Features.
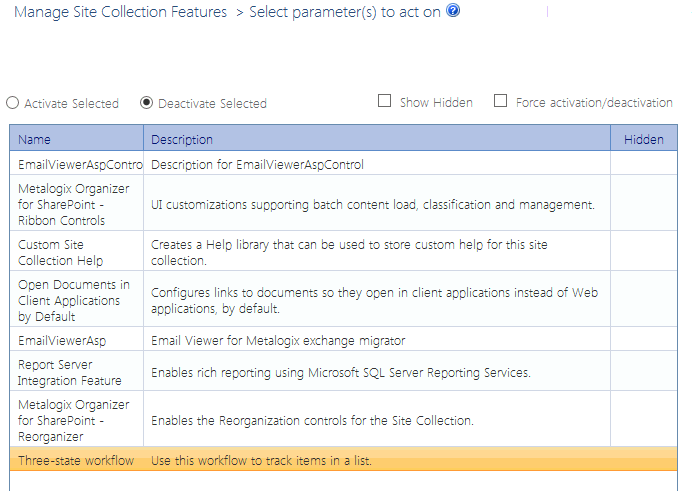
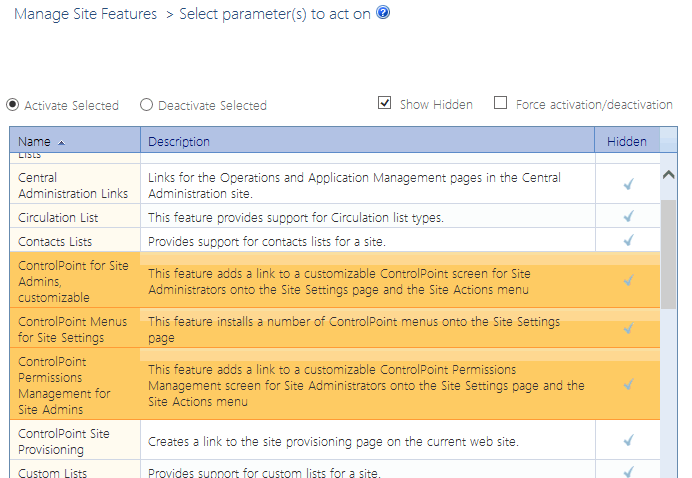
All of the available site collection or site-level features (depending on your selection) that can be activated/deactivated via the SharePoint user interface display.
NOTE: If you also want to manage hidden features (that is, features that cannot be activated/deactivated via the SharePoint user interface), check the Show Hidden box. Each hidden features will be identified by a check mark in the Hidden column.
3Select the action you want to carry out: Activate or Deactivate.
4If you want to override certain errors that could occur while attempting to activate a feature, check the Force activation/deactivation box.
NOTE: An error might occur, for example, if a feature becomes corrupted and you cannot uninstall it. The force option allows you to overwrite the existing feature.
5Highlight each feature you want to act on. (You can select multiple line items in the conventional manner by using the [SHIFT] or [CTRL] key .)
NOTE: Any site collections or sites that are already in the selected state will be skipped.
Example: Deactivate Site Collection Workflows
Example: Activate ControlPoint Site Features
(Note that these are hidden features)
Now you can:
·run the operation immediately (by clicking the [Run Now] button)
OR
·schedule the operation to run at a later time or on a recurring basis.
OR
·save the operation as XML Instructions that can be run at a later time.
If you chose the Run Now, option, after the operation has been processed:
·a confirmation message displays at the top of the page, and
·a ControlPoint Task Audit is generated for the operation and displays in the Results section.
If you schedule the operation, a link to the Task Audit is included in the scheduled action notification email.
See also The ControlPoint Task Audit.
Managing Audit Settings
The Manage Audit Settings action lets you to manage (enable and disable) SharePoint audit settings from within the ControlPoint application interface.
NOTE: Using "Manage Audit Settings" to disable or enable Audit flags will not affect auditing enabled through a SharePoint Information Management Policy for a list or library. These Audit flags are enabled at the Content Type level, and disabling auditing at the Site Collection level will not disable Content Type auditing.
In a multi-farm environment, audit settings can be managed across multiple farms.
To access the Manage Audit Settings workspace:
1Select the object(s) whose audit settings you want to manage.
NOTE: If you select the entire farm or one or more Web applications or site collections, the audit settings will be applied to the site collection(s) and inherited by child objects (sites, libraries, and lists). If you want a site collection to be included in the GDPR Dashboard Sites with Auditing Enabled calculation, you must enable audit settings at the site collection level or above.
2Choose Audit and Alerts > Manage Audit Settings.
It is important to note that if your selection includes a single object, audit settings currently enabled for that object will be checked. (Enabled settings will not be checked if your scope includes multiple objects.)
To enable or change audit settings:
1Select Enable Audit.
2Use the information in the following table to determine the appropriate action to take.
|
If you want to ... |
Then ... |
|---|---|
|
reset all audit settings for the selected objects* |
·select Reset Audit Settings to the settings below ·check/uncheck each setting you want to enable/disable. |
|
add to existing audit settings for the selected objects* |
·select Add the settings below to the existing Audit Settings ·check each setting you want to add. NOTE: Remember that existing audit settings will appear checked only if they were set explicitly for all objects within the scope of your selection. |
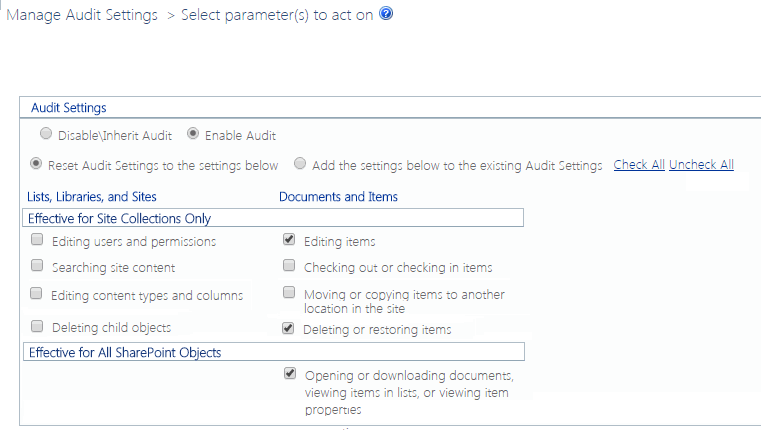
* For most audit settings, SharePoint will only recognize and report on those that have been set at the site collection level (in the Effective for Site Collections Only section). The only setting that can be set explicitly at the site or list/library level that SharePoint will recognize is Opening or downloading documents, viewing items in lists, or viewing item properties (in the Effective for all SharePoint Objects section).
If you are enabling audit settings at the site collection level or above, all settings (except for Deleting child objects) must be enabled if you want the affected site collections to be included in the GDPR Dashboard Sites with Auditing Enabled calculation.
Now you can:
·run the operation immediately (by clicking the [Run Now] button)
OR
·complete the Enforce Policy section and schedule the operation to run at a later time.
OR
·save the operation as XML Instructions that can be run at a later time.
If you chose the Run Now, option, after the operation has been processed:
·a confirmation message displays at the top of the page, and
·a ControlPoint Task Audit is generated for the operation and displays in the Results section.
If you schedule the operation, a link to the Task Audit is included in the scheduled action notification email.
See also The ControlPoint Task Audit.
To disable audit settings:
Select Disable\Inherit Audit.
If you select this option for site collections, auditing for individual sites and lists/libraries within the site collection depends on whether auditing has been enabled for the site or list/library. If you select it for sites, libraries, or lists, whether SharePoint captures audit events depends on whether auditing has been enabled for the site collection. (By design, sites, lists, and libraries inherit most audit behavior from the site collection.)
NOTE: If you disable the auditing of any event type(s) for which ControlPoint alerts have been scheduled, you will no longer receive alerts for those events. See also Setting ControlPoint Alerts.
Creating and Managing SharePoint Alerts
The ControlPoint Create SharePoint Alerts action lets you create alerts for users in your SharePoint environment. You can create SharePoint alerts for sites, lists, and individual list items.
You can also change and/or delete SharePoint alerts using the Manage SharePoint Alerts action.
In a multi-farm environment, alerts can be created and managed for the home farm only.