Database Setup for PostgreSQL as a Source
PostgreSQL configuration prerequisites:
- In the PostgreSQL configuration file, set the wal_level parameter to logical.
For example:wal_level = logical # minimal, replica, or logical
- Add an entry of SharePlex user in the pg_hba.conf file so that SharePlex Capture can establish a connection with the walsender process of PostgreSQL
For example: # TYPE DATABASE USER ADDRESS METHOD
host replication all 10.10.10.10/32 trust
- For all the tables which are going to be part of replication, set the 'replica identity' to 'full' before activation.
For example: alter table "DEMO_SRC" replica identity full;
- Navigate to the /var/lib/pgsql/13/data directory and edit the PostgreSQL file.
Remove the comment and increase the below two parameters' value as below:
wal_sender_timeout = 6000s
wal_receiver_timeout = 6000s
- Navigate to the bin directory and restart database: cd /usr/pgsql-13/bin/./pg_ctl -D /var/lib/pgsql/13/data/ restart
| Note:SharePlex PostgreSQL as Source does not replicate data from Archive WAL files. |
Overview
Run the PG Setup utility for PostgreSQL (pg_setup) to establish a user account, schema, and tables for use by SharePlex.
Guidelines for Use
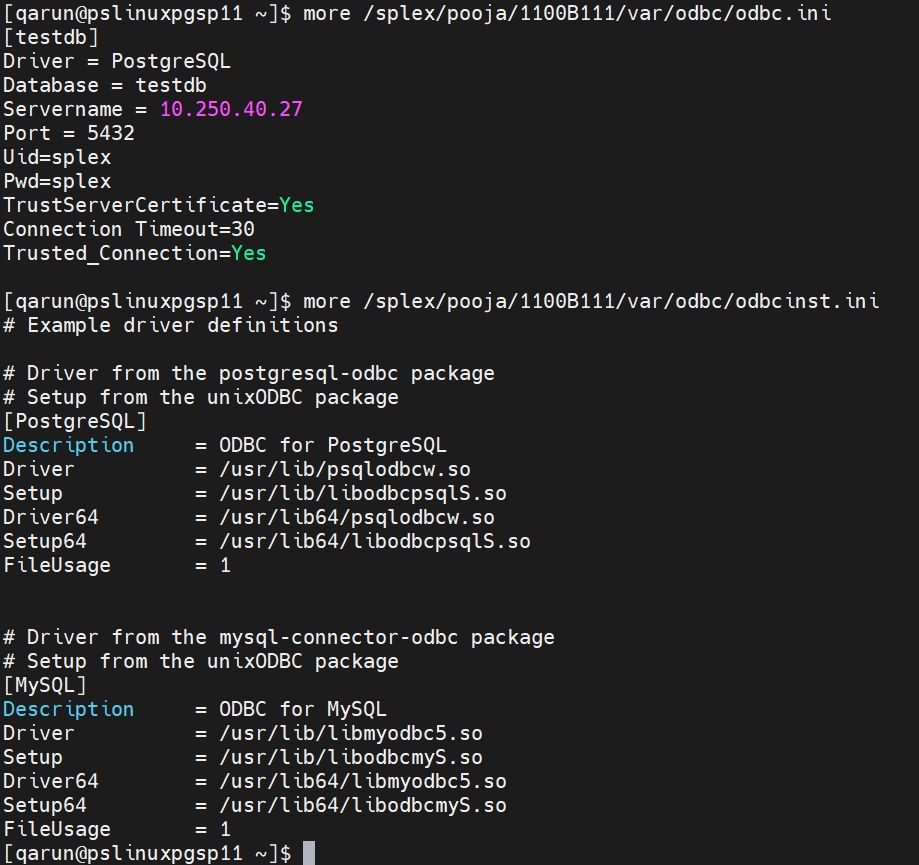
For an example of the sample odbc.ini and odbcinst.ini files, see the example below:
Required Privilege
The PG_Setup utility must be run as a PostgreSQL Administrator in order to grant SharePlex the required privileges to operate on the database and to create the SharePlex database account.
Run PG Setup for PostgreSQL
Follow the below instructions to run the PG setup for PostgreSQL:
- Shut down any running SharePlex processes and sp_cop on the source system.
-
Run the pg_setup program from the bin subdirectory of the SharePlex product directory.
Important! If you installed the SharePlex instance on any port other than the default of 2100, use the -p option to specify the port number. For example, in the following command the port number is 9400.
$ /users/splex/bin> pg_setup -p9400
Table 8: Setup prompts and responses
|
(Linux)
Enter the PostgreSQL DSN name or connection string[]: |
Enter a DSN or a connection string. |
|
Enter the PostgreSQL Administrator name : |
Enter the name of the PostgreSQL Administrator. This user will perform the work on the SharePlex account. |
|
Enter the password for the Administrator account : |
Enter the password of the Administrator. |
|
Enter the replication target database name: |
Enter the name of the database that you want to contain the SharePlex tables and other objects for use by SharePlex. You can enter the name of a new or existing database. |
|
Database name database does not exist. Would you like to create it? [y] : |
If this prompt is displayed, the specified database does not exist. Press Enter to have the setup utility create it for you. |
|
Would you like to create a new SharePlex user [y]: |
Press Enter to accept the default to create a new SharePlex database user account and schema of the same name in the specified database, or enter n to use an existing SharePlex account. |
|
Enter the name of the new SharePlex user:
Enter the name of the existing SharePlex user: |
One of these prompts is displayed depending on whether you elected to create a new user or use an existing user. Enter the name of the SharePlex user.
NOTE: Enter the user name in lowercase letters only. |
|
Enter the password of the SharePlex user : |
Enter the password of the SharePlex user account. |
|
Re-enter the password for the SharePlex user : |
This prompt is only shown if you created a new user. Enter the SharePlex password again. |
| Will this database be used as a source? [n] : |
Y |
| Enter the replication slot name? |
Enter the replication slot name. Example: Slot1, Slot2. etc |
| Enter the default tablespace for use by SharePlex [pg_default] : |
Enter the default tablespace by SharePlex |
| Enter the index tablespace for use by SharePlex [pg_default] : |
Enter the index tablespace by SharePlex |
A successful setup terminates with a message similar to the following:
Completed SharePlex for PostgreSQL database configuration
SharePlex User name: splexab
Database name: testdb
-- The datasource identifier in the SharePlex configuration is 'r.testdb' --
|
Important!SharePlex holds the WAL logs when configuration is not active. When pg_setup is executed, it creates a replication slot. This replication slot maintains the latest LSN value of the WAL records that Capture has received and processed. Also, it holds all the WAL files from getting removed or archived, starting from the stored LSN in this slot.
Following are the steps that need to be performed when no config is active and you don’t want to hold WAL files in the pg_wal directory:
-
Get the replication slot name from the var/data/connections.yaml file.
-
Check if the replication slot exists in the database using the below query:
select count(*) FROM pg_replication_slots where slot_name = <slot_name>;
-
If a replication slot exists, then delete that replication slot from the database using the below query:
select pg_drop_replication_slot(<slot_name>);
-
If you want to activate the config file, then first execute the pg_setup utility, which will create the replication slot again, and then activate the config file. |
PostgreSQL Setup as a Target (pg_setup)
Database Setup for PostgreSQL as a Target
Overview
Run the Database Setup utility for PostgreSQL (pg_setup) to establish a user account, schema, and tables for use by SharePlex.
Supported databases
All implementations of the PostgreSQL open-source database on supported platforms
Fujitsu Enterprise PostgreSQL Prerequisite
Fujitsu PostgreSQL contains a customized ODBC driver designed to run with the shared libraries supplied by Fujitsu PostgreSQL. In order to ensure the proper configuration, you must create a symbolic link to ensure that the correct libraries are found at runtime.
Issue Description:
If you attempt to run the pg_setup program prior to creating the symbolic link, pg_setup will fail with the following error message:
Error: [unixODBC]invalid connection option "target_server"
To create a symbolic link
To ensure that the proper library gets loaded, first locate the path to the directory where the Fujitsu PostgreSQL libraries are installed (for example /opt/fsepv95server64/lib). Then create a symbolic link in the SharePlex OPTDIR/lib/hooks directory pointing to the libpq.so.5 library in the Fujitsu PostgreSQL library directory. For example:
cd /opt/splex/lib/hooks
ln –s /opt/fsepv95server64/lib/libpq.so.5
Guidelines for use
Required privileges
Review the following requirements to ensure that the setup succeeds.
- The Database Setup utility must be run as a PostgreSQL Administrator in order to grant SharePlex the required privileges to operate on the database and to create the SharePlex database account.
-
(Symfoware only) If the person who is running the setup utility is not a Fujitsu Enterprise PostgreSQL owner, set the environment variable LD_LIBRARY_PATH to include the path to the lib subdirectory in the Fujitsu Enterprise PostgreSQL installation directory. The LD_LIBRARY_PATH is set in the .bash_profile file of the Fujitsu Enterprise PostgreSQL owner.
Example:
export LD_LIBRARY_PATH= /opt/symfoserver64/lib:$LD_LIBRARY_PATH
If you do not set this path, the following error occurs:
symbol lookup error: /opt/fsepv95client64/odbc/lib/psqlodbca.so: undefined symbol: PQconnectdbParams
- Cloud installations:
- Common restrictions on privileges in cloud-hosted database services make it difficult for the setup utility to succeed in every possible type of scenario. To ensure that the database setup succeeds, only use the setup utility for the following purposes: To do a first-time database setup with a new SharePlex user, or, to modify an existing SharePlex user that either owns the database or has access to it.
-
On Amazon RDS, you might need to grant usage/privileges on the target schema and tables to the SharePlex user, as shown in the following example:
Log in as the schema owner, then issue the following commands:
grant usage on schema schema_name to user_name;
grant all privileges on all tables in schema schema_name to user_name;
Run Database Setup for PostgreSQL
- Shut down any running SharePlex processes and sp_cop on the target system.
-
Run the pg_setup program from the bin subdirectory of the SharePlex product directory.
Important! If you installed the SharePlex instance on any port other than the default of 2100, use the -p option to specify the port number. For example, in the following command the port number is 9400.
$ /users/splex/bin> pg_setup -p9400
Table 9: Setup prompts and responses
|
(Linux)
Enter the PostgreSQL DSN name or connection string [] : |
Enter a DSN or a connection string if the system is Linux. |
|
Enter the PostgreSQL Administrator name : |
Enter the name of the PostgreSQL Administrator. This user will perform the work on the SharePlex account. |
|
Enter the password for the Administrator account : |
Enter the password of the Administrator. |
|
Enter the replication target database name: |
Enter the name of the database that you want to contain the SharePlex tables and other objects for use by SharePlex. You can enter the name of a new or existing database. |
|
Database name database does not exist. Would you like to create it? [y] : |
If this prompt is displayed, the specified database does not exist. Press Enter to have the setup utility create it for you. |
|
Would you like to create a new SharePlex user [y]: |
Press Enter to accept the default to create a new SharePlex database user account and schema of the same name in the specified database, or enter n to use an existing SharePlex account. |
|
Enter the name of the new SharePlex user:
Enter the name of the existing SharePlex user: |
One of these prompts is displayed depending on whether you elected to create a new user or use an existing user. Enter the name of the SharePlex user.
NOTE: Enter the user name in lowercase letters only.
|
|
Enter the password of the SharePlex user : |
Enter the password of the SharePlex user account. |
|
Re-enter the password for the SharePlex user : |
This prompt is only shown if you created a new user. Enter the SharePlex password again. |
A successful setup terminates with a message similar to the following:
Completed SharePlex for PostgreSQL database configuration
SharePlex User name: splex
Database name: ndb5
Target specification in SharePlex configuration: r.ndb5
Configure SharePlex to support PostgreSQL database on Azure platform
You can configure SharePlex to support the PostgreSQL database on the Azure platform using the below steps:
- Add the DSN entry in the Odbc.ini file at /etc/odbc.ini and the …/var/odbc directory.
- Copy the /etc/odbcinst.ini file to the …/var/odbc directory.
- Run the PostgreSQL setup utility.
This process creates the SharePlex tables, login and user accounts needed to run SharePlex replication.
Note: While performing DML operations in bulk for PostgreSQL PaaS (Azure), a performance slowness issue is observed.
Table 10: Setup Prompts and Responses
|
Enter the PostgreSQL DSN name or connection string [] : |
Enter the PostgreSQL DSN name or a connection string that connects to the PostgreSQL database system.
Example: pslazpgdb02 |
|
Is DB hosted over Azure ? : |
Y |
|
Enter the Database hostname : |
Enter the Azure database host name.
Note: PGsetup Administrator name should be in the <username> format (Don't mention hostname)
Example: pslazpgdb02.postgres.database.azure.com
If a user already exists for SharePlex then it should be entered in the <username@hostname> format.
If a new user needs to be created for SharePlex then is should be entered in the <username> format. |
|
Enter the PostgreSQL Administrator name : |
Enter the name of the PostgreSQL Administrator. This user will perform the setup work on the SharePlex account and schema.
Example: PostgreSQL |
|
Enter the password for the Administrator account: |
Enter the password of the Administrator.
Note: User 'postgres@pslazpgdb02.postgres.database.azure.com' got the superuser role. |
|
Enter the replication target database name : |
Enter the target database name on which replication needs to be performed.
Example:
sp_mk |
|
Would you like to create a new SharePlex user?
Enter the name of the existing SharePlex user: |
N (If you want to create a user, enter “y”)
Enter the name of the SharePlex user. |
|
Enter the password of the SharePlex user : |
Enter the password of the SharePlex user account. |
|
Re-enter the password for the SharePlex user : |
This prompt is only shown if you created a new user. Enter the SharePlex password again. |
A successful setup terminates with a message similar to the following:
Completed SharePlex for PostgreSQL database configuration
SharePlex User name: postgres@pslazpgdb02.postgres.database.azure.com
Database name: sp_mk
The data source identifier in the SharePlex configuration is 'r.sp_mk' –
SQL Server Setup (mss_setup)
Database Setup for SQL Server
Overview
Run the Database Setup utility for SQL Server (mss_setup) on a Microsoft SQL Server system to establish SharePlex as a SQL Server database user.
This utility creates the following:
- A SharePlex user account with the db_owner role
- Tables and indexes for use by SharePlex and owned by the SharePlex user in a database of your choosing
- A default database connection.
Supported databases
For supported SQL Server platforms and versions, see the SharePlex Release Notes.
Guidelines for use
- A system DSN (data source name) must exist for the SQL Server database. SharePlex Post uses the DSN to connect to the database through ODBC.
- Run the Database Setup utility on all SQL Server instances in the SharePlex replication configuration.
- Within a cluster, run the Database Setup utility on the node to which the shared disk that contains the variable-data directory is mounted.
- For consolidated replication, run the Database Setup utility for each variable-data directory.
Required privileges
Review the following requirements to ensure that the setup succeeds.
-
The Database Setup utility must be run as a SQL Server System Administrator in order to grant SharePlex the required privileges to operate on the database and to create the SharePlex database account and objects.
-
The sysadmin role is required to run mss_setup, but it is not required by the SharePlex database account used to run SharePlex replication (the SharePlex User). The db_owner role is required by the SharePlex User account and it is granted by mss_setup (for source and target).
- (Cloud installations) Common restrictions on privileges in cloud-hosted database services make it difficult for the setup utility to succeed in every possible type of scenario. To ensure that the database setup succeeds, only use the setup utility for the following purposes: To do a first-time database setup with a new SharePlex user, or, to modify an existing SharePlex user that either owns the database or has access to it. (Cloud installation is not supported while replicating data from PostgreSQL to SQL Server)
Run database setup for SQL server
Perform the following steps to run database setup for SQL server:
- Shut down any running SharePlex processes and sp_cop on the SQL Server system.
-
Run the mss_setup program from the bin subdirectory of the SharePlex product directory.
| Important! If you installed the SharePlex instance on any port other than the default of 2100, use the -p option to specify the port number. For example, in the following command the port number is 9400.
C:\users\splex\bin>mss_setup-p9400 |
Table 11: Setup prompts and responses
|
Enter the Microsoft SQL Server DSN name [] : |
Enter the data source name (DSN) that connects to SQL Server. Make certain the DSN is a system DSN, not a user DSN. |
|
Enter the Microsoft SQL Server Administrator name : |
Enter the name of the SQL Server Administrator. This user will perform the setup work on the SharePlex account and schema. |
|
Enter the password for the Administrator account : |
Enter the password of the Administrator. |
|
Enter the database name: |
Enter the name of the database where you want to install the SharePlex objects. |
|
Database name database does not exist. Would you like to create it? [y] : |
If this prompt is displayed, the specified database does not exist. Press Enter to have the setup utility create it for you. |
|
Would you like to create a new SharePlex login [y]: |
Press Enter to accept the default to create a new SharePlex database user account, or enter n to use an existing account as the SharePlex database user. |
|
Enter the name of the existing SharePlex login:
Enter the name of the new SharePlex login: |
One of these prompts is displayed depending on whether you elected to create a new user or use an existing user. Enter the name of the SharePlex user.
|
|
Enter the password for login: |
Enter the password of the SharePlex user account. |
|
Re-enter the password for login : |
Enter the SharePlex password again. |
|
Will this database be used as a source? |
Accept the default of n if the database will only be a target. Enter y if this database will be a source database for SharePlex. A response of y prompts the setup to prepare the database for data capture and installs the SharePlex account and objects. |
A successful setup terminates with a message similar to the following:
Completed SharePlex for Microsoft SQL Server database configuration
SharePlex User name: splex
Database name: db1
Target specification in SharePlex configuration: r.db1
Configure Remote Posting from a Linux to a SQL Server Database
To replicate data from a Linux server to a SQL server database, follow the steps below:
-
Install the latest SQL Server ODBC drivers on Linux.
By default, the ODBC drivers will be installed at /opt/microsoft/msodbcsql18/lib64.
-
Modify the odbcinst.ini and odbc.ini files in the <var_dir>/odbc directory.
-
Run the mss_setup program from the bin subdirectory of the SharePlex product directory.
-
Provide other details when it prompts you, like the database name, username, password, etc. For more information, see Run Database Setup for SQL Server.
A successful setup terminates with a message similar to the following:
Completed SharePlex for Microsoft SQL Server database configuration
SharePlex User name: splex
Database name: db1
Target specification in SharePlex configuration: r.db1
Database Setup for Snowflake as a Target
Snowflake configuration prerequisites:
-
Create an Admin user for Snowflake using SharePlex setup, as shown in the following query:
create user <user_name> identified by '<user_password>';
-
Grant the SYSADMIN and USERADMIN roles to the Admin user using the following queries:
grant role SYSADMIN to user <user_name>;
grant role USERADMIN to user <user_name>;
-
Snowflake_setup internally uses the SYSADMIN role to perform the tasks; SYSADMIN in Snowflake has grants to create databases and schema.
-
Grant MANAGE GRANTS and CREATE USER grants to the user as shown in the following queries:
grant MANAGE GRANTS on ACCOUNT to SYSADMIN with grant option;
grant CREATE USER on ACCOUNT to SYSADMIN with grant option;
-
Provide Warehouse access to the Admin roles to be used for replication, as shown in the below queries:
grant USAGE on warehouse <warehouse_name> to role USERADMIN with grant option;
grant USAGE on warehouse <warehouse_name> to role SYSADMIN with grant option;
grant OPERATE on warehouse <warehouse_name> to role SYSADMIN with grant option;
-
Mention the same warehouse name, <waehouse_name> in the odbc.ini entry for Snowflake.
-
Create a new role with the name SHAREPLEX_ROLE for replication before running the setup.
create role SHAREPLEX_ROLE;
-
Grant the USAGE and OPERATE roles to the admin user for replication.
grant USAGE on warehouse <warehouse_name> to role SHAREPLEX_ROLE;
grant OPERATE on warehouse <warehouse_name> to role SHAREPLEX_ROLE;
-
Assign this new role to SYSADMIN for tracking newly created objects, as shown below:
grant role SHAREPLEX_ROLE to role SYSADMIN;
Overview
Use the Database Setup utility for Snowflake (snowflake _setup) to establish SharePlex as a Snowflake user and create the required SharePlex database objects.
This setup utility:
-
Uses already created SHAREPLEX_ROLE
-
Creates a new user or uses an existing user
-
Creates SharePlex internal tables and objects
It is recommended that you review all of the content in this topic before running the setup utility.
Guidelines for Use
-
Run the Snowflake_Setup utility on the target Snowflake instance in the SharePlex replication configuration.
-
Within a server cluster, run the Snowflake Setup utility on the node to which the shared disk that contains the SharePlex variable-data directory is mounted.
-
For consolidated replication, run the Snowflake Setup utility for each variable-data directory.
-
Provide a DSN (Data Source Name) as mentioned below:
-
If you have a DSN defined, and you want to use it for the SharePlex connection, copy or link the ODBC files in which that DSN is defined (odbc.ini and odbcinst.ini) to the odbc subdirectory of the SharePlex variable-data directory. This prevents connection errors when the SharePlex processes connect to the database.
-
If you do not have a DSN defined but want to use one, you can create it in the template files provided in the odbc subdirectory.
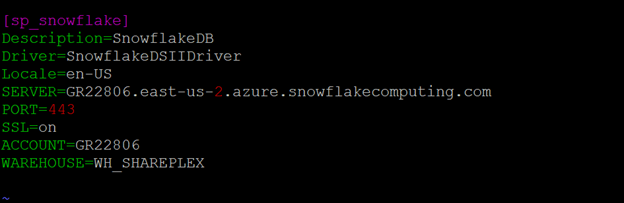
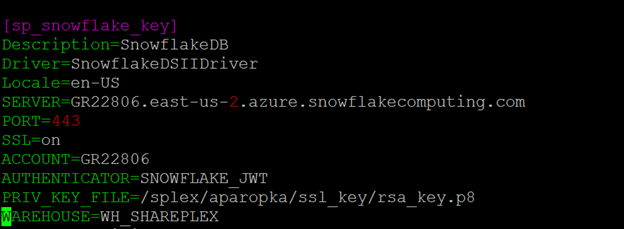
For an example of the sample odbc.ini and odbcinst.ini files, see the example below.
Sample of an ODBC file in a password based authentication:
Sample of an ODBC file for in an RSA based authentication:
Privileges granted to SharePlex
The database setup utility creates the SHAREPLEX_ROLE and assigns it to SharePlex users. SharePlex assigns the following privileges to the SharePlex_role:
|
Database privileges |
-
SELECT,INSERT,UPDATE,DELETE,TRUNCATE ON FUTURE TABLES IN DATABASE
-
USAGE ON DATABASE
|
| Schema |
ALL PRIVILEGES |
Run database setup for Snowflake
Important! The Snowflake instance must be open before this procedure is performed.
Perform the following steps to run database setup for Snowflake:
-
(Linux only) If you are using multiple variable-data directories, export the environment variable that points to the variable-data directory for the SharePlex instance for which you are running Database Setup.
ksh shell:
export SP_SYS_VARDIR=/full_path_of_variable-data_directory
csh shell:
setenv SP_SYS_VARDIR=/full_path_of_variable-data_directory
- Shut down any SharePlex processes that are running, including sp_cop.
-
Run the Snowflake database Setup command (./snowflake_setup ) using password or RSA based admin user.
- Refer to the following table for the prompts and responses to configure SharePlex correctly for the desired connection type.
Table 12: Setup prompts and response for password based authentication
| Enter the snowflake DSN name [ ] : |
Enter a DSN name.
Example: sp_snowflake_5 |
| Is authentication based on RSA public key? [n] : |
For password based authentication, enter "n" |
| Enter the Snowflake administrator name : |
Enter an administrator name. |
| Enter the password for the administrator account: |
Enter the administrator account password. |
| Enter the replication target database name : |
Enter the name of the Snowflake database where you want to install the SharePlex objects.
Example: shareplex_test |
| Database name database does not exist. Would you like to create it? [y] : |
If this prompt is displayed, the specified database does not exist. Press Enter to have the setup utility create it for you. |
| Enter the DB schema name: |
Enter the DB schema name. Example: shareplex_test_5 |
| DB schema name does not exist. Would you like to create it? [y] : |
If this prompt is displayed, the specified DB schema name does not exist. Press Enter to have the setup utility create it for you. |
| Would you like to create a new SharePlex user? [y/n] : |
Press Enter to accept the default to create a new SharePlex database user account in the specified database, or enter n to use an existing SharePlex account. |
|
Enter the name of the new SharePlex user:
Enter the name of the existing SharePlex user: |
One of these prompts is displayed depending on whether you elected to create a new user or use an existing user. Enter the name of the SharePlex user. |
| Enter the password for the new SharePlex user: |
Enter a password for the new SharePlex user. |
| Re-enter the password for the new SharePlex user: |
This prompt is only shown if you created a new user. Enter the SharePlex password again. |
A successful setup terminates with a message similar to the following:
Completed SharePlex for Snowflake database configuration
SharePlex user name: amore2
Database name: SHAREPLEX_TEST
- - The datasource identifier in the SharePlex configuration is 'r.SHAREPLEX_TEST' - -
Table 13: Setup prompts and response for RSA based authentication
| Enter the snowflake DSN name [ ] : |
Enter a DSN name.
Example: sp_snowflake_5 |
| Is authentication based on RSA public key? [y] : |
For password based authentication, enter "y".
Note: Make sure that the RSA key has been configured for Admin user. |
| Enter the snowflake administrator name : |
Enter an administrator name. |
| Enter the replication target database name : |
Enter the name of the Snowflake database where you want to install the SharePlex objects.
Example: shareplex_test |
| Database name database does not exist. Would you like to create it? [y] : |
If this prompt is displayed, the specified database does not exist. Press Enter to have the setup utility create it for you. |
| Enter the DB schema name: |
Enter the DB schema name.
Example: shareplex_test_5 |
| DB schema name does not exist. Would you like to create it? [y] : |
If this prompt is displayed, the specified database schema does not exist. Press Enter to have the setup utility create it for you. |
| Would you like to create a new SharePlex user? [y/n] : |
Press Enter to accept the default to create a new RSA user account in the specified database, or enter n to use an existing SharePlex account. |
|
Enter the name of the new SharePlex user:
Enter the name of the existing SharePlex user: |
One of these prompts is displayed depending on whether you elected to create a new user or use an existing user. Enter the name of the SharePlex user. |
| Enter path for RSA public key for configuration of New User. |
Enter the path for the RSA public key. (This field is applicable only for a new user)
Note: For existing user account, make sure that the RSA key has been configured for Admin user. |
A successful setup terminates with a message similar to the following:
Completed SharePlex for Snowflake database configuration
SharePlex user name: amore2
Database name: PROVIDENCE
- - The datasource identifier in the SharePlex configuration is 'r.SHAREPLEX_TEST' - -
