SharePlex integrates with Oracle Clusterware cluster hardware and software to maintain the high availability of data capture and uninterrupted replication to your targets. If the node where SharePlex is running fails or must be taken out of the cluster for maintenance, SharePlex can be started on another server by the cluster software. SharePlex start and stop is controlled through the cluster.
These instructions assume that the cluster solution is already installed according to the cluster documentation, tested, and is functioning, and they are not a substitute for the documentation. Additional steps that are specific to your cluster installation may be required.
The following diagram shows SharePlex installed into an Oracle RAC cluster:

These instructions are for setting up SharePlex in an Oracle cluster. The setup is similar for the Windows and UNIX or Linux platforms. Differences are noted. UNIX is used in the examples.
Important! These instructions cover the parts of installing and setting up a cluster that pertain to the setup of SharePlex in the cluster. See the Oracle documentation for complete instructions for the platform that you are using.
The setup has the following phases:
Perform these steps on a source cluster and a target cluster, if applicable.
On one node of the cluster, create a static application Virtual IP (VIP) address for SharePlex. This VIP must point to the node where SharePlex will run and fail over to the secondary node if the primary node fails.
Notes:
See the Oracle documentation for more information about creating a Virtual IP address on your specific platform.
The VIP establishes a consistent host name across all nodes.
The cluster software maps the VIP to the SharePlex server and migrates it during a failover.
Alternatively, this mapping can be done as a host alias in the /etc/hosts file (on Unix and Linux) or the hosts file (on Windows) on both nodes. The alias is exported in the SharePlex user profile and used in the SharePlex configuration parameters.
Example:
123.456.0.78 splex
Create a TNS alias for SharePlex to use to connect to the database on each node. Use the same alias on each node of a cluster. Set load balance to off and set failover to on. For example:
Node 1:
	ora_a_sp =
       	(DESCRIPTION =
       	(ADDRESS_LIST =
          	(ADDRESS = (PROTOCOL = TCP)(HOST = RAC1)(PORT = 1521))
          	(ADDRESS = (PROTOCOL = TCP)(HOST = RAC2)(PORT = 1521))
        	)
        	(LOAD_BALANCE = OFF)
        	(FAILOVER = ON)
        	  (CONNECT_DATA =
		  (SERVER = DEDICATED)
        	  (SERVICE_NAME = ora_a)
		  (INSTANCE_NAME = ora_a1)
        	  )
		)
Node 2:
	ora_a_sp =
       	(DESCRIPTION =
       	(ADDRESS_LIST =
          	(ADDRESS = (PROTOCOL = TCP)(HOST = RAC2)(PORT = 1521))
          	(ADDRESS = (PROTOCOL = TCP)(HOST = RAC1)(PORT = 1521))
        	)
        	(LOAD_BALANCE = OFF)
        	(FAILOVER = ON)
        	  (CONNECT_DATA =
		  (SERVER = DEDICATED)
        	  (SERVICE_NAME = ora_a)
		  (INSTANCE_NAME = ora_a2)
        	  )
		)
Note: A TNS alias establishes global connection information that supercedes local instance names and enables SharePlex to connect to the failover instance without requiring a configuration reactivation. SharePlex identifies the correct Oracle instance from the configuration file.
(UNIX and Linux only) Add the TNS alias to the oratab file on each node that SharePlex is expected to start on during a failover.
Example (all nodes):
ora_a:/u01/app/oracle/product/11.2.0/dbhome_1:N
ora_a_sp:/u01/app/oracle/product/11.2.0/dbhome_1:N
If the Oracle instances in the cluster have different ORACLE_HOMEs, edit the oratab file on each node and on the DNS nameserver, if applicable, to use a symbolic link in place of the actual ORACLE_HOME path:
SID:/path_to_symbolic_link:N
In a cluster, SharePlex is installed differently on Unix and Linux versus Windows.
To install on Unix and Linux
On Linux and Unix, the best practice is to install both the SharePlex variable-data and product directories on a shared drive, rather than on each node. This configuration enables more efficient failover and faster upgrades of SharePlex. If you do install these directories locally on both nodes of the cluster, do the following:
To install on Windows
On Windows, you must install the SharePlex product directory on each node of the cluster in order to make the binaries and the required MKS Toolkit components available to all nodes, and to establish Registry entries. Install each SharePlex instance on the same port number, with identical path names.
After you install SharePlex, run the Database Setup utility. The following applies in a cluster:
Perform these steps on a source cluster and on a target cluster, if applicable.
SharePlex will not run without a license key for each node of the cluster. This license key must be persisted in the SharePlex environment.
To add licenses on Unix and Linux
On the secondary node, determine the host ID of the secondary node of the cluster by running the following command from the util subdirectory of the SharePlex product directory.
/home/shareplex/util/splex_uname
Look for the HostID line and record the value:
HostID = 1234567890
On the primary node, run the splex_add_key utility from the install sub-directory of the SharePlex product directory.
/home/shareplex/install/splex_add_key
To add licenses on Windows
Run the license utility on each node of the cluster.
If SharePlex is running, do the following:
Select the SharePlex port number from the Port list.
Click Add License, then type or paste the information exactly as you received it from Quest, as follows:
(Windows Cluster) To add a license for another node in a cluster, select the Add Alternate Host Id check box, then select the machine ID from the CPU ID list box. Repeat this step to add a license to all secondary nodes in the cluster.
Click OK to close the utility.
To start SharePlex, do the following:
Perform these steps on a source cluster and on a target cluster, if applicable.
Set the SharePlex environment to point to the VIP alias and SharePlex variable-data directory.
To set the environment on UNIX and Linux
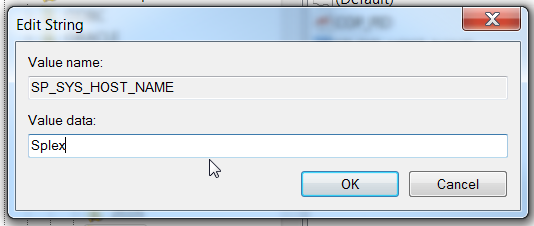
EXPORT SP_SYS_HOST_NAME="splex"
SP_SYS_PRODDIR=/home/shareplex
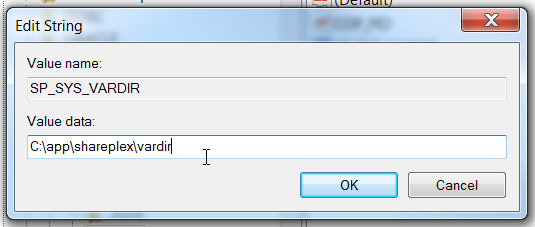
SP_SYS_VARDIR="/app/shareplex/vardir"
To set the environment on Windows
Important! Do not set these parameters as environment variables, and do not set them on any systems outside the cluster, even if those systems are running SharePlex.
Locate the following SharePlex entry:
HKEY_LOCAL_MACHINE\SOFTWARE\Wow6432Node\QuestSoftware\SharePlex.
Expand the SharePlex node, then highlight the port number of the SharePlex instance you are configuring.
Type the full path name of the shared variable-data directory in the Value Data field, then click OK.
Type the VIP alias in the Value Data field, then click OK.
When you create the configuration file that directs SharePlex replication, you specify the TNS alias rather than an actual ORACLE_SID, as follows.
To capture from a source cluster
Specify the TNS alias on the o.datasource line of the file. This is the first line of the configuration file.
For example:
datasource:o.ora_a_sp
To post to a target cluster
Specify the TNS alias as the destination in the routing map.
For example (assumes the use of wildcards to specify objects):
expand hr.% hr.% inst_c@ora_b_sp
Once a source and target cluster (if applicable) are configured, you can populate a standalone or clustered target with a copy of the source data, while replication keeps track of transactional changes made by users on the source database. Use any of the Oracle-specific copy methods for activating replication from an active source. See the procedures listed in Start replication on your production systems in the SharePlex Administration Guide for more information.
Incorporate SharePlex as a resource in the cluster software, and include it in the cluster failover routines so that it migrates with the other applications during failover. This ensures that the sp_cop process is started on the adoptive node by the cluster software. At minimum, this includes creating a startup script for SharePlex and a cluster script for SharePlex to handle failover. Note the following:
If possible, configure SharePlex and Oracle into a single global cluster package. The combination of SharePlex and Oracle in the same package allows the cluster software to start and stop SharePlex and Oracle in the proper sequence if any component of the package fails. Configure Oracle to start before SharePlex.
Make certain your systems administrators understand that any changes or upgrades they perform to the operating system on any node in the cluster must be implemented on all nodes in the cluster so that SharePlex fails over to an identical environment.
SharePlex can capture from an Oracle database that is running on a system other than the system where SharePlex is running.
This support covers Oracle databases running on Linux and Windows. This support applies only when SharePlex and the remote capture database are running on the same operating system type (i.e., if SharePlex is on Linux, the remote database must be on Linux). For more information about the supported Oracle database versions, see SharePlex Release Notes.
SharePlex does not support remote capture from Oracle on RAC unless the database is running on ASM.
Note: These instructions apply to on-premises installations. If configuring SharePlex to capture from a remote database that is on Amazon AWS, see the SharePlex Installation and Setup Guide for Oracle on RDS.
Note:Remote capture using more than one SharePlex instance to the same Oracle instance is not supported.
To set up SharePlex for remote capture
Run Oracle Setup on the SharePlex system according to the directions in Database Setup for Oracle.
