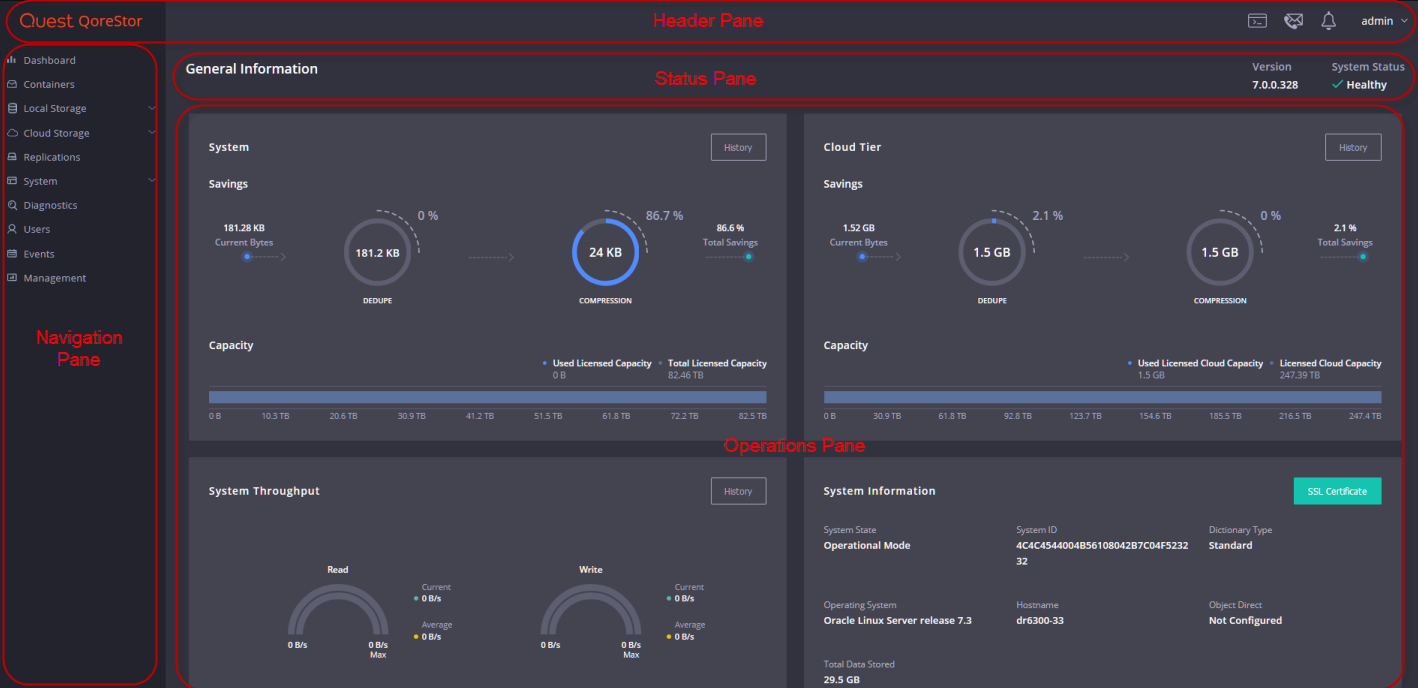
The QoreStor UI consists of the Header pane, the Navigation pane, a Status pane, and the Operations pane.

The panes provide the functions and options described below:
| Pane |
Description |
|
Header pane |
Provides the following items:
- Terminal icon - Provides a quick link to the QoreStor web terminal. Refer to Using the QoreStor Web Terminal.
- Contact Us icon - information for contacting Quest sales and Support.
- QoreStor Alerts - lists any Alerts on the QoreStor system.
- Current user - displays the current user account, provides the option to log out, and provides the option to switch the UI to the Light theme.
|
|
Status pane |
Provides the following items:
- Version - displays the version of QoreStor
- System Status - displays the status of the QoreStor.
|
| Navigation pane |
Provides navigation options to:
- Dashboard
- Containers
- Local Storage
- Cloud Storage
- Replications
- System
- Diagnostics
- Users
- Events
- Management
|
|
Operations pane |
Displays the data and dialogs appropriate for the chosen navigation option. |
QoreStor includes a custom shell implementation that simplifies and secures command line access. During installation, QoreStor creates the qsadmin user account with the permissions and configurations necessary to run QoreStor commands. You can access the QoreStor command line through a remote access program (such as PuTTY) or through the QoreStor UI Web Terminal.
To access the command line interface for QoreStor:
- Using a remote access program, connect to your QoreStor server.
- Log in using the credentials:
user: qsadmin
password: St0r@ge!
- Enter the desired command at the prompt. To view the available QoreStor CLI commands, type help.
|

|
NOTE: Refer to the QoreStor Command Line Reference Guide for more information on the QoreStor CLI. |
The QoreStor UI offers direct access to the QoreStor terminal for execution of CLI commands through the browser.
To access the Web Terminal
- On the QoreStor UI, select System to expand the menu. Click Terminal
- In the Username field, enter the desired user name. You will be prompted for the password.
|

|
NOTE: QoreStor includes a custom shell implementation that simplifies and secures command line access. During installation, QoreStor creates the qsadmin user account with the permissions and configurations necessary to run QoreStor commands. Unless absolutely necessary, Quest recommends using the qsadmin account for CLI access. The default credentials are:
user: qsadmin
password: St0r@ge! |
- Click Connect to authenticate and access the terminal.
- To view the list of available QoreStor commands, enter help at the prompt.
|

|
NOTE: Refer to the QoreStor Command Line Reference Guide for more detailed information on QoreStor CLI commands. |
- To log out of the terminal, enter exit at the prompt.
|

|
NOTE: When using Internet Explorer 11 to access the QoreStor UI, the Terminal page is displayed directly after logging in to QoreStor. The QoreStor navigation menu is not displayed and use of other UI functions is not supported. |
QoreStor provides a REST API in order to provide an efficient method for application management or integration. For more information on using the REST API, see the sections below.
API Overview
All API requests should be sent to https://<QoreStor host>:5233/api. With the exception of the Authentication request, all requests should carry the HTTP header Authorization: Bearer <token>.
API calls will generate one of the response types below. Refer to the API documentation for the specific request for more information on expected responses.
- 200 - OK
- 400 - Bad request
- 401 - Unauthorized
- 404 - Not found
- 500 - Internal server error
Authentication
Authentication to the API is accomplished using the username and password for an existing QoreStor account. Once logged in, a token will be generated that can be used to authenticate API commands.
To use API authentication:
- Execute the login request using the username and password for the desired QoreStor account as well as the IP or domain name of your QoreStor server.
curl -X POST "https://QoreStor.host.com:5233/api/auth/login" -H "accept: application/json" -H "Content-Type: application/json" -d "{ \"name\": \"TestUser\", \"password\": \"TestUserPassword\"}"
- In the request response, find and record the value for JWT_Token.
- For subsequent API requests, ensure that the header contains the value Authorization: Bearer <token>.
You may also use this token to authorize API requests via the documentation page. To do so,
- At the top of the API documentation page, click Authorize.
- In the Value field, enter the token.
- Click Authorize.
API Documentation
The detailed documentation for the QoreStor API is hosted on your QoreStor serer. To view the documentation, enter the URL below into a browser.
https://<QoreStor Server>:5233//api/docs/index.html
|

|
NOTE: In the example above, replace <QoreStor Server> with the FQDN or IP address of your QoreStor server. |
The API documentation contains the following:
- An Authorize button to enable authentication.
- A list of available API resource categories. Each list is expandable to reveal the resources in each category.
- Each resource listing can be expanded to view the resource description, parameters and responses, and a Try it Out button that can be used to execute the API call with entered parameters.
To view and test an API
|

|
NOTE: The example below uses the GET containers request. The steps are similar for other requests. |
- Before testing the API, authenticate as described in Authentication.
- In the resource list, expand Containers.
- Find the Get Containers request (GET/v1/Containers) and click to expand.
- Click Try it Out. Note that the parameters fields are now enabled.
|

|
NOTE: Parameters for Get Containers are optional. Some requests have required parameters. |
- Optionally, enter the parameters as described below:
- Storage Group - The name of the storage group to which the containers belong
- Type - required container type (cloud, link, or tier)
- Click Execute.


