|
Scenario You need to schedule full, differential and t-log database backups on several servers and automate backup cleanup according to your company’s retention policy. |
You are going to create a maintenance plan on one SQL Server instance and then simply copy it to the other server instances.
To automate backups on server instances
Click 
NOTE: This scenario describes how to back up all user databases. Similarly, you can configure maintenance plans to back up system databases and databases matching wildcard or regular expressions.
 on the tool bar. The task you just created will serve as a base for differential and t-log backups.
 , then Ok.
 to paste.
Double-click every subplan in the plan. Enter the name and description. Click 
When you are done editing the subplan properties, select Enabled and click Ok.
 Copy Plan.
Back Up Databases Using Maintenance Plans
The Restore wizard guides you through the process of restoring a database (full or differential), transaction log, files, or filegroups.
Tip: Database backups created with LiteSpeed Version 8.x cannot be restored using older versions of LiteSpeed.
NOTES:
|
Scenario You need to restore a LiteSpeed disk backup to a new database on another SQL Server. Copy the backup files needed for restore to another server and run the Restore wizard. |
To run the Restore wizard
In the Navigation pane, select a database to restore and click the Restore or Automated Restore button. Alternately you can right-click a database and select Restore or Automated Restore from the menu. If you clicked Restore, click one of the following. If you clicked Automated Restore, review the automated restore information below.
Tip: The database (full or differential), files and filegroups, and transaction log restore types use the restore wizard pages listed in the steps below: restore destination, backup source, backup content, recovery options, data files, scheduled restore, execute script, and finish.
Tip: The attached files type uses the restore wizard pages listed in the steps below: restore destination, backup source, backup content, data files, attached files, scheduled restore, execute script, and finish.
Tip: The automated restore type uses the restore wizard pages listed in the steps below: restore destination, backup source, backup files, restore options, database integrity database files, scheduled restore, notification, execute script, and finish.
Review information on the Restore Destination page. Select the Kill all current connections before restore checkbox to obtain exclusive access to the selected database. Additionally, you can select the View current activity link to view the database connection activity table. A database cannot be restored unless the restore process has exclusive access to the database. No user connections can exist when performing a database restore.
Caution: Automated Restore for multiple databases - When running restores for multiple databases, we recommend that you use the %DATABASENAME% variable to automatically generate an original database name for database(s) going to be restored. When running restores from multiple servers, different databases with the same server name can be overwritten. To prevent this, the variable %SOURCESERVER% adds the source server name (server+instance) to the target database name when running multiple automated restores. For example: %SOURCESERVER%_%DATABASENAME%.
Scenario: Select the server instance to restore the backup to and enter a new database name.
On the Backup Source page, select Database to restore from a specific database's backup history, or select Device to manually select files to restore.
If you select Database, the database you are restoring is displayed. You can select another database using the Database drop down selector. Use the SQL Server drop down selector if the database is on a different SQL Server instance.
TIP:You can do point in time restores, restoring from a specific date and time or a time period (for example four hours prior to recovery).
TIP: The restore type option Restore Verify Only in combination with the backup type Verify the latest full or differential backup is less time consuming for full and differential backups or fast compression backups where you only want to verify the latest backup, rather than the full and the latest differential. For backups that are run every day this will serve to verify all backups.
If you select Device, the options are Disk, Cloud, TSM Backup, TSM Archive, and Tape.
Scenario: Select Device and then Disk and specify the backup files you copied.
If you selected Cloud, review the Cloud Account Settings information below:
|
Cloud account |
Select the Cloud account from the drop-down list. |
|
|
Select the following items to add or edit the registered cloud account settings.
|
|
Proxy Settings |
Select the following items to edit the Cloud account proxy settings.
|
If you selected TSM Backup or TSM Archive,
|
Client node |
Enter the node name for the TSM session. This field is not case-sensitive. |
|
Client owner password |
Enter the access password for the specified node. |
|
Configuration file |
Select the configuration file. (Usually, dsm.opt.) NOTE: This file contains session options such as the TSM server's TCP address. If you select the Use PASSWORDACCESS GENERATE from TSM configuration file checkbox and your options file is configured to support this option, you do not need to specify the client node and client owner password. |
|
TSM Object |
Click Select TSM Object. Enter the filespace and the high-level and low-level names and click Query TSM to pick the object name from the list of available TSM objects. From the Available TSM Objects list, double-click the objects you would like to select. NOTE: If you leave the High level and Low level fields blank, LiteSpeed will query all TSM server levels. Querying all levels may take longer to complete. |
If you selected Automated Restore, review the following for additional information.
| Restore from |
Select SQL Server and databases to specify the source from where to search the backups for automated restore.
Use the drop-down treeview to add multiple sources from the System and User parent nodes. Select User databases and all subordinate user databases are automatically selected. Individually select and deselect databases using the checkbox next to it. For AlwaysOn availability groups, you may need to specify both SQL Server (primary and secondary) to allow LiteSpeed to search backups among all replicas. To specify a secondary SQL Server, use the semicolumn as a separator between SQL Servers (e.g. SQL-PROD\AG1; SQL-PROD\AG2) in the Source list (Server column). | ||
| Latest backup search method |
Select one of the following options:
NOTES:
| ||
| Backup type |
Specify backup types to use for the restore. Select one of the following options:
|
If you selected Automated Restore, on the Backup Files page, select the backup file locations to search.
| Restore from |
Select the restore from location (disk or cloud) using the drop down menu. |
|
Add |
Add the backup file location to restore to the list by selecting and using the Backup File Location wizard. |
|
Remove |
Select and remove the backup file location from the list. |
If you selected Automated Restore, on the Database Integrity page, define the options to check database integrity after restore.
| Check database integrity after restore (DBCC_CHECKDB) |
Use this option to run a CHECKDB on the restored database and report the results to the repository for review. This option is selected by default. Select a combination of the following database integrity options:
|
If you selected Automated Restore, on the Restore Options page, specify options for automated restore.
| Drop databases after restore |
Use this option if you no longer need the restored database. For example, if you are only restoring the latest backup for testing purposes. This option contains two additional options to select. One or both options can be selected.
|
| Overwrite the existing database | Use this option if you want to overwrite the existing database with the restored database. |
| Include databases that are part of a replication plan |
Use this option to include databases that are part of a replication plan. |
| Recovery state |
The options are as follows:
|
| Password |
Provide a password for encrypted backups. NOTE: Automated Restore requires that you use the same password for all encrypted backups. |
Review the following additional information about the Backup Content page. Skip this page for Automated Restore.
On the Recovery Options page, select the database recovery state following the restore. Skip this page for Automated Restore.
| Overwrite the existing database | Select to have the current database overwritten with the restored database. The default is not selected. |
| Preserve the replication settings | Select to preserve the replication settings for the restored database. The default is not selected. |
| Restrict access to the restored database |
Select to restrict access to the database after it is restored. The default is not selected. |
| Recovery state |
The options are as follows:
|
Review the following additional information about the Data Files page:
If you added an attachment to the backup file, select the Restore Attached Files and Directories on the Attached Files page.
NOTE: The SQL Server Agent must be configured to send email using Database Mail. Review the following for additional information:
Complete the wizard.
To restore a Double Click Restore executable, do one of the following:
Double-click the Double Click Restore executable and complete the LiteSpeed Double Click Restore dialog.
Run the command line, change the directory until you are in the directory containing the Double Click Restore executable and run the following:
backup.exe -R database -F backup_file -W replace
where
backup.exe is the name of the Double Click Restore executable.
backup_file specifies the path to the file containing backup data. You can supply multiple instances of this argument. Use this argument to list all backup files except the executable being run:
NOTE: The syntax is exactly the same as that for sqllitespeed.exe. For more information, see LiteSpeed Command-Line Arguments.
Restore as any other backup using the Restore Wizard, command-line interface or procedures.
NOTE: If logging is enabled during a restore, the log file is written to:
To restore the master database from a LiteSpeed backup, start the server instance in single-user mode and execute the LiteSpeed restore statement.
To manually restore a master database
From a command prompt, run as administrator, change the directory until you are in the directory containing sqlservr.exe. Usually:
C:\Program Files\Microsoft SQL Server\MSSQL\Binn
Run the following to start the server instance in single-user mode:
sqlservr.exe -c –m"LiteSpeed"
For named instance:
sqlservr.exe -c –m"LiteSpeed" –s"<instance name>"
NOTE: You must switch to the appropriate directory (for the instance of Microsoft SQL Server you want to start) in the command window before starting sqlservr.exe.
Using another command prompt, change the directory until you are in the directory containing SQLLiteSpeed.exe. Usually:
C:\Program Files\Quest Software\LiteSpeed\SQL Server\Engine
Execute the LiteSpeed restore statement to restore a full database backup of master.
SQLLiteSpeed.exe -R"Database" -D"master" -F "<path to backup file\backup file name>" -W"REPLACE" -S "<server name>\<instance name>" –T
| Example | Script |
| Restore a master database to the default instance |
sqllitespeed.exe –R"Database" -D"master" -F"c:\backup\master.bak" –W"REPLACE" -S "<server name>" -T |
| Restore a master to the named instance |
sqllitespeed.exe –R"Database" -D"master" -F"c:\backup\master.bak" –W"REPLACE" -S "<server name>\<instance name>" –T |
| Restore with encryption |
sqllitespeed.exe –R"Database" -D"master" -F"c:\backup\master.bak" -Kpassword –W"REPLACE" -S "<server name>\<instance name>" –T |
| Restore with replace |
sqllitespeed.exe –R"Database" -D"master" -F"c:\backup\master.bak" -Kpassword –W"REPLACE" -S "<server name>\<instance name>" –T -W"MOVE 'master' TO 'C:\Program Files\Microsoft SQL Server\MSSQL.1\MSSQL\Data\master.mdf'" -W"MOVE 'master_log' TO 'C:\Program Files\Microsoft SQL Server\MSSQL.1\MSSQL\Data\master_Log.ldf'" |
| Restore using the Tivoli Storage Manager |
sqllitespeed.exe –R"Database" -D"master" –W"REPLACE -i"filespace\highlevel\lowlevel" -c"nodename" -k"password" -j"c:\program files\Tivoli\TSM\baclient\dsm.opt" |
Restart SQL Server and LiteSpeed. If the process hangs, stop the following services and retry them:
Alerter
Cluster
Computer Browser
Event Log
License Logging
Logical Disk Manager
Messenger
Net Logon
NTLM Security Support Provider
Plug and Play
Remote Procedure Call (RPC) Locator
Remote Procedure Call (RPC)
Server
Print Spooler
TCP/IP NetBIOS Helper
Windows Time
Workstation
NOTE: To restore the master database from a native full backup, refer to msdn.microsoft.com. For example, SQL Server 2012: http://technet.microsoft.com/en-us/library/ms190679(v=sql.110).aspx.


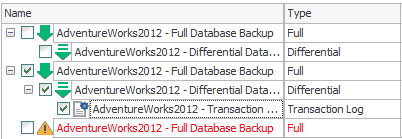
 to launch a window containing a list of backups to restore.
  indicates a successful full backup.
 indicates a successful differential backup.
 indicates a successful transaction log backup.
 indicates a warning. Possible reasons: encrypted backup that requires entering an encryption key, backup no longer exists, or corrupted backup.
 indicates a selected backup.