Create the BTIDCache Database in the Integration for Notes Domino Data Directory using the installed template:
Configure the database; see the Configuration of the Domino Database section below for more information; use the IBM IDVault database as the preferred configuration
Configure the following Notes.ini values on all Domino Coexistence servers:
|
INI Variable Name |
Description |
Value |
|
0 - disabled (default) 1 - encrypt and decrypt 2 - decrypt only 3 - encrypt only |
Example value: 1 | |
|
0 - disabled (default) 1 – Enabled |
1 | |
|
BTIDFileLocation |
BTIDFileLocation= BTIDVaultDB BTIDVaultDB (default) – Uses the BTIDVault database which will store the users ID and password FileSystem – Uses a central file share repository that holds all backup copy of the user’s ID files. The password will be stored in the BTIDVaultDB PersonDoc – Backup copy of the ID files will be stored in the person docs with in the Domino Directory; password for the ID files will be stored in the BTIDVaultDB DominoIDV – Backup copy of the ID Files will be stored in the IBM IDVault Database, with the corresponding passwords in the BTIDVaultDB DominoIDV2 – The users ID in the Domino IDVault Database, and the corresponding password will be provided Automatically by the Domino API; for this configuration option, the “Check Password setting in the senders person doc must be set to “don’t check password” PerUser – This option allows the configuration to be done at the user level individually selecting the first five options |
<BTIDVaultDB> |
|
BTIDVaultDB |
This variable sets the file name for the BTIDVault Notes Database |
|
|
BTIDsDir |
This variable sets the path information of the Senders notes ID when the BTIDFileLocation=FileSystem |
|
If using any options other than DominoIDV2 in the INI setting BTIDFileLocation, user information will need to be gathered for each user. The following section explains how this will be accomplished with the database defined in the BTIDVaultDB INI setting.
The mail file template for all Domino users must be modified so that any time a message is marked for encryption, the Domino user account used for On the Fly Decryption and Encryption is added to the BCC field. This account should be an administrative account with a valid ID, password and certificate.
The Domino user account used for On the Fly Decryption and Encryption must have a valid Notes Certificate in their Person Document in the Domino Directory, but it does not need a mail file associated with it.
The Domino user account ID file used for On the Fly Decryption and Encryption must be on all Domino Coexistence servers. The password for this ID may be stored in the Notes.ini or in a text file the Domino Coexistence server(s).
All Exchange Recipients must also have a valid Notes Certificate in their Person Document in the Domino Directory.
The following Notes.ini values must be configured on all Domino Coexistence servers:
|
INI Variable Name |
Description |
Value |
|
0 - disabled (default) 1 - encrypt and decrypt 2 - decrypt only 3 - encrypt only
Note: the last two values do not have a use at present and are broken out in case they are needed for future use cases |
Example value: 1 | |
|
BTDecryptID |
This is the ID file that is associated with the user account that is added to the BCC field of encrypted messages (from Domino to Exchange) |
<ID file name, full pathname if not in the Data folder> |
|
BTDecryptEmail |
This is the Notes name of the account used for on-the-fly encryption/decryption |
|
|
BTDecryptPasswordFile |
Use this INI parameter if you will be storing the password for the BTDecrypt ID in a text file; this must be a plain text file that contains nothing but the password for the BTDecrypt ID file. OS security can be enabled on this file, as long as done with windows server account used by the Domino server. |
<full path and file name> |
|
BTDecryptPassword |
Use this option is you will be storing the password for the BTDecrypt ID in the Notes.ini file |
<password for the account used for on-the-fly encryption/decryption> |
|
INI Variable Name |
Description |
Value |
|
0 - disabled (default) 1 - encrypt and decrypt 2 - decrypt only 3 - encrypt only
Note: the last two values do not have a use at present and are broken out in case they are needed for future use cases
This setting must be set even if the BTIDVaultDB is being used |
Example value: 1 | |
|
BTDominoEncryptDomains |
This is a multi-value, comma separated parameter that should contain a list of Domino domains to be included in processing On the Fly Decryption and Encryption |
|
|
BTCalTargetAddressPrefix |
This is the value that is prepended to the SMTP address when creating the TargetAddress. The above value is a typical example (domino.); note the value ends with a period, since that too is prefixed to the base smtp address for Domino users - as happens when the AD SMTP address of "Jane.Smith@contoso.com" is stored in the AD targetAddress as a value of "Jane.Smith@domino.contoso.com") |
Domino |
|
BTLeaveKeepPrivate |
|
Examples: 0/1 (default=0) |
|
BTScanSubjectForEncryptFlag |
|
1 |
|
BTScanSubjectFlag |
This value is used to allow Exchange mobile users to put a keyword in the subject of an email to have that message encrypted; this should be unique text that will not be used accidentally; this value is case insensitive |
<text> |
|
INI Variable Name |
Description |
Value |
|
BTEXPANDCALGROUPS |
|
N |
|
BTEXPANDMAILGROUPS |
N | |
|
BTEXPANDGROUPS |
N |
It is strongly recommended to investigate how these setting will impact the messaging environment before making any changes.
As with other Integration for Notes NDR messages, there is a single customizable message, and 4 customizable encrypt NDR’s reasons. The default text is listed below. These are customized in the same manner as any BTNDR text:
|
INI Variable Name |
Description |
Value |
|
BTENCRYPTFAILTEXT |
This is a multi-line value that supplies the generic NDR email text. Example:
|
Examples: Thank you for giving this matter your prompt attention.\n |
|
BTNDR49 |
"An encrypted copy of the message could not be delivered to the following Domino Group(s): %GROUPLIST%.\r\nPlease re - send the message using individual recipients." | |
|
BTNDR50 |
"An encrypted copy of the message could not be created for the following Notes recipient(s): %RECIPIENTS%.\r\nPlease contact the HelpDesk." | |
|
BTNDR51 |
"An encrypted copy of the message could not be delivered to the following Notes recipient(s) : %RECIPIENTS%.\r\nPlease contact the HelpDesk." | |
|
BTNDR52 |
"This meeting contains more text than BTCal can process for Domino users.\r\nPlease recreate it using less than 25K of text." | |
With the recommended option 1 of not using a customized mail template, the configuration will require the corresponding BTIDVaultDB to be deployed to all Integration for Notes servers in a replicated model with the exception that the customer is using IBM Domino IDVault Database and it has been configured to allow applications to have access to the ID files. The following will cover how to deploy the database for all other scenarios:
Installing the BTIDVaultDB is a simple process of adding the template and creating a new BTIDVaultDB.nsf in the Domino Data directory.
After the installation of Integration for Notes, the BTIDCache.ntf template will appear in the Domino Data Directory
If the template is not displaying in the data directory, reinstall Integration for Notes
The Coexistence server may need a restart to use the new databases created from the copied template files
Create the BTIDVault.nsf from this template and note the file name as it will need to be added in the INI parameter BTIDVaultDB, then proceed with the configuration
Integration for Notes uses a mail-in storage database to store all mail-enabled application messages in a single store repository that provides document level security and allows Exchange/Outlook users to access any applications during the coexistence period.
From the Coexistence server, open Domino Administration Client
From the Domino Administrator, open the server, and then navigate to the Files tab as shown below, select Databases only from the Show Me: drop-down box:
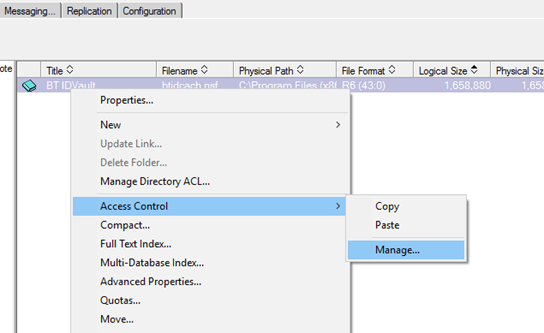
Right-click BTIDVault.nsf
Select Access Control > Manage to set up the ACL as shown below:

Because the database is new and not signed or secured, if you receive a prompt to cross-certify the signature as seen below, select Yes:
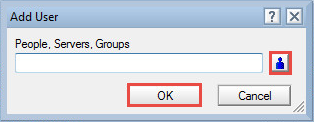
The ACL displays. Add the Domino Administrators for the domain or LocalDomainAdmin as shown below and click Add; from the Add User dialog box, select LocalDomainAdmin, and then click OK:

Change the user types to Person group for LocalDomainAdmins as shown below. Additionally, grant your LocalDomainAdmins [Admin] role to view additional configuration options in the BTStore database:
Demote the Default group by giving it only Author without delete access; this database has document security and its own set of purging options to prevent users from deleting documents even by mistake
Confirm the INI setting defined in the section Prerequisites & Settings/Decryption Option 1 (Recommended) and proceed with this database for all options in the INI parameter BTIDFileLocation except “DominoIDV2”.
Once in the database is opened expand in the left navigator the section Configuration and select Settings. Configure the database as follows:
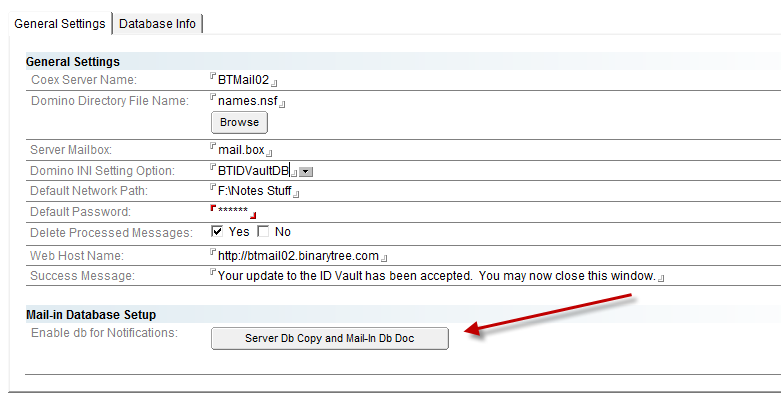
On the General Setting tab set the following values:
Coex Server Name – This is the Domino server that the users will be populated from
Domino Directory File Name – Domino Directory that the user record will be created from
Server Mailbox – Populate this with the Router mailbox tnat will be used to send messages from
Domino INI Setting Option - This should be set to the option set on the Domino COEXT server for the INI value BTIDFileLocation
|
|
|
Default Network Path - Enter the network path where the backup copy of the ID files are stored; this can only be a single value entry is used if the INI settting is set to “File System”
Default Password - Value set to Domino ID file on creation
Delete Process Messages - Since the database has the ability to send request for users to collect ID and Password this option allow the cleanup of the responses if environment policy do not dictate that all electronic communication be saved
Web Host Name - The database has the ability to collect user information via email or a website; the website can also be used to maintain the account information for the users; this is the URL for the database
|
|
|
Success Message - Message that will display when the user Successful perform an action via the website
A Mail-in Database Document is required for mail to be delivered to the newly created BTIDVault database. The procedure copies the database to the server and creates a Mail-In database document for the Notes Migrator database.
Create a mail-in database for BTIDVault database; click on the Server Db Copy and Mail-In Db Doc button to create a copy of the BTIDVault database on the Domino server and configure the Mail in Database document:

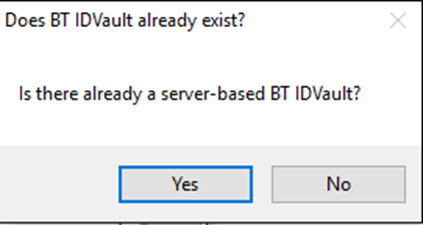
The Does BT IDVault already exist? dialog box opens; click Yes (and skip to step 5):

If working with a local copy of the BTIDVault database, then click No. The Create a db copy? dialog box opens
Click Yes to create a copy of the local BTIDVault database on the server
If Yes was clicked in the Does IDVaultDB already exist? dialog box, the Choose Application dialog box opens. Locate the Notes Migrator database in the CMT folder on the server, and then click Open
The Fullname for the mail-in db doc dialog box confirms that the mail-in database for the selected server-based BTIDVault database does not exist and prompts to specify a name for the mail-in database; after specifying the name, click OK
In the Open the new mail-in doc? dialog box, click Yes to open the mail-in database
The mail-in database document for BTIDVaultDB opens
To verify the creation of the mail-in database, launch Domino Administrator, open the Domino server, and access the Mail-In Databases and Resources folder under the People & Groups tab
Double-click the document to open and review
Once the mail-in database is successfully created, the Open Mail-In Db Doc button replaces the Server Db Copy and Mail-In Db Doc button; clicking it opens the database document for a review; clicking the button with the X sign on it will remove all pointers to the location of the mail-in database
It is recommended that after copying the database to the server, you delete the database from the local client folder; to remove it, right-click on BTIDVaultDB on Local; select Database, and then Delete; the Notes client prompts that the database and related documents will be permanently deleted; click Yes to delete the local database
Once the database has been mail-enabled, modify the Inbound Processing agent to view the updates. Perform the following steps to run the agent.
With Domino Designer open the BTIDVault database in Domino Designer
Expand Shared Code and select Agents
Select the InboundProcessing agent as shown below
Double-click InboundProcessing to open the InboundProcessing Agent Properties
Click the Security tab
The Administrator should be listed in the Run on behalf of section
In the Set Runtime security level: field, select Allow Restricted Operations with full administration rights
Once you've edited the agent, close the Properties box
Close the Inbound Processing – Agent tab
Save the changes
Click Sign
Message Templates can be used for communication with the end users via Notes mail messages. These messages can be used for informational purposes only or they may contain action buttons with associated code designed to perform specific tasks. These messages are created using the Message Templates.
Click Message Templates in the Navigation Pane; the Data Pane displays a list of predefined message templates
|
|
|
Select a predefined template and click the New Template button in the Data Pane
A new tab opens and displays a form where the details of the new Message Template can be specified; notice that the tab clearly specifies that the new template is based on the predefined template; when saving this template with a new name, however, the tab will reflect its new name
Customize the new template; refer to the table below for details on settings
Once all the details have been specified, click Spell Check to ensure there are no spelling errors in the message
A message box appears to confirm that no misspellings were found; click OK to close the message box
Next, save the new template; click Save & Close
The following table describes the values for each setting:
|
Settings |
Description |
|
Template Name |
Specify a name for the template that best describes the purpose of the new message template |
|
Template Type |
Specify the type of the new message template, such as Email Only or ID Retrieval |
|
Return Notification |
Specify whether you want a return notice from the end user when the message is received and the required action is performed |
|
From |
Specify the name of the entity sending this migration message to end users (for example, Migration Coordinator) |
|
Subject |
Specify a brief description of the purpose of the new template |
|
User Action Required |
Check this box if migration for this user cannot proceed until the user performs the embedded action within the message This check box also indicates that the user will remain in the Pending Reponses view until they perform the end user action in a particular message template |
|
Message Body |
Specify a customized message |
The new template is saved and it appears in the list of existing templates
The database comes with predefined Message Templates which are designed to perform specific migration tasks. The information contained within these predefined templates can be modified to tailor them to a client’s needs. Predefined Message Templates can be of the following types depending on the actions they perform:
Gather ID and Password Info
Notification Only Email
Gather ID and Password Info
This message is used to gather User ID and password information
Notification Email Only
As the name implies, Notification Email Only is designed for informational purposes only and does not include any action buttons. Notification Email Only templates can be used to keep the end users informed.
Users from the Domino Directory must be imported into the database.
|
|
Ongoing maintenance of users as they are added, deleted, or renamed must be maintained in this database. Also, if Password Policies exist in the environment, management of this must be considered for this database. |
With the database open, expand in the left navigator the section Configuration and select Import Users. Import users as follows:
Click on the Import Users button and select either All Users or Select Users to Import (to select specific users)
If Select Users to Import is selected, choose users to import in the People view in the Address Book and click OK
On the confirmation screen, click OK
Notification will be sent to the end users. These may be for relaying information, delivering end user driven action buttons for actions such as gathering ID and password information or both.
Send End User Notifications
To send a notification:
Expand User Notifications and click Send in the Navigation Pane
Select all the user documents in the Data Pane to whom the notification will be sent
Click the Send Notifications button in the Data Pane
In the Message Templates dialog box, a list of available predefined templates is displayed; if custom templates have been created, these will also be listed; select the desired template to send and click OK
The progression message box displays; after a few seconds of processing, another message box displays confirming that notifications have been sent to selected users; click OK
After sending the first notification to the users, the users remain in the Notify step under the Pending Responses view so that all desired notifications can be sent to the user
Pending Responses
Notifications where users are required to click an embedded button in the email are processed differently. If users don’t click the buttons, their response is considered pending and is listed in the Pending Responses view. To check if there are any pending responses from the sent notifications, click Pending Responses.
For example, if John Smith has not performed the required action. The Data Pane will show that two notifications have been sent, one requires user action, and no response has been received. In a situation like this, another notification can be sent prompting users to respond to migration notifications.
Responses Received
Responses can also be seen in the Responses view; click Responses Received in the Navigation Pane
Errors
If needed, check to see if there were any errors during the sending of the notifications; click Errors
Incoming Email Responses
The Incoming Email Responses view shows user responses sent in via email
Exchange-generated email sent to Domino users that is marked private or has the property ICCategory=4 will be encrypted; before submitting an item for encryption, Integration for Notes will validate that all users in the recipient list have a Public Key in the Domino Directory; if any recipients do not have a Public Key, an NDR will be sent to the originator
These items will be marked as Private in the recipients’ inbox
If BTScanSubjectForEncryptFlag=1 and the subject contains the text value in BTScanSubjectFlag the messages sent from Exchange to Domino users will be encrypted; this is to allow mobile users to encrypt messages sent from smart phone
For Domino users to reply with history and respond to calendar items, “Prevent Copy” (Notes feature) is NOT set on encrypted items from Exchange
When Calendar invitations are encrypted, they will appear as a memo with a meeting.ics attachment in the Domino user’s inbox; when the item is opened it will be converted to a typical invitation
Notes:
Exchange generated email with external recipients should not be routed through the Domino Integration for Notes servers, therefore not encrypted
Encrypted calendar invitations from Exchange to Domino will initially arrive as an email with a meeting.ics attached, not an invitation:

Once the email is opened, it is properly displayed as an invitation:
There will also be an additional email version of the item in the inbox; if the Notes preferences are set to not to remove items from the inbox after processing them, two items will show for each invitation:
