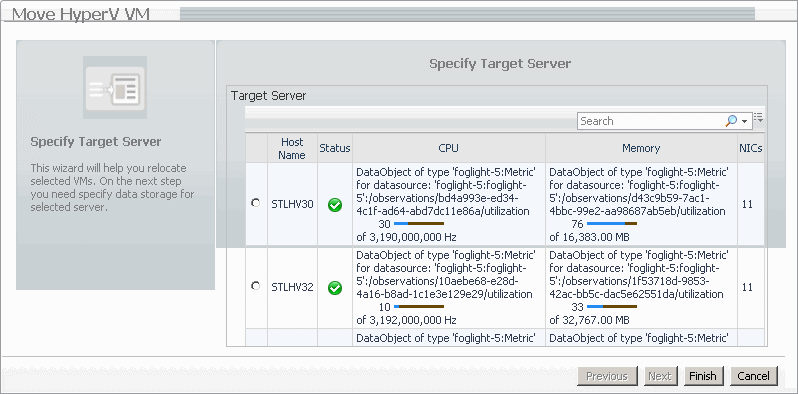
Use the Create VM, Edit, and Move buttons on the Hyper-V Explorer Administration tab to create virtual machines and move them, as required.
|
1 |
Select a server object instance and open the Hyper-V Explorer Administration tab. |
|
2 |
|
3 |
Follow the flow in the wizard by supplying the required information and clicking Next. At any point you can return to a previous step using the Previous button. |
|
a |
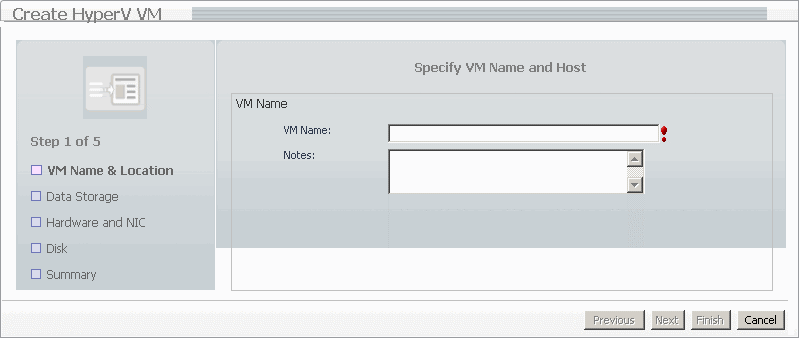
On the Specify VM Name and Host page, in the VM Name box, specify the name of the virtual machine that you are about to create. |
|
b |
On the Select Data Storage page, specify the location of the virtual machine or select the use default location check box. |
|
c |
On the Customize Hardware and Network page, define the number of CPUs and memory size that you want to allocate to the VM. If necessary, add a network adapter and assign a static or dynamic IP address. |
|
d |
On the Customize VM Disk(s) page, allocate disk resources to the virtual machine. You can choose from existing disk drives or create a new one. |
|
e |
|
1 |
Select a virtual machine object instance and open the Hyper-V Explorer Administration tab. |
|
2 |
|
3 |
Follow the flow in the wizard by supplying the required information and clicking Next. At any point you can return to a previous step using the Previous button. |
|
a |
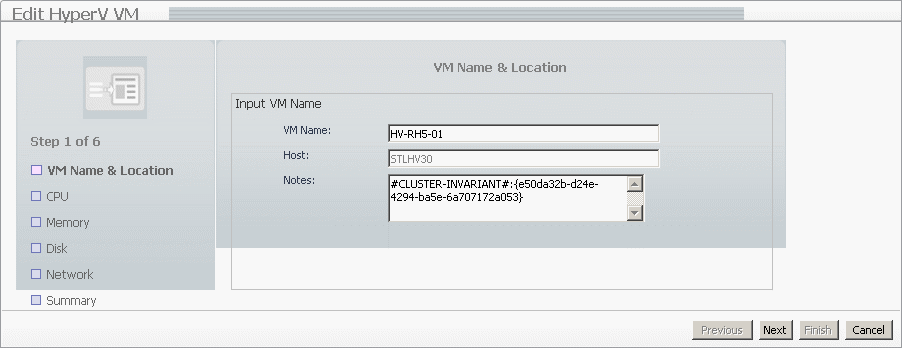
On the VM Name & Location page, edit the name of the virtual machine, if required. |
|
b |
On the Customize CPU Usage page, edit the CPU allocation properties as required, including the number of CPUs, if the CPUs are to be shared, and the related allocation limits. |
|
c |
On the Customize Memory Usage page, edit the memory amount that is allocated to the virtual machine. |
|
d |
On the VM Disk page, add or remove any disks, as required. |
|
e |
On the VM Network page, add or remove any network adapters, and edit their IP addresses, as required. |
|
f |
|
1 |
Select a virtual machine object instance and open the Hyper-V Explorer Administration tab. |
|
2 |
Use the Pause, Power Off, and Shutdown OS buttons on the Hyper-V Administration tab to pause and power off virtual machines, and to shut down their OS, as required.
|
1 |
Select a virtual machine object instance and open the Hyper-V Explorer Administration tab. |
|
2 |
|
3 |
Click OK. |
|
1 |
Select a virtual machine object instance and open the Hyper-V Explorer Administration tab. |
|
2 |
|
3 |
Click OK. |
|
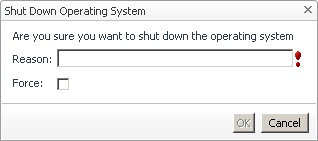
1 |
Select a virtual machine object instance and open the Hyper-V Explorer Administration tab. |
|
2 |
|
3 |
In the Shutdown Operating System dialog box, in the Reason box, type the reason for shutting down the virtual machine’s OS. |
|
4 |
To force the virtual machine to shut down, select the Force check box. |
|
5 |
Click OK. |
Use the Clone, Delete, and Save buttons on the Hyper-V Administration tab to clone, delete, and save changes to virtual machines, as required.
|
1 |
Select a virtual machine object instance and open the Hyper-V Explorer Administration tab. |
|
2 |
|
1 |
Select a virtual machine object instance and open the Hyper-V Explorer Administration tab. |
|
2 |
|
1 |
Select a virtual machine object instance and open the Hyper-V Explorer Administration tab. |
|
2 |
|
3 |
Click OK. |
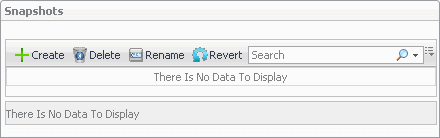
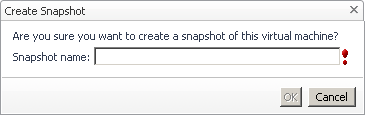
A virtual machine snapshot is a saved virtual machine image to which you can return at any point in time. Use the Snapshots view on the Hyper-V Administration tab to create, manage, and revert to virtual machine snapshots, as required.
|
1 |
Select a virtual machine object instance and open the Hyper-V Explorer Administration tab. |
|
2 |
|
3 |
|
4 |
Click OK. |
|
1 |
Select a virtual machine object instance and open the Hyper-V Explorer Administration tab. |
|
2 |
On the Hyper-V Explorer Administration tab, in the Snapshots view, select the virtual machine snapshot that you want to delete. |
|
3 |
Click Delete. |
|
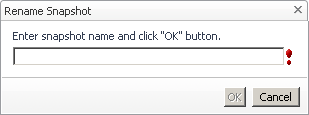
1 |
Select a virtual machine object instance and open the Hyper-V Explorer Administration tab. |
|
2 |
On the Hyper-V Explorer Administration tab, in the Snapshots view, select the virtual machine snapshot that you want to rename. |
|
3 |
Click Rename. |
|
4 |
In the Rename Snapshot dialog box, type the snapshot name. |
|
5 |
Click OK. |
|
1 |
Select a virtual machine object instance and open the Hyper-V Explorer Administration tab. |
|
2 |
On the Hyper-V Explorer Administration tab, in the Snapshots view, select the virtual machine snapshot to which you want to revert. |
|
3 |
Click Revert. |
|
4 |
Click OK. |