About this Document
This document provides information about how to use Migrator Pro for Exchange to perform migrations from supported source versions of Microsoft Exchange to supported target versions of Exchange or to Microsoft Office 365 Exchange Online. See Supported Mailbox Migration Paths and Supported Public Folders Migration Paths below for checklists of supported scenarios.
A separate Migrator Pro for Exchange Installation and Configuration Guide describes how to install and configure the Migrator Pro for Exchange product.
This document assumes the reader brings some basic admin-level experience with Microsoft Exchange and Microsoft Outlook. If you are unfamiliar with some Outlook and Exchange terms or concepts that appear in this document, please refer to the Microsoft documentation.
Online Help
Migrator Pro for Exchange also offers context-sensitive browser-based help from the data-entry screens and tabs of the Admin Portal.
Getting more information
The Migrator Pro for Exchange Fast Start Guide and Installation and Configuration Guide provide an orientation to the product’s intended uses and features, including the Migrator Pro for Exchange Admin Portal, with detailed instructions for installing and configuring the product for your environment.
For additional resources, refer to Support: https://support.quest.com
About Migrator Pro for Exchange
Migrator Pro for Exchange facilitates migration from one version of Microsoft Exchange to another. It combines a back-end policy engine with front-end management components, to provide project managers and administrators more control over Exchange upgrades.
Key features and functions include:
Workflow engine lets administrators create migration tasks, select objects, schedule jobs, and provide user self-service.
Unified console enables flexible filtering and selection of mailbox objects.
Content included in the mailbox is moved in one transaction, so mailbox security and permissions (delegates) are retained.
Reports on object and migration status feed into the console, reducing effort required to create tasks.
Does not require server-hosted agents for any of its functionality.
Public folder migration for Exchange and Microsoft Office 365.
Migration to Microsoft Office 365 and resource forest migrations.
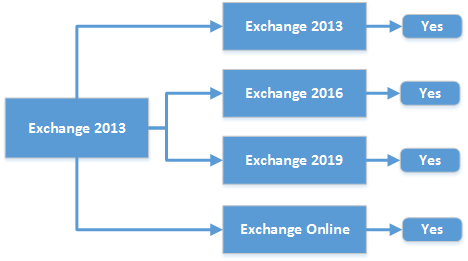
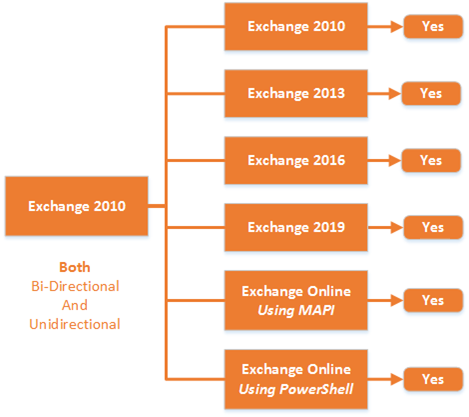
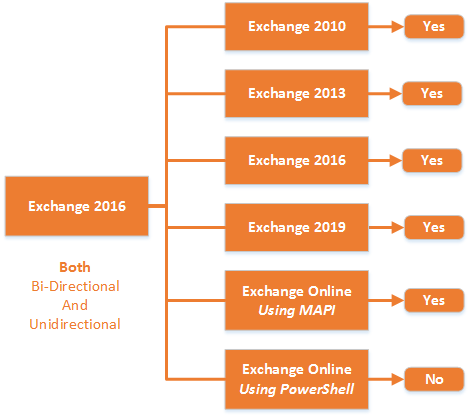
Supported Mailbox Migration Paths
The current release of Migrator Pro for Exchange supports mailbox migration for these source/target scenarios:


Supported Public Folders Migration Paths
Migrator Pro for Exchange supports inter-org (only) public folders migration for these source/target scenarios:


Components of Migrator Pro for Exchange
The main components of Migrator Pro for Exchange are: the MCP Windows Service, the Admin Portal and the User Portal.
MCP Windows Service
The MCP Windows Service (Migrator Pro for Exchange MCP Service) is the controlling service for all Migrator Pro for Exchange functions. This service should automatically start. Make sure that Migrator Pro for Exchange MCP Service is started in Windows Services.
Admin Portal
Migrator Pro for Exchange's Admin Portal is a friendly user interface that lets you configure and execute most administrative tasks associated with a migration.
To launch the Admin Portal, double-click the Migrator Pro for Exchange shortcut on your Windows desktop, or select Migrator Pro for Exchange from the Windows Start menu:

The Admin Portal opens in a browser window. Migrator Pro for Exchange supports Internet Explorer 8 or later, Firefox and Google Chrome.

For best results, maximize the browser window.
The Admin Portal launches with http://localhost/exchangepro/admin/default.aspx. You can use localhost, <machinename>, or the IP address to access the Admin Portal.
User Portal
The User Portal is available for users to postpone and schedule blackouts for their migrations and to provide alternative notification capabilities.
The User Portal is located at: http://<MachineName>/exchangepro/user/default.aspx
Windows Authentication is enabled for this virtual application. When performing cross-forest migrations, if the users in the source forest attempt to connect to the Migrator Pro for Exchange server in the target forest and a trust has not been established between the two forests, the users will be prompted for their target credentials.
About the Migrator Pro for Exchange Admin Portal
Migrator Pro for Exchange's Admin Portal is a friendly user interface that lets you control various administrative tasks related to Exchange mailbox migration.
The first time you run the Admin Portal after installing Migrator Pro for Exchange, the program leads you through a series of screens for you to enter your Migrator Pro for Exchange license key and configure Migrator Pro for Exchange communications with other programs and hardware. This process is documented in the Migrator Pro for Exchange Installation and Configuration Guide. After that initial configuration, the Admin Portal lets you update configuration data, define new forests, designate mailboxes and public folders for migration, schedule and execute migrations, pause and resume migrations, review migration statistics, and so forth.
To access the Admin Portal, double-click the Migrator Pro for Exchange shortcut on your Windows desktop, or select Migrator Pro for Exchange from the Windows Start menu:
The Admin Portal opens as a new tab in your browser called Migrator Pro for Exchange:
|
|
We recommend the browser hosting Migrator Pro for Exchange be set to clear temporary files and history upon exit. |
Main Toolbar
Migrator Pro for Exchange's Admin Portal Main Toolbar appears across the top of the browser tab:

The toolbar buttons let you change the view of the Admin Portal, to show different types of information and different groups of available features below the Main Toolbar:
Mailboxes: Lists mailboxes from all the sites in the specified forest. In addition, it allows you to sort, group, search, and select mailboxes to add to the migration queue.
Mailbox Jobs: Manages the sequence of migration requests for the selected migration destination site.
Public Folders: Displays the public folder tree from the selected Source and Target forest. In addition, it allows you to sort, group, search, and select public folders to add to the migration queue. Public folder migration is only enabled during on-premises cross forest migration projects.
Public Folder Jobs: Manages the sequence of migration requests for the selected migration destination. Public folder migration is only enabled during on-premises cross forest migration projects.
Content Analysis: Allows public folder content information collection and analysis in SQL for data remediation.
Blackout Times: Allows the configuration of time periods when mailboxes cannot be migrated for the selected migration site.
Summary: Displays high-level accounting of mailbox migrations, which allows you to view all status levels.
Schedule: Displays estimated migration sequence for the selected migration site. It is a read-only view.
Metrics: Provides historical data and throughput measurements of migrations in a graphical format.
View Delegation: Lists mailboxes with one or more delegates, and their delegate mailboxes, so you can select delegation-linked pairs to add to a migration queue (to migrate them together, which preserves delegation rights after migration).
Forests: Configure global forest settings, add new forest, etc.
Workers: Administer public folder migration workers.
Settings: Configure general settings, activities, mailboxes, public folders, workers, scripts, notification templates, and licenses.


Data Panel
In addition to the Main Toolbar, the Admin Portal also contains a Data Panel that displays data depending on the button that is currently selected.

Version Information
To view version information: Click
Migrator Pro for Exchange migrates data from a source forest to a target forest. The source forest can be any forest in your local domain. The target forest can be another local forest, or can be a tenant forest in Office 365. Within Migrator Pro for Exchange we classify forests by three types:
Source Forest: A forest in your local domain from which you will migrate.
Target Forest: A forest in your local domain to which you will migrate. Generically speaking, a "target forest" can reside either in your local domain or in Office 365, but within Migrator Pro for Exchange we define and configure Office 365 forests separately (see below). Within Migrator Pro for Exchange you can designate only one forest of this Target Forest type. A local Exchange target forest is defined when migrating Intra-org (no other forests would be needed), or when migrating Inter-org (a source forest would be defined).
Office 365 Forest: A forest in Microsoft's Office 365 to which you will migrate. Within Migrator Pro for Exchange you can designate only one forest of this target forest type.
The first time you run the Admin Portal after installing Migrator Pro for Exchange, the program leads you through a series of screens for you to enter your Migrator Pro for Exchange license key and configure Migrator Pro for Exchange communications with other programs and hardware. (This process is documented in the Migrator Pro for Exchange Installation and Configuration Guide.) These screens also prompt you to identify and characterize your Target Forest—to register it with Migrator Pro for Exchange so the program will know where the forest resides and how to connect to it. After this initial configuration, you can register and configure one or more Source Forests.
The subtopics below explain how the Forests view lets you define (register with Migrator Pro for Exchange) forests for cross-forest migrations, and how to update configuration settings for previously defined forests.
Adding a New Source Forest
To add a new Migrator Pro for Exchange source forest: Click Forests in the main Migrator Pro for Exchange toolbar, and then click Add Forest:

Migrator Pro for Exchange then opens the first of a series of screens to define and configure the new forest. The first in the series is the Source Forest screen.
Work your way through the screens, as described in the subtopics below. Migrator Pro for Exchange will register the new forest when you click the Finish button from the Summary screen (the last screen in the series).
Add Source Forest: Source Forest Screen
Enter the name of the Source Forest (top-level domain) you want to add to Migrator Pro for Exchange, and be sure to leave the Office 365 Forest checkbox unmarked.
|
|
Or, if you are migrating to Office 365 and configured the local/on-premises forest during your initial Migrator Pro for Exchange Forest configuration, you can configure the O365 forest now, and Migrator Pro for Exchange will automatically switch the two. That is, Migrator Pro for Exchange will correctly configure the on-premises forest as the source and the O365 forest as the target. In that case, mark the Office 365 Forest checkbox and see Adding a New Office 365 Forest below. |
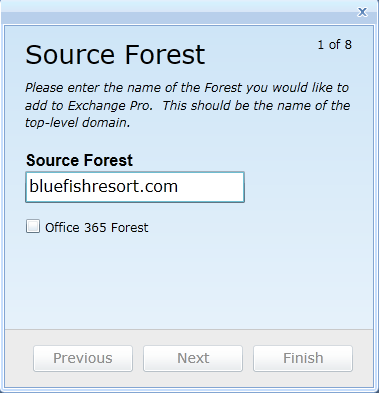
The Source Forest must be a fully qualified domain name (FQDN), and must be resolvable in DNS to a domain controller and global catalog server in the source forest.
When you have entered the Source Forest name:
Click Next to advance to the next screen; or
Click Finish (if enabled) to save all your configuration settings (in all screens in this sequence) and return to the Forests view, with the newly defined forest opened into the multi-tabbed Forest Configuration Settings screen.
Add Source Forest: Active Directory Screen
Enter the User Name and Password for the account Migrator Pro for Exchange should use for Active Directory calls, and specify the Global Catalog for this forest. You can mark the Auto-detect a Global Catalog checkbox to have Migrator Pro for Exchange scan your environment and determine the Global Catalog for you, or manually enter the Global Catalog into the text box.

When these settings appear as you want them:
Click Next to advance to the next screen; or
Click Previous to return to the previous screen in the sequence; or
Click Finish (if enabled) to save all your configuration settings (in all screens in this sequence) and return to the Forests view, with the newly defined forest opened into the multi-tabbed Forest Configuration Settings screen.
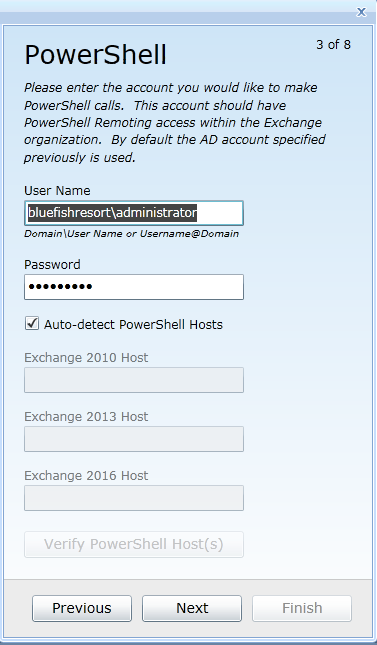
Add Source Forest: PowerShell Screen
Enter the User Name and Password for the account Migrator Pro for Exchange should use for PowerShell calls. This account should have PowerShell Remoting access with the Exchange organization.
Leave the Auto-detect PowerShell Hosts checkbox marked if you want Migrator Pro for Exchange to automatically find and specify the PowerShell hosts, or unmark the checkbox if you want to manually specify the hosts in the respective text boxes: Exchange 2010 Host, Exchange 2013 Host and Exchange 2016 Host.
|
|
A PowerShell host must be specified here as a Fully Qualified Domain Name (FQDN). An IP address will generate an SSL certificate error. |
If you specify the hosts manually, be sure to click the Verify PowerShell Host(s) button to verify connectivity to the PowerShell host servers.
When these settings appear as you want them:
Click Next to advance to the next screen; or
Click Previous to return to the previous screen in the sequence; or
Click Finish (if enabled) to save all your configuration settings (in all screens in this sequence) and return to the Forests view, with the newly defined forest opened into the multi-tabbed Forest Configuration Settings screen.
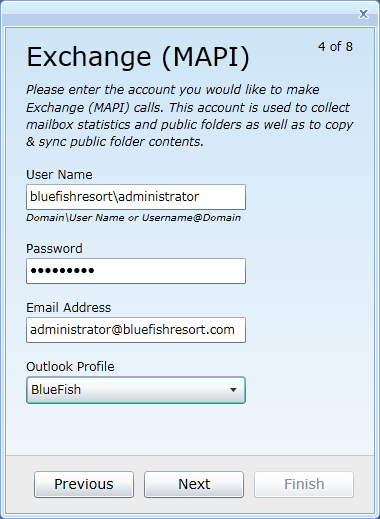
Add Source Forest: Exchange (MAPI) Screen
These settings are required only when migrating public folders in cross-forest migrations where no trusts exist.
Enter the User Name, Password and Email Address for the account Migrator Pro for Exchange should use for Exchange (MAPI) calls, and select the Outlook Profile.
|
|
|
When these settings appear as you want them:
Click Next to advance to the next screen; or
Click Previous to return to the previous screen in the sequence; or
Click Finish (if enabled) to save all your configuration settings (in all screens in this sequence) and return to the Forests view, with the newly defined forest opened into the multi-tabbed Forest Configuration Settings screen.
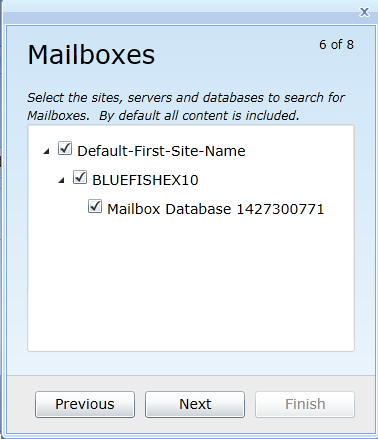
Add Source Forest: Mailboxes Screen
Select the sites, servers and databases you want Migrator Pro for Exchange to search for mailboxes to migrate. All content is selected by default.
You can right-click in the list area to select options to expand/collapse levels of the tree.
When the selections appear as you want them:
Click Next to advance to the next screen; or
Click Previous to return to the previous screen in the sequence; or
Click Finish (if enabled) to save all your configuration settings (in all screens in this sequence) and return to the Forests view, with the newly defined forest opened into the multi-tabbed Forest Configuration Settings screen.
Add Source Forest: Public Folders Screen
Select the sites, servers, and databases you want Migrator Pro for Exchange to search for public folders to migrate. All content is selected by default.
You can right-click in the list area to select options to expand/collapse levels of the tree.

When the selections appear as you want them:
Click Next to advance to the next screen; or
Click Previous to return to the previous screen in the sequence; or
Click Finish to save all your configuration settings (in all screens in this sequence) and return to the Forests view, with the newly defined forest opened into the multi-tabbed Forest Configuration Settings screen.
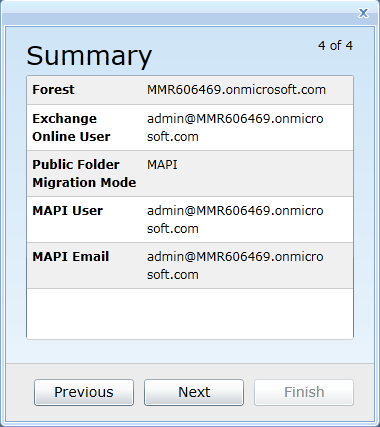
Add Source Forest: Summary Screen
Review the displayed summary of the new forest's configuration settings, and determine whether you want to change any settings before you save them into a new forest record.
If necessary, you can click Previous to return to any previous screen in the sequence to change the settings there.
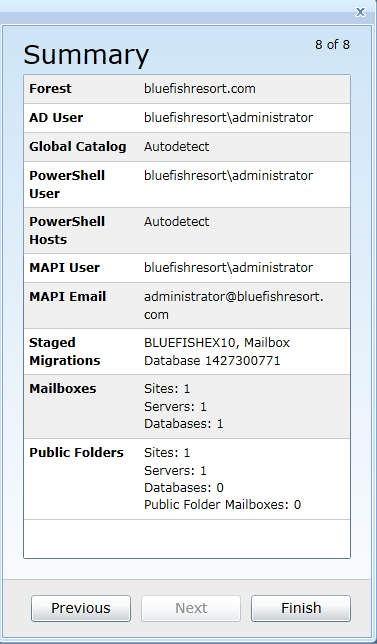
When this Summary shows all the configuration settings as you want them, click Finish to save all the settings (in all screens in this sequence) and return to the Forests view, with the newly defined forest opened into the multi-tabbed Forest Configuration Settings screen.
Adding a New Office 365 Forest
To add a new Migrator Pro for Exchange Office 365 tenant forest: Click Forests in the main Migrator Pro for Exchange toolbar, and then click Add Forest:
Migrator Pro for Exchange then opens its Source Forest screen. This is actually the first screen in a series to define a new source forest, but a checkbox on this screen lets you shift the feature to the series for an Office 365 tenant forest:

To shift the feature to define a new Office 365 tenant forest, mark the checkbox for Office 365 Forest. The screen title then changes to Office 365 Forest, and the text-box field name also changes to Office 365 Forest (as shown below).
Work your way through the screens, as described in the subtopics below. Migrator Pro for Exchange will register the new forest when you click the Finish button from the Summary screen (the last screen in the series).
Add Office 365 Forest: Office 365 Forest Screen
Enter the name of the Office 365 Forest (top-level domain) you want to add to Migrator Pro for Exchange, and be sure to leave the Office 365 Forest checkbox marked. (If you unmark the checkbox, the screen will shift back to its Source Forest mode and the entire screen sequence will change to the Source Forest configuration mode.)
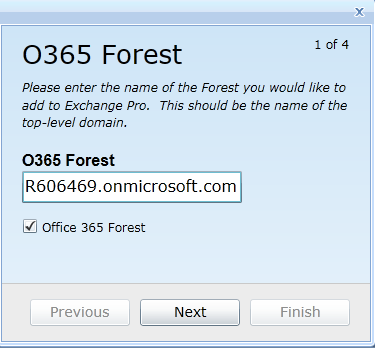
When these settings appear as you want them:
Click Next to advance to the next screen; or
Click Finish (if enabled) to save all your configuration settings (in all screens in this sequence) and return to the Forests view, with the newly defined forest opened into the multi-tabbed Forest Configuration Settings screen.
Add Office 365 Forest: Exchange Online Screen
Enter the User Name and Password for the account Migrator Pro for Exchange should use for program calls to Exchange Online.
Then, if you will migrate public folders to Exchange Online, specify a Public Folders Migration Mode from the drop-down list. PowerShell and MAPI are the two available methods.
For Msol Host Name, enter the Office 365 endpoint URL. The default Msol Host Name value is ps.outlook.com.
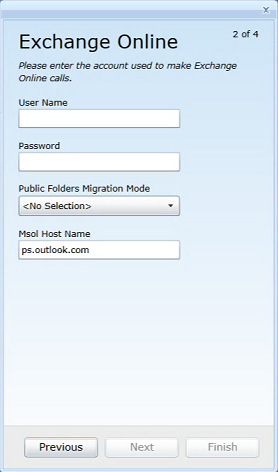
When these settings appear as you want them:
Click Next to advance to the next screen; or
Click Previous to return to the previous screen in the sequence; or
Click Finish (if enabled) to save all your configuration settings (in all screens in this sequence) and return to the Forests view, with the newly defined forest opened into the multi-tabbed Forest Configuration Settings screen.
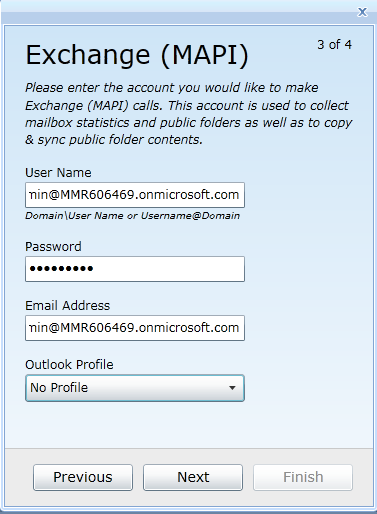
Add Office 365 Forest: Exchange (MAPI) Screen
These settings are required only when migrating public folders in cross-forest migrations where no trusts exist.
Enter the User Name, Password and Email Address for the account Migrator Pro for Exchange should use for program calls to Exchange (MAPI), and select the Outlook Profile.
|
|
|
When these settings appear as you want them:
Click Next to advance to the next screen; or
Click Previous to return to the previous screen in the sequence; or
Click Finish (if enabled) to save all your configuration settings (in all screens in this sequence) and return to the Forests view, with the newly defined forest opened into the multi-tabbed Forest Configuration Settings screen.
Add Office 365 Forest: Summary Screen
Review the displayed summary of the new forest's configuration, and determine whether you want to change any settings before you save them into a new forest record.
If necessary, you can click Previous to return to any previous screen in the sequence to change the settings there.
When this Summary shows all the configuration settings as you want them, click Finish to save all the settings (in all screens in this sequence) and return to the Forests view, with the newly defined forest opened into the multi-tabbed Forest Configuration Settings screen.
|
|
Before you can begin migrating to Office 365, you must select Office 365 license packs and related service plans for Migrator Pro for Exchange to use when auto-licensing Exchange Online mailbox migrations, adding mailboxes to the migration queue and scheduling mailbox migration to Office 365. Licensing information is specified in the Licenses tab in the Forest Configuration Settings screen. |
Forest Configuration
Forests that have already been defined in Migrator Pro for Exchange can be configured and reconfigured in the multi-tabbed Forest Configuration Settings screen, which appears in the Forests view below the Forests toolbar. The three different Migrator Pro for Exchange forest types (Source, Target, and Office 365 Tenant forests) are configured differently, on different sets of tabs. This illustration shows the screen with the tabs to configure a source forest:
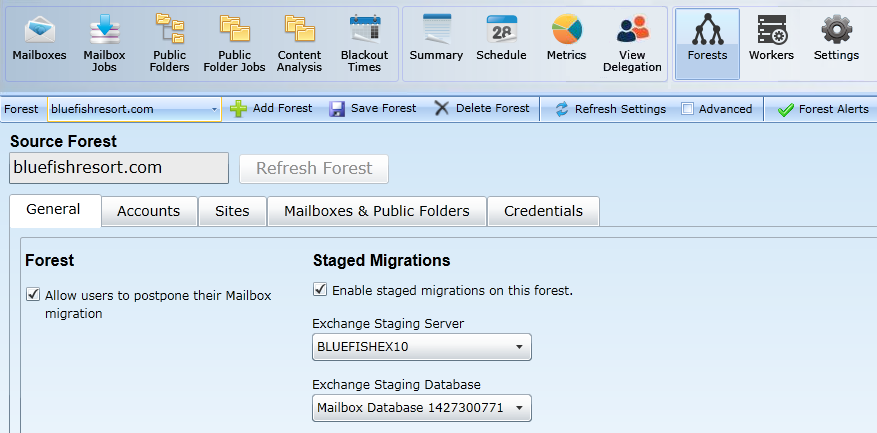
Configuration Tabs for a Source Forest

These tabs are documented under separate topic headings:
Mailboxes & Public Folders Tab
Configuration Tabs for the Target Forest

These tabs are documented under separate topic headings:
Mailboxes & Public Folders Tab
Configuration Tabs for an Office 365 Tenant Forest

These tabs are documented under separate topic headings:
Mailboxes & Public Folders Tab
Forest Alerts
The forest selection bar on the Forests view includes a Forest Alert indicator to show the accessibility status of required components for successful migration. A green checkmark indicates that no issues are detected. A red exclamation mark indicates that there may be issues that need to be resolved.

|
|
The Forest Alerts may not appear during the initial setup of the forest. It may take an hour or more for the first Alert indicators to display accurately. Also note that the Forest Alert indicator is not available for Tenant (Office365) Forests. |
Clicking on the icon will bring up dialog boxes to help in troubleshooting. You can click the Details button for more information. This information also displays the relevant PowerShell script that is used to troubleshoot the issue.

Check the [ü] Fix This Issue checkbox to select the issues that you would like Migrator Pro for Exchange to attempt to repair for you. Then click the Fix Issues button at the bottom.
The Export Scripts button allows you to optionally export and save the scripts. You can then use them as a baseline to create custom scripts that meet your unique environmental needs.

Deleting a Forest
The Forests Configuration Settings screen lets you delete additional (secondary or source) forests. When you delete a secondary forest, Migrator Pro for Exchange removes all its entries for the users and forest information, including any past migration history. Home (or target) forests cannot be deleted on the Forests Configuration Settings screen. A Home (or target) forest can be deleted only by a SQL query. Contact Support for assistance.
To delete a secondary forest: Click Forests in the main toolbar. Then select the secondary forest you want to delete (in the Forest drop-down list), and click Delete Forest.
Source Forest Configuration | General Tab
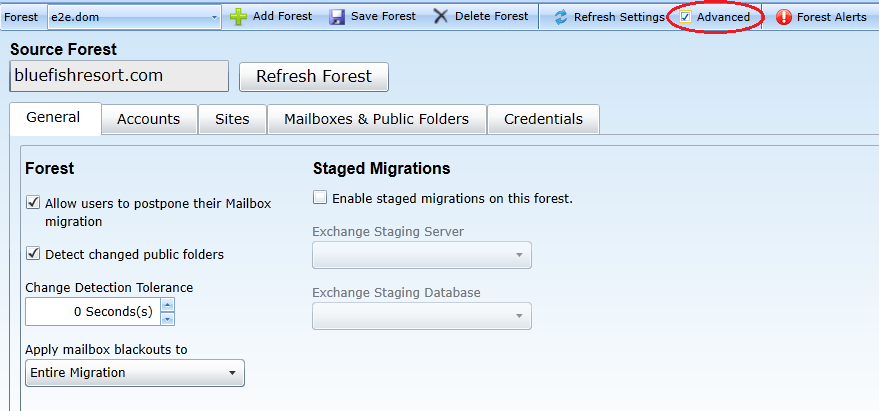
To view or edit the General tab for source forest configuration: From the Forest view toolbar, select a previously defined source Forest from the drop-down list, and then click the General tab. The General tab appears in its default view when the Advanced checkbox option is left unmarked:
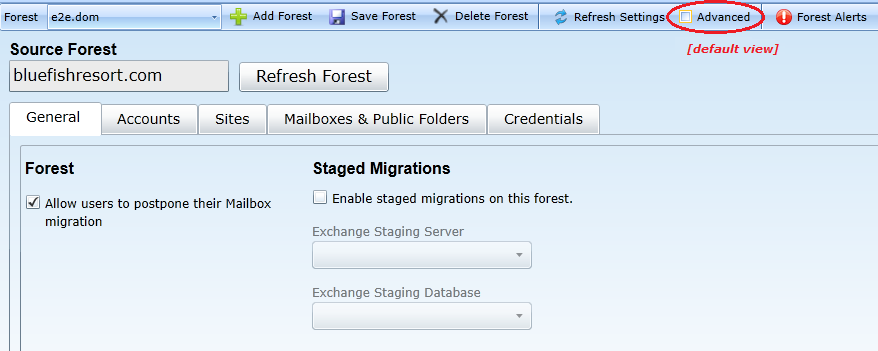
Or, you can mark the Advanced checkbox to view additional options, although most admins simply accept the default values for these Advanced settings:
Forest Section
The default (non-Advanced) view of this tab contains only one setting for the selected forest:
Allow users to postpone their Mailbox migration: Mark this checkbox if you want users to be able to set their own migration blackout periods in Migrator Pro for Exchange's User Portal.
|
|
The E2E_Schedulers group in Active Directory (if it exists) will override this user-postpone option. |
These settings, also in the Forest section, appear only in Advanced mode:
Detect changed public folders: Mark this checkbox if you want Migrator Pro for Exchange to monitor public folders in the organization to detect forest-level additions, deletions and moves. The option is enabled by default, and we recommend you leave it enabled. If this feature is turned off, the admin and Migrator Pro for Exchange will not know when public folders have changed after the initial sync. This would be irrelevant if you do not intend to re-sync public folders after their initial sync, but would be necessary to permit future syncs.
Change Detection Tolerance: The spinner control lets you set a wait period for Migrator Pro for Exchange's Detect feature (above, if enabled), specifying a number of seconds for Migrator Pro for Exchange to ignore changes to public folders after the time MAPI reports the most recent sync. For example, if set to 5 seconds, any changes detected within 5 seconds of the last sync are ignored. The default (and recommended) value is 2 seconds.
Apply mailbox blackouts to: Blackout periods can be defined in Migrator Pro for Exchange's Blackout Times view (see the Blackout Times topic for more information). The drop-down list here lets you specify one of three options for applying blackout times to the forest:
Entire Migration (default, and recommended): All Mailbox jobs are affected by blackouts during the entire migration.
Initial Migration: Mailbox jobs marked as "Suspend when ready to complete" are affected by blackouts until the migration reaches 95% complete (pre-AutoSuspend). All other mailbox jobs are affected by blackouts during the entire migration. Choose this setting when you want blackouts to be enforced during the pre-staging process, but not for the cutover process.
Final Migration\Cutover: Mailbox jobs marked as "Suspend when ready to complete" are affected by blackouts after the migration reaches 95% complete (post-AutoSuspend, cutover). All other mailbox jobs are affected by blackouts during the entire migration. Choose this setting when you want all mailbox jobs to be prevented from Cutover during the blackout period, but you want to allow “Suspend Until Ready to complete” jobs to continue working up to the 95% complete stage (pre-staging).
Source Forest Configuration | Accounts Tab
To view or edit the Accounts tab for source forest configuration: From the Forest view toolbar, select a previously defined source Forest from the drop-down list, and then click the Accounts tab. On this tab, all fields are displayed whether or not the Advanced checkbox is marked.

Active Directory Section
Enter the User Name and Password for the account Migrator Pro for Exchange should use for Active Directory calls, and specify the Global Catalog for this forest.
You can mark the Auto-detect a Global Catalog checkbox to have Migrator Pro for Exchange scan your environment and determine the Global Catalog for you, or manually enter the Global Catalog into the text box. Make sure that the designated GC is physically close to the Migrator Pro for Exchange server. (If you know of another GC that is physically closer than the one found by the Auto-detect feature, you may want to disable Auto-detect and manually specify the nearer option.)
PowerShell Section
Enter the User Name and Password for the account Migrator Pro for Exchange should use for PowerShell calls. This account should have PowerShell Remoting access within the Exchange organization.
Leave the Auto-detect PowerShell Hosts checkbox marked if you want Migrator Pro for Exchange to automatically find and specify the PowerShell hosts, or unmark the checkbox if you want to manually specify the hosts in the respective text boxes: Exchange 2010 Host, Exchange 2013 Host and Exchange 2016 Host. Make sure the designated PS hosts are physically close to the Migrator Pro for Exchange server. (If another PS Host is physically closer than the one found by the Auto-detect feature, you may want to disable Auto-detect and manually specify the nearer option.)
|
|
A PowerShell host must be specified here as a Fully Qualified Domain Name (FQDN). An IP address will generate an SSL certificate error. |
If you specify PowerShell hosts manually, be sure to click the Verify PowerShell Host(s) button to test connectivity to the PowerShell host servers.
Exchange (MAPI) Section
These settings are required only when migrating public folders in cross-forest migrations where no trusts exist.
Enter the User Name, Password and Email Address for the account Migrator Pro for Exchange should use for Exchange (MAPI) calls, and select the Outlook Profile.
SMTP Section
These settings are necessary for Migrator Pro for Exchange to use SMTP (Simple Mail Transfer Protocol), which is the Internet standard for electronic mail transmission across Internet Protocol (IP) networks.
Complete the fields here, and then click the Send Test Email button to verify connectivity. When you Send Test Email, Migrator Pro for Exchange posts a status response:
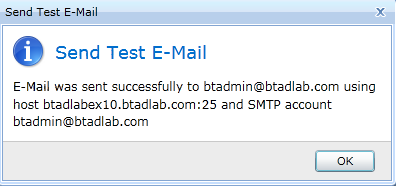
If the test succeeds, click OK to continue. If the test fails, modify the above SMTP settings and test again.
Source Forest Configuration | Sites Tab
To view or edit the Sites tab for source forest configuration: From the Forest view toolbar, select a previously defined source Forest from the drop-down list, and then click the Sites tab. On this tab, all fields are displayed whether or not the Advanced checkbox is marked.
The table in this view displays a list of the AD sites that were found in your environment for the selected forest:
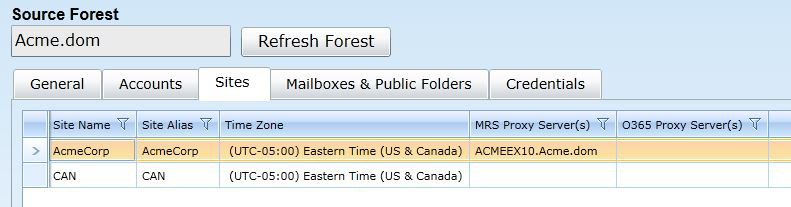
Most of the settings in this table can be edited:
Site Name: Displays the name of the migration site.
Site Alias: Displays the user-defined name for the migration site. Actual Site Names are often cryptic or otherwise difficult to read, so Migrator Pro for Exchange lets you assign "friendlier" shorthand names ("aliases") to identify the sites within Migrator Pro for Exchange features. This is an optional but popular feature, which can also be useful to differentiate among duplicate or very similar Site Names—as sometimes occurs if you add external forests to your project. To edit the alias value, just click inside the cell and the value becomes editable.
Time Zone: Displays the time zone of the migration, which Migrator Pro for Exchange uses to calculate configured blackout periods for a given site. An AD site may span several time zones, but Migrator Pro for Exchange associates each site with a single time zone. To change a time zone setting: Click inside the cell to make the value editable (a small triangle appears), then click the triangle to view a list of available options, and select the time zone you want to assign to this forest.
MRS Proxy Server(s): Displays the Exchange Mailbox Replication Service (MRS) proxy servers that Migrator Pro for Exchange has discovered for the site. Server names are separated with commas. You can manually define the publicly addressable names of the MRS proxy servers for the site. Manually entered server names are not overwritten by scheduled or manual forest refreshes.
To manually define MRS Proxy Server(s): Click inside the cell to make the values editable, and enter publicly addressable names for the site's MRS proxy servers, separating multiple names with commas.
|
|
Remember to click Save Forest (in the Forest toolbar above the tabs) to save any changes you make to these settings. |
Source Forest Configuration | Mailboxes & Public Folders Tab
To view or edit the Mailboxes & Public Folders tab for source forest configuration: From the Forest view toolbar, select a previously defined source Forest from the drop-down list, and then click the Mailboxes & Public Folders tab. On this tab, all options are displayed whether or not the Advanced checkbox is marked.
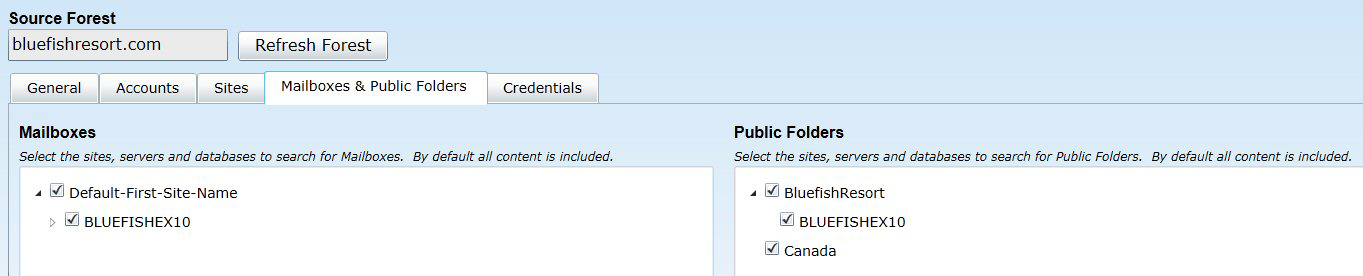
Mailboxes Section
Select the sites, servers and databases you want Migrator Pro for Exchange to search for mailboxes in this forest to migrate. All content is selected by default.
You can right-click in the list area to select options to expand/collapse levels of the tree.
Public Folders Section
Select the sites, servers, and databases you want Migrator Pro for Exchange to search for public folders in this forest to migrate. All content is selected by default.
You can right-click in the list area to select options to expand/collapse levels of the tree.
Source Forest Configuration | Credentials Tab
To view or edit the Credentials tab for source forest configuration: From the Forest view toolbar, select a previously defined source Forest from the drop-down list, and then click the Credentials tab. On this tab, all options are displayed whether or not the Advanced checkbox is marked.
The table in this tab shows the credentials that are available for Migrator Pro for Exchange to use for its public folder Workers in the selected forest. (Source and Target credentials are selected in the Worker’s settings, and the credentials defined here make up the list of selectable credentials for the Workers.)

To define a credential for this forest: Click the Add button (below the table) to open the Forest Credential screen:
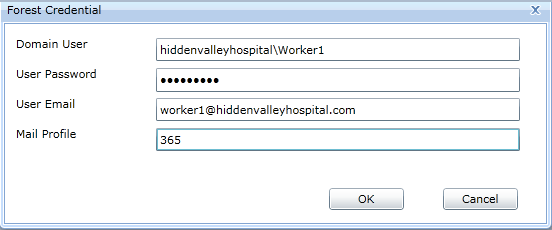
... and enter this information:
Domain User: The Domain user (in Domain\Username format).
User Password: The password for the user
User Email: The email address of the user
Mail Profile: The name of the Outlook Profile that has been preconfigured on the Worker machine. A Worker machine without Outlook installed cannot use credentials with Outlook Profiles. This field should remain blank to create a credential for Workers that do not have Outlook installed.
Then click OK to create a new credentials record and dismiss the Forest Credential screen.
You can also Edit or Delete a previously defined credential.
Target Forest Configuration | General Tab
To view or edit the General tab for target forest configuration: From the Forest view toolbar, select the previously defined target Forest from the drop-down list, and then click the General tab. The General tab appears in its default view when the Advanced checkbox option is left unmarked:

Or you can mark the Advanced checkbox to view additional options, although most admins simply accept the default values for these Advanced settings:
Forest Section
In the default (non-Advanced) view of this tab, the Forest section contains these two settings for the selected forest:
Resource Forest: If the target Exchange environment is configured as an Exchange Resource Forest environment, mark the Resource Forest checkbox to create a “Linked User” relationship between the source and target account. This option applies only for Inter-Org migrations; and this checkbox appears only when configuring the Home Forest. (For more information about resource forests, see Microsoft's article http://technet.microsoft.com/en-us/library/aa998031.aspx and other Microsoft resources.)
Allow users to postpone their Mailbox migration: Mark this checkbox if you want users to be able to set their own migration blackout periods in Migrator Pro for Exchange's User Portal.
|
|
The E2E_Schedulers group in Active Directory (if it exists) will override this user-postpone option. |
These settings, also in the Forest section, appear only in Advanced mode:
Detect changed public folders: Mark this checkbox if you want Migrator Pro for Exchange to monitor public folders in the organization to detect forest-level additions, deletions and moves. The option is enabled by default, and we recommend you leave it enabled. If this feature is turned off, the admin and Migrator Pro for Exchange will not know when public folders have changed after the initial sync. This would be irrelevant if you do not intend to re-sync public folders after their initial sync, but would be necessary to permit future syncs.
Change Detection Tolerance: The spinner control lets you set a wait period for Migrator Pro for Exchange's Detect feature (above, if enabled), specifying a number of seconds for Migrator Pro for Exchange to ignore changes to public folders after the time MAPI reports the most recent sync. For example, if set to 5 seconds, any changes detected within 5 seconds of the last sync are ignored. The default (and recommended) value is 2 seconds.
Apply mailbox blackouts to: Blackout periods can be defined in Migrator Pro for Exchange's Blackout Times view (see the Blackout Times topic for more information). The drop-down list here lets you specify one of three options for applying blackout times to the forest:
Entire Migration (default, and recommended): All Mailbox jobs are affected by blackouts during the entire migration.
Initial Migration: Mailbox jobs marked as "Suspend when ready to complete" are affected by blackouts until the migration reaches 95% complete (pre-AutoSuspend). All other mailbox jobs are affected by blackouts during the entire migration. Choose this setting when you want blackouts to be enforced during the pre-staging process, but not for the cutover process.
Final Migration\Cutover: Mailbox jobs marked as "Suspend when ready to complete" are affected by blackouts after the migration reaches 95% complete (post-AutoSuspend, cutover). All other mailbox jobs are affected by blackouts during the entire migration. Choose this setting when you want all mailbox jobs to be prevented from Cutover during the blackout period, but you want to allow “Suspend Until Ready to complete” jobs to continue working up to the 95% complete stage (pre-staging).
Target Forest Configuration | Accounts Tab
To view or edit the Accounts tab for target forest configuration: From the Forest view toolbar, select the previously defined target Forest from the drop-down list, and then click the Accounts tab. On this tab, all fields are displayed whether or not the Advanced checkbox is marked.

Active Directory Section
Enter the User Name and Password for the account Migrator Pro for Exchange should use for Active Directory calls, and specify the Global Catalog for this forest.
You can mark the Auto-detect a Global Catalog checkbox to have Migrator Pro for Exchange scan your environment and determine the Global Catalog for you, or manually enter the Global Catalog into the text box. Make sure that the designated GC is physically close to the Migrator Pro for Exchange server. (If you know of another GC that is physically closer than the one found by the Auto-detect feature, you may want to disable Auto-detect and manually specify the nearer option.)
PowerShell Section
Enter the User Name and Password for the account Migrator Pro for Exchange should use for PowerShell calls. This account should have PowerShell Remoting access within the Exchange organization.
Leave the Auto-detect PowerShell Hosts checkbox marked if you want Migrator Pro for Exchange to automatically find and specify the PowerShell hosts, or unmark the checkbox if you want to manually specify the hosts in the respective text boxes: Exchange 2010 Host, Exchange 2013 Host and Exchange 2016 Host. Make sure the designated PS hosts are physically close to the Migrator Pro for Exchange server. (If another PS Host is physically closer than the one found by the Auto-detect feature, you may want to disable Auto-detect and manually specify the nearer option.)
|
|
A PowerShell host must be specified here as a Fully Qualified Domain Name (FQDN). An IP address will generate an SSL certificate error. |
If you specify PowerShell hosts manually, be sure to click the Verify PowerShell Host(s) button to test connectivity to the PowerShell host servers.
Exchange (MAPI) Section
These settings are required only when migrating public folders in cross-forest migrations where no trusts exist.
Enter the User Name, Password and Email Address for the account Migrator Pro for Exchange should use for Exchange (MAPI) calls, and select the Outlook Profile.
SMTP Section
These settings are necessary for Migrator Pro for Exchange to use SMTP (Simple Mail Transfer Protocol), which is the Internet standard for electronic mail transmission across Internet Protocol (IP) networks.
Complete the fields here, and then click the Send Test Email button to verify connectivity. When you Send Test Email, Migrator Pro for Exchange posts a status response:
If the test succeeds, click OK to continue. If the test fails, modify the above SMTP settings and test again.
Target Forest Configuration | Sites Tab
To view or edit the Sites tab for target forest configuration: From the Forest view toolbar, select the previously defined target Forest from the drop-down list, and then click the Sites tab. On this tab, all options are displayed whether or not the Advanced checkbox is marked.
The table in this view displays a list of the AD sites that were found in your environment for the selected forest:

Most of the settings in this table can be edited:
Site Name: Displays the name of the migration site.
Site Alias: Displays the user-defined name for the migration site. Actual Site Names are often cryptic or otherwise difficult to read, so Migrator Pro for Exchange lets you assign "friendlier" shorthand names ("aliases") to identify the sites in Migrator Pro for Exchange features. This is an optional but popular feature, which can also be useful to differentiate among duplicate or very similar Site Names—as sometimes occurs if you add external forests to your project. To edit the alias value, click inside the cell and the value becomes editable.
Time Zone: Displays the time zone of the migration, which Migrator Pro for Exchange uses to calculate configured blackout periods for a given site. An AD site may span several time zones, but Migrator Pro for Exchange associates each site with a single time zone. To change a time zone setting: Click inside the cell to make the value editable (a small triangle appears), then click the triangle to view a list of available options, and select the time zone you want to assign to this forest.
MRS Proxy Server(s): Displays the Exchange Mailbox Replication Service (MRS) proxy servers that Migrator Pro for Exchange has discovered for the site. Server names are separated with commas. You can manually define the publicly addressable names of the MRS proxy servers for the site. Manually entered server names are not overwritten by scheduled or manual forest refreshes. To manually define MRS Proxy Server(s): Click inside the cell to make the values editable, and enter publicly addressable names for the site's MRS proxy servers, separating multiple names with commas.
|
|
Remember to click Save Forest (in the Forest toolbar above the tabs) to save any changes you make to these settings. |
Target Forest Configuration | Mailboxes & Public Folders Tab
To view or edit the Mailboxes & Public Folders tab for target forest configuration: From the Forest view toolbar, select the previously defined target Forest from the drop-down list, and then click the Mailboxes & Public Folders tab. On this tab, all options are displayed whether or not the Advanced checkbox is marked.
Mailboxes Section
Select the sites, servers and databases in this forest you want to search for mailboxes to migrate. All content is selected by default. You can right-click in the list area to select options to expand/collapse levels of the tree.
Public Folders Section
Select the sites, servers, and databases in this forest you want to search for public folders to migrate. All content is selected by default. You can right-click in the list area to select options to expand/collapse levels of the tree.
Target Forest Configuration | Credentials Tab
To view or edit the Credentials tab for target forest configuration: From the Forest view toolbar, select the previously defined target Forest from the drop-down list, and then click the Credentials tab. On this tab, all options are displayed whether or not the Advanced checkbox is marked.
The table in this tab shows the credentials that are available for Migrator Pro for Exchange to use for its public folder Workers in the selected forest. (Source and Target credentials are selected in the Worker’s settings, and the credentials defined here make up the list of selectable credentials for the Workers.)
To define a credential for this forest: Click the Add button (below the table) to open the Forest Credential screen:
... and enter this information:
Domain User: The Domain user (in Domain\Username format).
User Password: The password for the user
User Email: The email address of the user
Mail Profile: The name of the Outlook profile that has been preconfigured on the Worker machine. A Worker machine without Outlook installed cannot use credentials with Outlook Profiles. This field should remain blank to create a credential for Workers that do not have Outlook installed.
Then click OK to create a new credentials record and dismiss the Forest Credential screen.
You can also Edit or Delete a previously defined credential.
Tenant Forest (Office 365) Configuration | Accounts Tab
To view or edit the Accounts tab for tenant forest configuration: From the Forest view toolbar, select a previously defined tenant Forest from the drop-down list, and then click the Accounts tab. On this tab, all options are displayed whether or not the Advanced checkbox is marked.

Exchange Online Section
These settings are required for Migrator Pro for Exchange program access to Office 365.
Enter the User Name and Password for the account Migrator Pro for Exchange should use to access Office 365.
Specify a Public Folders Migration Mode from the drop-down list. PowerShell and MAPI are the two available methods. If the Migration Mode is not specified here, Migrator Pro for Exchange will use the MAPI migration method by default.
For Msol Host Name, enter the Office 365 endpoint URL. The default Msol Host Name value is ps.outlook.com.
Exchange (MAPI) Section
These settings are required only when migrating public folders in cross-forest migrations where no trusts exist.
Enter the User Name, Password and Email Address for the account Migrator Pro for Exchange should use for program calls to Exchange (MAPI), and select the Outlook Profile.
|
|
|
Tenant Forest (Office 365) Configuration | Sites Tab
To view or edit the Sites tab for tenant forest configuration: From the Forest view toolbar, select a previously defined tenant Forest from the drop-down list, and then click the Sites tab. On this tab, all options are displayed whether or not the Advanced checkbox is marked.
The table in this view displays a list of the AD sites that were found in your environment for the selected forest:
Most of the settings in this table can be edited:
Site Name: Displays the name of the migration site.
Site Alias: Displays the user-defined name for the migration site. Actual Site Names are often cryptic or otherwise difficult to read, so Migrator Pro for Exchange lets you assign "friendlier" shorthand names ("aliases") to identify the sites within Migrator Pro for Exchange features. This is an optional but popular feature, which can also be useful to differentiate among duplicate or very similar Site Names—as sometimes occurs if you add external forests to your project. To edit the alias value, just click inside the cell and the value becomes editable.
Time Zone: Displays the time zone of the migration, which Migrator Pro for Exchange uses to calculate configured blackout periods for a given site. An AD site may span several time zones, but Migrator Pro for Exchange associates each site with a single time zone. To change a time zone setting: Click inside the cell to make the value editable (a small triangle appears), then click the triangle to view a list of available options, and select the time zone you want to assign to this forest.
MRS Proxy Server(s): Displays the Exchange Mailbox Replication Service (MRS) proxy servers that Migrator Pro for Exchange has discovered for the site. Server names are separated with commas. You can manually define the publicly addressable names of the MRS proxy servers for the site. Manually entered server names are not overwritten by scheduled or manual forest refreshes. To manually define MRS Proxy Server(s): Click inside the cell to make the values editable, and enter publicly addressable names for the site's MRS proxy servers, separating multiple names with commas.
|
|
Remember to click Save Forest (in the Forest toolbar above the tabs) to save any changes you make to these settings. |
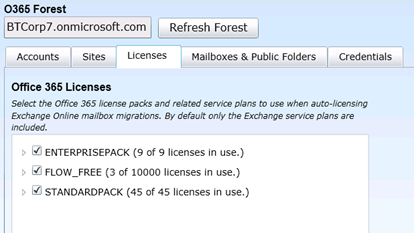
Tenant Forest (Office 365) Configuration | Licenses Tab
To view or edit the Licenses tab for tenant forest configuration: From the Forest view toolbar, select a previously defined tenant Forest from the drop-down list, and then click the Licenses tab. On this tab, all options are displayed whether or not the Advanced checkbox is marked.
This tab lets you select Office 365 license packs and related service plans for Migrator Pro for Exchange to use for auto-licensing Exchange Online mailbox migrations.
Tenant Forest (Office 365) Configuration | Mailboxes & Public Folders Tab
To view or edit the Mailboxes & Public Folders tab for tenant forest configuration: From the Forest view toolbar, select a previously defined tenant Forest from the drop-down list, and then click the Mailboxes & Public Folders tab.
Or you can mark the Advanced checkbox to view additional options, although most admins simply accept the default values for these Advanced settings.
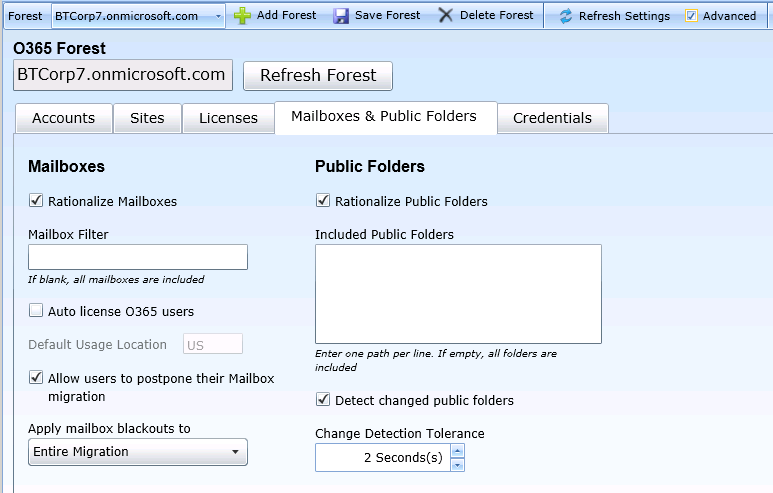
Mailboxes Section
In the default (non-Advanced) view of this tab, the Mailboxes section contains these three settings for the selected forest:
Rationalize Mailboxes: Mark this checkbox if you want Mailboxes rationalized.
Mailbox Filter: Enter a PowerShell query used to select user mailboxes. This query is used as the [string] parameter in Get-Mailbox -Filter [string]. For example, CustomAttribute13 -like '*Wave1*'
More information about using the Filter parameter can be found here.
Auto license O365 users: Displays only for Office 365 Exchange Online. Set this feature to optionally activate a mailbox for an end user. Mailbox migration will fail if the user is not activated. You can also apply an existing SharePoint and Lync/Skype for Business license by reviewing the Office 365 License section on the Migrator Pro for Exchange Settings tab. Click on your license for options.
Default Usage Location: The default usage location of the Auto-licensed O365 users.
Allow users to postpone their Mailbox migration: Mark this checkbox if you want users to be able to set their own migration blackout periods in Migrator Pro for Exchange's User Portal.
|
|
The E2E_Schedulers group in Active Directory (if it exists) will override this user-postpone option. |
This setting, also in the Mailboxes section, appears only in Advanced mode:
Apply mailbox blackouts to: Blackout periods can be defined in Migrator Pro for Exchange's Blackout Times view (see the Blackout Times topic for more information). The drop-down list here lets you specify one of three options for applying blackout times to the forest:
Entire Migration (default, and recommended): All Mailbox jobs are affected by blackouts during the entire migration.
Initial Migration: Mailbox jobs marked as "Suspend when ready to complete" are affected by blackouts until the migration reaches 95% complete (pre-AutoSuspend). All other mailbox jobs are affected by blackouts during the entire migration. Choose this setting when you want blackouts to be enforced during the pre-staging process, but not for the cutover process.
Final Migration\Cutover: Mailbox jobs marked as "Suspend when ready to complete" are affected by blackouts after the migration reaches 95% complete (post-AutoSuspend, cutover). All other mailbox jobs are affected by blackouts during the entire migration. Choose this setting when you want all mailbox jobs to be prevented from Cutover during the blackout period, but you want to allow “Suspend Until Ready to complete” jobs to continue working up to the 95% complete stage (pre-staging).
Public Folders Section
In the default (non-Advanced) view of this tab, the Public Folders section contains these three settings for the selected forest:
Rationalize Public Folders: Mark this checkbox if you want Public Folders rationalized.
Included Public Folders: Included Public Folders can be further filtered by entering a list of full folder paths.
These settings, also in the Public Folders section, appear only in Advanced mode:
Detect changed public folders: Mark this checkbox if you want Migrator Pro for Exchange to monitor public folders in the organization to detect forest-level additions, deletions and moves. The option is enabled by default, and we recommend you leave it enabled. If this feature is turned off, the admin and Migrator Pro for Exchange will not know when public folders have changed after the initial sync. This would be irrelevant if you do not intend to re-sync public folders after their initial sync, but would be necessary to permit future syncs.
Change Detection Tolerance: The spinner control lets you set a wait period for Migrator Pro for Exchange's Detect feature (above, if enabled), specifying a number of seconds for Migrator Pro for Exchange to ignore changes to public folders after the time MAPI reports the most recent sync. For example, if set to 5 seconds, any changes detected within 5 seconds of the last sync are ignored. The default (and recommended) value is 2 seconds.
Tenant Forest (Office 365) Configuration | Credentials Tab
To view or edit the Credentials tab for tenant forest configuration: From the Forest view toolbar, select a previously defined tenant Forest from the drop-down list, and then click the Credentials tab. On this tab, all options are displayed whether or not the Advanced checkbox is marked.
The table in this tab shows the credentials that are available for Migrator Pro for Exchange to use for its public folder Workers in the selected forest. (Source and Target credentials are selected in the Worker’s settings, and the credentials defined here make up the list of selectable credentials for the Workers.)

To define a credential for this forest: Click the Add button (below the table) to open the Forest Credential screen:
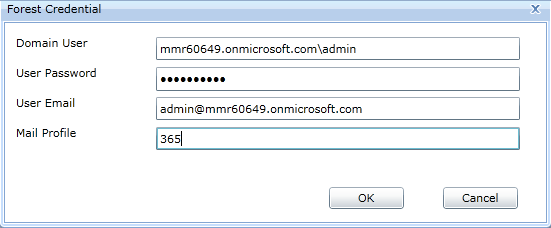
... and enter this information:
Domain User: The Domain user (in Domain\Username format).
User Password: The password for the user
User Email: The email address of the user
Mail Profile: The name of the Outlook Profile that has been preconfigured on the Worker machine. A Worker machine without Outlook installed cannot use credentials with Outlook Profiles. This field should remain blank to create a credential for Workers that do not have Outlook installed.
Then click OK to create a new credentials record and dismiss the Forest Credential screen.
You can also Edit or Delete a previously defined credential.
Migrator Pro for Exchange supports configuration of an AWD (Automated Workload Distribution) process for the migration of public folders. The AWD process uses multiple workers assigned different roles (multiple computers working in parallel) in the overall migration process, to scale public folder migration and improve throughput when migrating larger volumes of public folders. Migrator Pro for Exchange's Workers view lists all installed public folder Workers that are configured to point to the Migrator Pro for Exchange SQL database. The Migrator Pro for Exchange server automatically becomes the local master worker when Migrator Pro for Exchange is installed, but additional remote workers can be defined.
The Migrator Pro for Exchange Installation and Configuration Guide documents the installation of Migrator Pro for Exchange public folder Workers.
To open the Workers view in the Migrator Pro for Exchange Admin Portal:
Click the Workers button in Migrator Pro for Exchange's main toolbar.
The Migrator Pro for Exchange Workers view features a table showing the current state and processing statistics of each worker, and this information can be sorted and filtered as needed:

Enabling/Disabling Workers
You can enable/disable the processing of public folder jobs by a worker. For example, you may want to temporarily disable a worker to isolate any errors when troubleshooting an issue. To enable/disable the processing of public folder jobs by a worker (beginning in the Workers view):
Click on a worker in the table to highlight its row, and then click the Enable or Disable button.
A worker can also be enabled or disabled when viewing the Migrator Pro for Exchange Worker detail dialog.
Viewing and Editing Worker Settings
To edit (or just view) the configuration settings of any individual worker in the Workers table:
Double-click on a Worker row in the table (or select a Worker in the table and then click the Modify button) to open the Migrator Pro for Exchange Worker dialog box for the selected Worker:

In the dialog box above the tabs, you can view and edit these settings:
ID: The worker ID, an arbitrary index number for Migrator Pro for Exchange.
Name: The worker name (also the worker's address).
State: The current state of the worker.
Disable or Enable: Click Disable to disable an enabled worker, or click Enable to enable a disabled worker.
In the Settings tab you can view and edit these settings:
Roles: Select the role(s) you want the worker to perform by marking/unmarking these checkbox options:
Provisioning: If marked, this worker will create the needed public folders on the target. One or more workers can have this role. We recommend you leave this marked unless you are designating different workers to different tasks. (You may want to create multiple workers to assign different types of roles to different workers—for example, to designate a particular set of workers to handle only the content sync actions.)
Content Sync: If marked, this worker will copy public folder contents. There can be one or more workers with this role. We recommend you leave this marked unless you are designating different workers to different tasks. (You may want to create multiple workers to assign different types of roles to different workers—for example, to designate a particular set of workers to handle only the content sync actions.)
Change Detection: If marked, this worker will check for changes in public folders. One or more workers can have this role. We recommend you leave this marked unless you are designating different workers to different tasks. (You may want to create multiple workers to assign different types of roles to different workers—for example, to designate a particular set of workers to handle only the content sync actions.) Note that if Change Detection is not enabled on any workers, Public Folder Jobs that are created with Sync Interval will not sync again after the initial copy, since no changes will be detected.
New Folder Detection: If marked, this worker will check for new public folders. One or more workers can have this role.
Reporting: If marked, this worker will collect public folder data for reporting. One or more workers can have this role. Workers assigned this role are the workers that will run the PF Content Analysis job. We recommend you leave this marked unless you are designating different workers to different tasks. (You may want to create multiple workers to assign different types of roles to different workers—for example, to designate a particular set of workers to handle only the content sync actions.)
Use Default Settings: If checked, the worker will use the default Worker settings (and General settings for Logging Level) configured in the Settings view instead of the settings on the worker detail dialog.
Use Windows Credential Manager: If checked, Worker (MAPI) credentials are cached in Windows Credential Manager, removing the need to use the saved password that was configured for public folder migrations.
MAPI Cache Recycle: Number of jobs after which the MAPI cache should be cleared. Larger numbers increase performance, but may cause instability if too large. The practical limit depends on your local environment. The default is After 20 jobs.
Logging Level: Determines level of detail in program logging for public folder migrations. Options are:
Off: No public folder messages are logged
Error: Only public folder error messages are logged
Warning: Public folder warnings and error messages are logged
Info: Public folder informational, warnings, and error messages are logged
Verbose: All public folder messages are logged including debug and trace messages
Job Polling Interval: How often the worker should poll for new jobs. We recommend you leave this at the default (every 2 seconds) unless this worker is configured for only the Reporting role (see next field below).
Report Job Polling Interval: How often the worker should poll for report jobs. We recommend you leave this at the default (every 30 seconds) unless this worker is configured for only the Reporting role.
Refresh Interval: How often the worker should look for any changes to its settings in the SQL Worker table. We recommend you leave this at its default (every 15 seconds).
Max Threads: The number of items that are processed concurrently for a public folder job. The default is 4 threads. For best performance, this setting should not be lower than the number of cores in the Worker machine, unless the machine will share its resources with other (non-Worker) functions. The setting can be increased to match the number of cores in a dedicated Worker machine (if greater than the default 4).
In the Credentials tab you can view and edit these settings:
Exchange (MAPI)
Source Credentials: The Exchange credentials to use for the source. Credentials are maintained in the Forest Credentials tab.
Target Credentials: The Exchange credentials to use for the target. Credentials are maintained in the Forest Credentials tab.
|
|
The selected credentials should not include a Mail Profile (defined in the Forest Credentials tab) if Outlook is not installed on the Worker. |
PowerShell
Source Credentials: The PowerShell credentials to use for the source. Credentials are maintained in the Forest Credentials tab.
Target Credentials: The PowerShell credentials to use for the target. Credentials are maintained in the Forest Credentials tab.
The Statistics tab is described in the next subtopic below.
Click the Close button to save any changes and close the Migrator Pro for Exchange Worker dialog box (and return to the Workers table).
Viewing Worker Processing Statistics
To view the processing statistics for an individual worker in the Workers table:
Double-click on a Worker row in the table (or select a Worker in the table and then click the Modify button) to open the Migrator Pro for Exchange Worker dialog box for the selected Worker, and then click the Statistics tab in the Migrator Pro for Exchange Worker dialog box.
In the Statistics tab, select a Time Period from the drop-down list to define the scope of the statistics you want to see. The Totals will display the numbers of migrated folders, items, bytes and elapsed time for the selected time period, and the average throughput over the period.
To close the dialog box: Click the Close button.
To view aggregate statistics for all Migrator Pro for Exchange Workers:
From the Workers table, click the Statistics button to open the Public Folder Statistics dialog box.
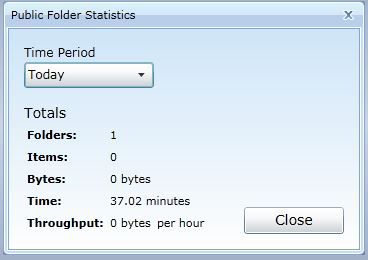
Select a Time Period from the drop-down list to define the scope of the statistics you want to see. The Totals will display the numbers of migrated folders, items, bytes and elapsed time for the selected time period, and the average throughput over the period.
To close the dialog box: Click the Close button.
Viewing the Migrator Pro for Exchange Worker Application
The Migrator Pro for Exchange Worker application is installed on the worker machine and lets you enable/disable the worker and view its migration processing logs.
To open the Migrator Pro for Exchange Worker application:
On the machine hosting the worker: Click the Migrator Pro for Exchange Worker desktop shortcut, or right-click on the Migrator Pro for Exchange icon in the system tray and click Open.
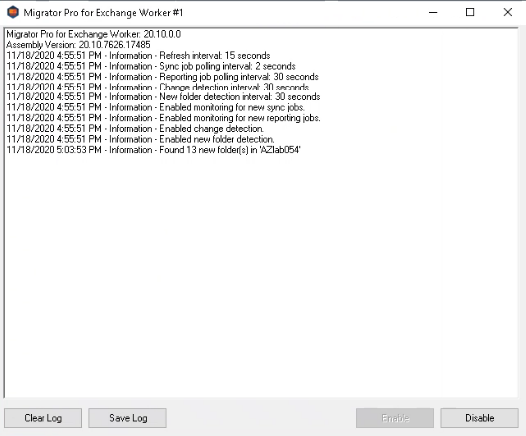
The Migrator Pro for Exchange Worker application then opens the log screen, with four buttons:
Clear Log: The displayed log will be cleared.
Save Log: A text file of the displayed log will appear and can be saved.
Enable: Enables public folder processing for the worker (if disabled). This option is also available by right-clicking on the Migrator Pro for Exchange icon in the system tray and selecting Enable.
Disable: Disables public folder processing for the worker (if enabled). This option is also available by right-clicking on the Migrator Pro for Exchange icon in the system tray and selecting Disable.
To view the worker's configuration settings: Right-click on the Migrator Pro for Exchange icon in the system tray, and select Settings.
Many Migrator Pro for Exchange configuration settings can be entered, viewed and edited in the tabbed panels of the Configuration Settings screen.
Click Settings from the main Admin Portal toolbar to open the Migrator Pro for Exchange Configuration Settings screen, which contains several tabs for different types of settings. The default view of the Settings screen shows only the tabs with settings that are commonly used in many environments:

The default view hides the tabs that contain settings changed by only a few users from their default values, but you can mark the [X] Advanced checkbox (in the toolbar) to show the tabs that contain these Advanced settings:

The settings on these tabs are documented separately under these topic headings:
General Tab (Advanced view only)
Mailboxes Tab (Advanced view only)
Workers Tab (Advanced view only)
Scripts Tab (Advanced view only)
|
|
This tab is available only in Advanced mode. The tab appears only if the Advanced checkbox (in the Settings toolbar) is marked. |
To view or edit Configuration Settings (any tab): From the Admin Portal main toolbar, click Settings to open the Configuration Settings screen. Then click the tab for the settings you want to view or edit.
To view or edit the General configuration settings (from any other tab on the Configuration Settings screen): Make sure the Advanced checkbox is marked, and click the General tab.
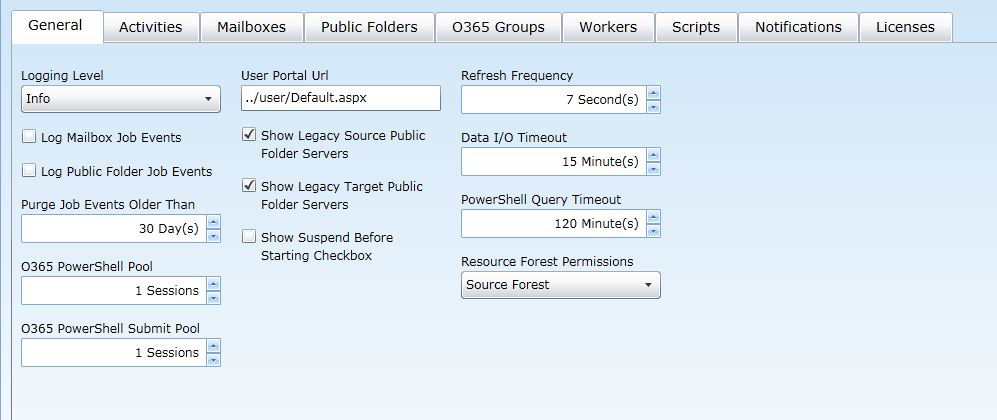
These General settings let you configure options for logging and the user interface:
Logging Level: Select one of the options for logging levels within the Migrator Pro for Exchange service for both mailbox and public folder migrations:
Off: No messages are logged.
Error: Only error messages are logged.
Warning: Warnings and error messages are logged.
Info: Informational, warnings, and error messages are logged.
Verbose: All messages are logged including debug and trace messages.
Log Mailbox Job Events: If checked, mailbox job events are saved to CMTEUP_JobEvents.
Log Public Folder Job Events: If checked, public folder job events are saved to CMTEUP_PublicFolderJobEvents.
Purge Job Events Older Than: Number of days after which job event records should be purged from the logging database. We recommend you leave this at its default (30 days), to maintain a month's worth of records in the database but not take up too much space in SQL. A higher setting would generate bloated records in SQL, while a lower setting may leave too few records to be useful in the event you ever need them for troubleshooting.
O365 PowerShell Pool: Sets the maximum number of Office 365 PowerShell sessions to establish. The default is 1. We recommend this value be set to match the number of available Office 365 sessions for your tenant.
O365 PowerShell Submit Pool: Sets the number of Office 365 sessions to use for PowerShell queries during mailbox migrations. This feature improves overall migration rates by distributing the workload across multiple Office 365 sessions running in parallel. The valid range is 1 to 100, and the default is 1. We recommend a value based on number of available Office 365 sessions for your tenant.
User Portal Url: The URL of the Migrator Pro for Exchange portal.
Show Legacy Source Public Folder Servers: If checked, Exchange 2003/2007/2010 public folder servers are displayed in the Source folder hierarchy.
Show Legacy Target Public Folder Servers: If checked, Exchange 2003/2007/2010 public folder servers are displayed in the Target folder hierarchy.
|
|
Exchange 2013/2016 public folders can be split across multiple servers and mailboxes and will not show in a hierarchy. The public folder server and mailbox information will be displayed in the “hover over” text. The above configuration options allow the Legacy public folders to be displayed in a hierarchy. |
Show Suspend Before Starting Checkbox: If checked, mailbox jobs can be suspended before they start.
Refresh Frequency: How often to automatically refresh Migrator Pro for Exchange's UI. We recommend you leave this at its default (7 seconds). Changing this to a lower setting poses an increased burden on system resources, while a higher value diminishes the likelihood that any particular view is current. You can always manually refresh the screen whenever desired.
Data I/O Timeout: How long Migrator Pro for Exchange should wait for web service calls to complete before timing out. We recommend the default setting of 15 minutes, although you may want to temporarily set this higher to overcome a high rate of timeout errors. A lower setting will unnecessarily generate more timeout errors.
PowerShell Query Timeout: How long Migrator Pro for Exchange should wait for an on-premises only PowerShell reply to a query before concluding the query has failed, and giving up. We recommend you leave this at its default 120 minutes. A higher setting usually would not provide any benefit, since the HTTP request will have already timed out, while a lower setting may be too short for a PowerShell query to successfully complete, especially in a large distributed environment.
Resource Forest Permissions: Specifies which trustees to use to apply permissions during a Resource Forest migration. The default Source Forest option stamps the permissions from the source environment onto the target mailboxes and public folders. The Target Forest option is typically used only in a non-resource forest scenario, so that trustees from the Target forest are used to apply permissions.
|
|
Migrator Pro for Exchange will always use the target AD user account for GrantSendOnBehalf permissions regardless of this setting for this Resource Forest Permissions. Therefore all user accounts that have been specifically provided the delegated GrantSendOnBehalf permission must be included within the scope of directory synchronization. |
||
|
|
Remember to click Save Settings (in the toolbar above the tabs) to save any changes you make to these settings. | ||
|
|
This tab is available in both the default and Advanced modes. But some of the fields on this tab appear only if the Advanced checkbox (in the Settings toolbar) is marked. The field notes below indicate which fields appear only in the Advanced mode. |
To view or edit Configuration Settings (any tab): From the Admin Portal main toolbar, click Settings to open the Configuration Settings screen. Then click the tab for the settings you want to view or edit.
To view or edit the Activities configuration settings (from any other tab on the Configuration Settings screen): Click the Activities tab.
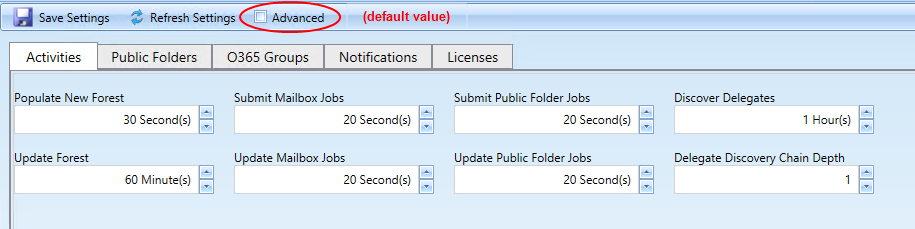
Populate New Forest: How often to populate new forests with sites, servers, databases, groups, mailboxes, and mailbox statistics. We recommend the default 30 seconds, which ensures that new forests are populated relatively quickly.
Update Forest: How often to update existing forests with sites, servers, databases, groups, mailboxes, and mailbox statistics. This is an "expensive" task (in computing/network resources), since Migrator Pro for Exchange has to explicitly query AD and Exchange for much information. We therefore recommend the default 60 minutes. A lower setting (more frequent updates) will tax the GC specified in Forests | Accounts | Active Directory, probably to the detriment of performance, although the performance hits will likely be less pronounced in smaller environments (1000 or fewer users). A higher setting may be more appropriate in very large environments where existing GCs are already taxed and the admin does not require more frequent updates.
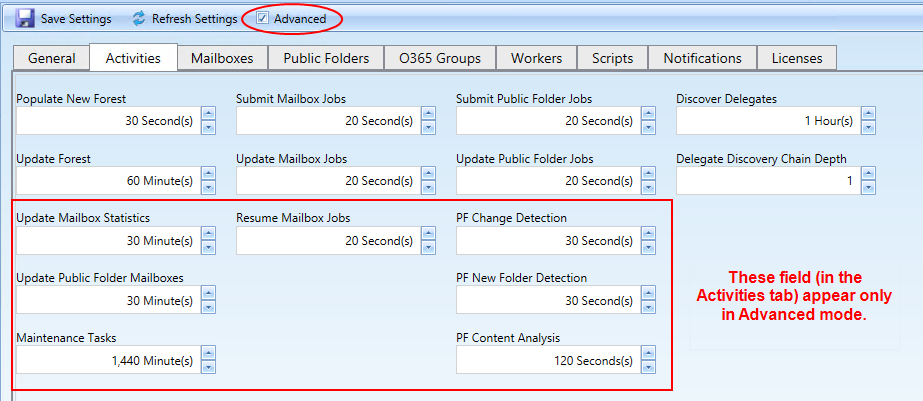
Update Mailbox Statistics (appears only in Advanced mode): How often to update mailbox statistics. We recommend you leave this set at its default 30 minutes. A lower setting may be better suited to an organization that requires more frequent updates for Migrator Pro for Exchange to intelligently forecast migration times (based on mailbox size). A higher setting may be more appropriate in very large environments where existing GCs are already taxed and the admin does not require more frequent updates.
Update Public Folder Mailboxes (appears only in Advanced mode): How often to update Public Folder mailboxes. We recommend you leave this set at its default 30 minutes. A lower setting may be better suited to an organization that requires more frequent updates. A higher setting may be more appropriate in large environments that do not require more frequent updates.
Maintenance Tasks (appears only in Advanced mode): How often to run Migrator Pro for Exchange maintenance tasks in the job event tables, such as removing (from Migrator Pro for Exchange logs) records of migration events that are older than the Purge Job Events setting. We recommend you leave this set at the default 1440 minutes (one day), although a lower setting (more frequent maintenance) may be appropriate if you are writing hundreds of thousands of events per hour and want to have more control over a rolling purge window in the Migrator Pro for Exchange Log database.
Submit Mailbox Jobs: How often to submit Mailbox Jobs. The default is 20 seconds, but a higher setting (less frequent submissions) may be better for an Exchange source environment that is older or otherwise shows performance issues, and the admin wants to stagger the number of jobs submitted.
Update Mailbox Jobs: How often to update/refresh the running Mailbox Jobs view. The default is 20 seconds, but a higher setting (less frequent updates) may be better where larger numbers of jobs are running and the admin doesn't require frequent updates.
Resume Mailbox Jobs (appears only in Advanced mode): How often the program should look for Mailbox Jobs that are ready to be resumed. The default is 20 seconds.
Submit Public Folder Jobs: How often to submit new public folder Jobs. The default is 20 seconds, which ensures new mailbox migration jobs are picked up quickly, but a higher setting (less frequent submissions) may be better for an Exchange source environment that is older or otherwise shows performance issues, and the admin wants to stagger the number of jobs submitted.
Update Public Folder Jobs: How often to update/refresh the running public folder jobs view. The default is 20 seconds, but a higher setting (less frequent updates) may be better where larger numbers of jobs are running and the admin doesn't require frequent updates.
PF Change Detection (appears only in Advanced mode): How often to check for public folder changes. We recommend you accept the default 30 seconds, although a higher value (less frequent checks) may be more appropriate if the public folders environment does not have many changes and the data is relatively static (in the source).
PF New Folder Detection (appears only in Advanced mode): How often to check for new public folders. We recommend you accept the default 30 seconds, although a higher value (less frequent checks) may be more appropriate if the public folders environment does not have many changes and the data is relatively static (in the source).
PF Content Analysis (appears only in Advanced mode): Determines how often Migrator Pro for Exchange should check the queue of pending public folders content analysis jobs. We recommend you accept the default 120 seconds.
Discover Delegates: The refresh interval, in hours, between Migrator Pro for Exchange’s delegation discovery processes to update delegation data (only) for mailboxes within the scope of the subset filters that have been defined for the View Delegation lists (as described in Migrating Delegation Rights). The default is 1 hour.
These delegation discovery processes are run separately for each defined filter, and this refresh interval applies to the processes for all Filters.
Delegate Discovery Chain Depth: The number of delegation levels Migrator Pro for Exchange will trace in its delegation discovery process, relative to the highest-level mailbox in a delegation chain. For example, if A delegates to B, and B delegates to C, and C delegates to D, and so forth, this Chain Depth value sets a limit to the number of levels Migrator Pro for Exchange will trace in its delegation discovery process.
The default is 1 level (to show A delegating to B, but not any of B’s delegates). The feature will accept a Chain Depth value as high as 10, but note that values higher than 2 or 3 will, in most environments, require longer discovery times while offering diminishing benefits.
|
|
Remember to click Save Settings (in the toolbar above the tabs) to save any changes you make to these settings. |
Settings | Mailboxes Tab
|
|
This tab is available only in Advanced mode. The tab appears only if the Advanced checkbox (in the Settings toolbar) is marked. |
To view or edit Configuration Settings (any tab): From the Admin Portal main toolbar, click Settings to open the Configuration Settings screen. Then click the tab for the settings you want to view or edit.
To view or edit the Mailboxes configuration settings (from any other tab on the Configuration Settings screen): Make sure the Advanced checkbox is marked, and click the Mailboxes tab.
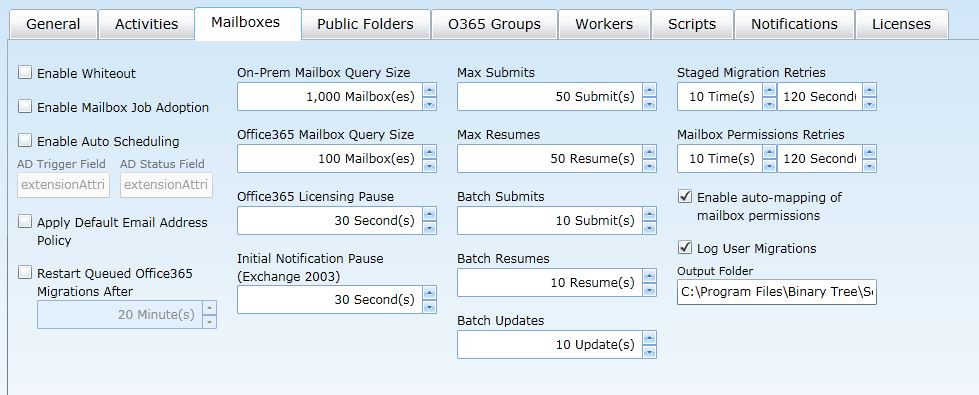
Enable Whiteout: If checked, all activities except for mailbox migrations activities are suppressed. This feature is intended for use during times when active migration is taking place in earnest. This can significantly improve performance of mailbox migrations during busy times, easing the burden of the installed Migrator Pro for Exchange machine as well as the Exchange servers.
|
|
Be sure to disable this Whiteout option when the period of focused migrations ends, so that Migrator Pro for Exchange can resume its other background processing. |
Enable Mailbox Job Adoption: If checked, enables Migrator Pro for Exchange to find and show mailbox migrations started outside of Migrator Pro for Exchange. Select this only if migration processes may have been started outside of the Migrator Pro for Exchange environment.
Enable Auto Scheduling: This checkbox enables/disables Migrator Pro for Exchange's auto-scheduling feature, which tells Migrator Pro for Exchange to schedule mailbox migration upon certain conditions being met, as specified by the AD Trigger Field and AD Status Field:
AD Trigger Field: The AD property used to submit mailboxes during auto-scheduling. For example, extensionAttribute13.
AD Status Field: The AD property used to store job status for auto-scheduled mailbox migrations.
Apply Default Email Address Policy: If checked, the default email address policy will be applied to the target mail users before the mailbox is submitted. This is the equivalent of the PowerShell cmdlet string: Set-MailUser -EmailAddressPolicyEnabled:$true
Restart Queued Office365 Migrations After: If checked, Office 365 mailbox jobs that are stuck in a Queued state are automatically canceled and resubmitted. The default to restart jobs stuck in a Queued state is every 20 minutes.
On-Prem Mailbox Query Size: The number of on-premises mailboxes to query at a time for statistics, etc. The default is 1,000 mailboxes.
Office365 Mailbox Query Size: The number of Office 365 mailboxes to query at time for statistics, etc. The default is 100 mailboxes.
Office365 Licensing Pause: How long to wait after licensing an Office 365 mailbox before submitting that mailbox for migration. The default is 30 seconds.
Max Submits: The maximum number of requests (per Exchange database) to submit for migration. This includes jobs that resumed before reaching 95% complete. The default is 50 submissions.
Max Resumes: The maximum number of requests (per Exchange database) to resume for completion. This only includes jobs that are resumed after reaching 95% complete. The default is 50 resumes.
Batch Submits: The number of requests (per Exchange database) to submit for migration at a time. This includes jobs that resumed before reaching 95% complete. The default is 10 submissions.
Batch Resumes: The number of requests (per Exchange database) to resume for completion at a time. This only includes jobs that are resumed after reaching 95% complete. The default is 10 resumes.
Batch Updates: The number of requests (per Exchange database) to update (Get-MoveRequestStatistics) at a time. The default is 10 updates.
Staged Migration Retries: How many times to re-submit a mailbox for staged migration and how long to wait before re-submitting. The default is 10 times re-submitted every 120 seconds.
Mailbox Permissions Retries: How many times to retry migrating mailbox permissions and how long to wait before retrying. The default is 10 times retried every 120 seconds.
Log User Migrations: If checked, logging user migrations is enabled and the Output Folder can be configured.
Output Folder: The folder where the log user migration reports are saved.
|
|
Remember to click Save Settings (in the toolbar above the tabs) to save any changes you make to these settings. |
To view or edit Configuration Settings (any tab): From the Admin Portal main toolbar, click Settings to open the Configuration Settings screen. Then click the tab for the settings you want to view or edit.
To view or edit the Public Folders configuration settings (from any other tab on the Configuration Settings screen): Click the Public Folders tab. On this tab, all options are displayed whether or not the Advanced checkbox is marked.
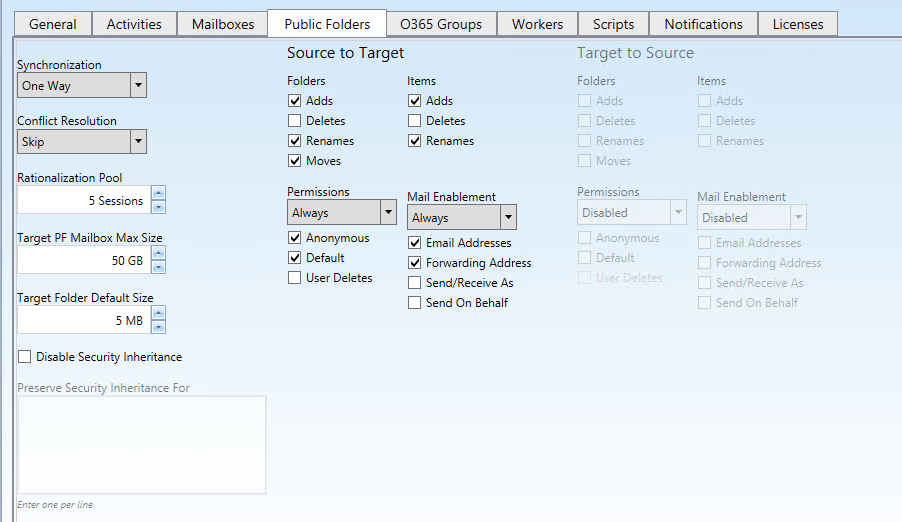
Synchronization: Select one of the options from the drop-down list.
One Way: Synchronize public folders from source to target. Only the Source to Target options can be selected. This means that changes made in the target will not be made in the source. Choose this when you are pre-staging Public folders in your Source environment to your Target environment, and there is no expectation that there will be any production changes made in the Target that need to be copied back to the Source.
Bi-Directional: Synchronize public folders in both directions, from source to target and target to source. The Target to Source options are enabled to allow configuration synchronization in both directions. Choose this when you expect production changes to occur in both the Source AND the Target during the migration project. If you choose Bi-Directional, carefully choose your Conflict Resolution settings (below). This setting means that changes made in the target could potentially override items in the Source, as determined by the Conflict Resolution settings.
Conflict Resolution: This setting tells Migrator Pro for Exchange how to resolve public folder migration conflicts (when a source public folder already exists in the target). These conflict-resolution rules are evaluated at the document level, per folder. We suggest the Skip option if you are unsure.
Skip: Migrator Pro for Exchange will just skip the public folder (PF), and do nothing. The source and target PFs will both remain unchanged.
Overwrite: The source PF contents will overwrite the corresponding target PF contents.
Rename: In a one-way migration, if a target document exists with the same name or subject that was not placed there by a migration, the target document is renamed by appending or prepending some string (the Rename Label) to the original target PF name, as specified below. If a target copy of the document exists from a previous migration, the documents follow the LastModified rule. If you select Rename as the Conflict Resolution method:
Rename Format: Valid options are Append or Prepend.
Rename Label: The string that Migrator Pro for Exchange should append or prepend to the original target PF name.
Last Modified: The source and target documents are evaluated and then migrated based on which document is more current.
Rationalization Pool Size: The maximum number of PowerShell sessions to dedicate to public folder rationalization. The default is 5 sessions.
Target PF Mailbox Max Size: The maximum size a Public Folder mailbox can be and still be considered for auto-select enabled jobs. Mailboxes above this amount will not be used unless they are explicitly selected on the job. The default is 50GB.
Target PF Mailbox Default Size: The size used to assign folders without a job to a Public Folder mailbox (parent folders, recycle bin folders, and so on). In order to prevent auto-split of mailboxes, this number should be large enough to allow for any folders that may not initially have a job but may in the future. The default is 5MB.
Disable Security Inheritance: If checked, Exchange Public Folder security inheritance is disabled.
Preserve Security Inheritance For: When security inheritance is disabled, enter one or more UPNs or DistinguishedNames (for users) and/or DistinguishedNames (for groups) to retain inherited permissions.
Source to Target Section
Folders: Mark and unmark checkboxes to specify which items should be synchronized to the target:
Adds: If checked, new folders in the source are added to the target.
Deletes: If checked, deleted folders in the source will cause corresponding folders in the target to be deleted during the sync cycle. By default, this is unchecked, to prevent subsequent deletions in the source from deleting the corresponding folder(s) in the target during the next synchronization cycle.
Renames: If checked, renamed folders in the source are renamed in the target.
Moves: If checked, moved folders in the source are moved in the target.
Items: Mark and unmark checkboxes to specify which items should be synchronized to the target:
Adds: If checked, new folder content in the source is added to the target.
Deletes: If checked, deleted folder content in the source is moved to the Recycle Bin in the target.
Renames: If checked, renamed items in the source are renamed in the target.
Permissions: Select an option from the drop-down list, and mark/unmark checkboxes to specify how permissions should be copied to the target (if at all):
Drop-down list options:
Disabled: Folder permissions will never be copied.
Once (default): Folder Permissions will only be copied with the initial sync, any changes after that will not be copied.
Always: Folder permissions will be copied each time the folder is synchronized.
Anonymous: If checked, “anonymous” user folder permissions are migrated to the target folder.
Default: If checked, “default” user folder permissions are migrated to the target folder.
User Deletes: If checked, user folder permissions deleted from the source folder are deleted from the target folder. For Bi-Directional Synchronization, this option cannot be selected if the Target to Source User Deletes option is selected.
Mail Enablement: Select an option from the drop-down list, and mark/unmark checkboxes to specify how mail-enablement should be copied to the target (if at all):
Drop-down list options:
Disabled: Mail-enabled folders in the source will not be mail-enabled in the target.
Once: Mail-enabled folders will be mail-enabled in the target during the initial sync, any changes after that will not be copied.
Always (default): Mail-enabled folders in the source will be mail-enabled each time the folder is synchronized.
Email Addresses: If checked, email addresses are copied to the target folder.
Forwarding Address: If checked, the source folder’s forwarding address is copied to the target folder.
Send/Receive As: If checked, send-as folder permissions on the source are migrated to the target folder.
Send On Behalf: If checked, send-on-behalf folder permissions on the source are migrated to the target folder.
Target to Source Section
Folders: Mark and unmark checkboxes to specify which items should be synchronized to the source:
Adds: If checked, new folders in the target are added to the source.
Deletes: If checked, deleted folders in the target are moved to the Recycle Bin in the source.
Renames: If checked, renamed folders in the target are renamed in the source.
Moves: If checked, moved folders in the target are moved in the source.
Items: Mark and unmark checkboxes to specify which items should be synchronized to the source:
Adds: If checked, new folder content in the target is added to the source.
Deletes: If checked, deleted folder content in the target is moved to the Recycle Bin in the source.
Renames: If checked, renamed items in the target are renamed in the source.
Permissions: Select an option from the drop-down list, and mark and unmark checkboxes to specify how permissions should be copied to the source (if at all):
Drop-down list options:
Disabled: Folder permissions will never be copied.
Once (default): Folder permissions will only be copied with the initial sync; any changes after that will not be copied.
Always: Folder permissions will be copied each time the folder is synchronized.
Anonymous: If checked, “anonymous” user folder permissions are migrated to the source folder.
Default: If checked, “default” user folder permissions are migrated to the source folder.
User Deletes: If checked, user folder permissions deleted from the target folder are deleted from the source folder. For Bi-Directional Synchronization, this option cannot be selected if the Source to Target User Deletes option is selected.
|
|
Enabling target-to-source synchronization of permissions may cause changes to your source environment or may have other unintended side effects. |
Mail Enablement: Select an option from the drop-down list, and mark and unmark checkboxes to specify how mail-enablement should be copied to the source (if at all):
Drop-down list options:
Disabled: Mail-enabled folders in the target will not be mail-enabled in the source.
Once: Mail-enabled folders will be mail-enabled in the source during the initial sync; any changes after that will not be copied.
Always (default): Mail-enabled folders in the target will be mail-enabled each time the folder is synchronized.
Email Addresses: If checked, email addresses are copied to the source folder.
Forwarding Address: If checked, the target folder’s forwarding address is copied to the source folder.
Send/Receive As: If checked, send-as folder permissions on the target are migrated to the source folder.
Send On Behalf: If checked, send-on-behalf folder permissions on the target are migrated to the source folder.
|
|
Enabling target-to-source mail synchronization may cause changes to your source environment or may have other unintended side effects. |
|
|
Remember to click Save Settings (in the toolbar above the tabs) to save any changes you make to these settings. |
Notes About Public Folder Permissions
Exchange Permissions:
All roles and rights are supported, e.g. Owner, CreateItems, FolderVisible, etc.
On-Prem and Office 365 are supported.
Send-As Permissions:
Only applicable to mail-enabled folders.
Allow\Deny is supported for On-Prem.
Only Allow is supported for Office 365.
Receive-As Permissions:
Only applicable to mail-enabled folders.
Allow\Deny is supported for On-Prem.
Not supported for Office 365.
Send-On Behalf Permissions:
Only applicable to mail-enabled folders.
On-Prem and Office 365 are supported.
Resource Forests:
Target RFPermissionAuthority is supported for On-Prem and Office 365 for all folder permissions shown above.
Source RFPermissionAuthority is supported for Send-As and Receive-As permissions but is not supported for Send-On-Behalf and Exchange permissions.
Trustee Cross-Reference: When locating a target trustee, the following properties from the source trustee are used as a cross-reference. These are the same properties used for mailbox permissions.
Mailbox GUID
Primary SMTP
Common Name
SAM Account Name
Settings | O365 Groups Tab
To view or edit Configuration Settings (any tab): From the Admin Portal main toolbar, click Settings to open the Configuration Settings screen. Then click the tab for the settings you want to view or edit.
To view or edit the O365 Groups configuration settings (from any other tab on the Configuration Settings screen): Click the O365 Groups tab. On this tab, all options are displayed whether or not the Advanced checkbox is marked.

Conflict Resolution: This setting tells Migrator Pro for Exchange how to resolve Office 365 migration conflicts (when matching content already exists in the target). We suggest the Skip option if you are unsure.
Skip: Migrator Pro for Exchange will just skip the public folder (PF) and do nothing. The source and target will both remain unchanged.
Overwrite: The source PF contents will overwrite the corresponding target contents.
Rename: In a one-way migration, if a target document exists with the same name or subject that was not placed there by a migration, the target document is renamed by appending or prepending some string (the Rename Label) to the original target PF name, as specified below. If a target copy of the document exists from a previous migration, the documents follow the LastModified rule. If you select Rename as the Conflict Resolution method:
Rename Format: Valid options are Append or Prepend.
Rename Label: The string that Migrator Pro for Exchange should append or prepend to the original target PF name.
Last Modified: The source and target documents are evaluated and then migrated based on which document is more current.
|
|
This tab is available only in Advanced mode. The tab appears only if the Advanced checkbox (in the Settings toolbar) is marked. |
To view or edit Configuration Settings (any tab): From the Admin Portal main toolbar, click Settings to open the Configuration Settings screen. Then click the tab for the settings you want to view or edit.
To view or edit the Workers configuration settings (from any other tab on the Configuration Settings screen): Make sure the Advanced checkbox is marked, and click the Workers tab.

Use Windows Credential Manager: If checked, Worker (MAPI) credentials are cached in Windows Credential Manager.
Sync Job Polling Interval: How often Workers should poll for new sync jobs. Default is every 2 seconds.
Reporting Job Polling Interval: How often Workers should poll for new reporting jobs. Default is 30 seconds.
Refresh Interval: How often Workers should refresh their status. Default is every 15 seconds.
Max Threads: Number of items that are processed concurrently for a public folder job. Default is 4 threads.
MAPI Cache Recycle: After how many jobs should the MAPI cache be cleared. A larger number will increase performance, but may cause instability if too large. Default is After 20 jobs.
Status Text Limit: Maximum number of status text displayed in the Worker UI. Default is 5,000 lines.
Max Sync Jobs: Maximum number of sync jobs that should be assigned to each worker. Default is 5 jobs.
Max Reporting Jobs: Maximum number of reporting jobs that should be assigned to each worker at a time. Default is 5 jobs.
Max Change Detection Jobs: Maximum number of change detection jobs that should be assigned to each worker at a time. Default is 5 jobs.
|
|
Remember to click Save Settings (in the toolbar above the tabs) to save any changes you make to these settings. |
|
|
This tab is available only in Advanced mode. The tab appears only if the Advanced checkbox (in the Settings toolbar) is marked. |
To view or edit Configuration Settings (any tab): From the Admin Portal main toolbar, click Settings to open the Configuration Settings screen. Then click the tab for the settings you want to view or edit.
To view or edit the Scripts configuration settings (from any other tab on the Configuration Settings screen): Make sure the Advanced checkbox is marked, and click the Scripts tab.
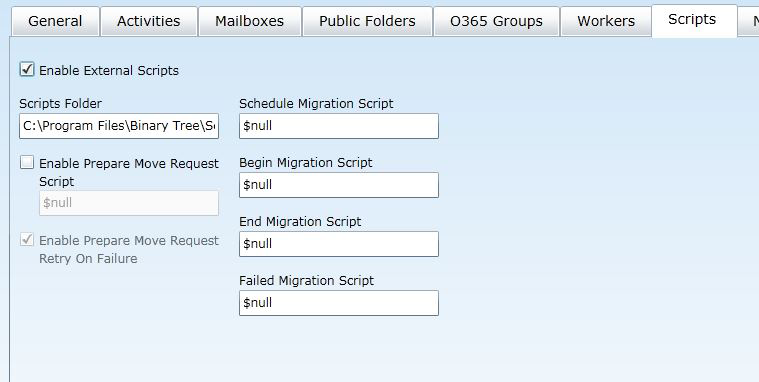
Enable External Scripts: If checked, external scripts are enabled and the following options are available:
Scripts Folder: The scripts folder location (e.g. c:\contoso\scripts\ps\ )
Enable Prepare Move Request Script: If checked, enables external CrossForestPrep (to execute Prepare-MoveRequest.ps1). The name of the prepare move request script can be configured (e.g., Prepare-MoveRequest.ps1).
Enable Prepare Move Request Retry On Failure: If checked, enables retry behavior in cross-forest preparation, instead of failure.
Schedule Migration Script: Name of the script for scheduled migrations, e.g., Confirm-ScheduleMigration.ps1.
Begin Migration Script: Name of the script for started migrations, e.g., Confirm-BeginMigration.ps1.
End Migration Script: Name of the script for completed migrations, e.g., Confirm-EndMigration.ps1.
Failed Migration Script: Name of the script for failed migrations, e.g., Confirm-FailedMigration.ps1.
|
|
Remember to click Save Settings (in the toolbar above the tabs) to save any changes you make to these settings. |
Migrator Pro for Exchange helps facilitate sending notification emails to end users, to inform them of the status of their migration as it progresses through different stages. The program can use email notification templates to generate "form letters" to end users, with variables that Migrator Pro for Exchange will fill with information such as the recipient's email address, any cc recipients, the message Subject, and so forth. Other template attributes let you control the message format and event triggers and so forth. Notifications can be configured in four languages, English, French, German and Spanish, and any additional languages in the source Exchange environment. By default, the message sent to an end user is matched to the Culture value present on their mailbox object. If a value cannot be determined, English is used as the default language. Users can change their notification language by changing the preference on the End User Portal page.
The Notification templates are configured in this Notifications tab, and in a dialog box accessible from this tab. On this tab, all options are displayed whether or not the Advanced checkbox is marked.
To view or edit the Notifications configuration settings (from any other tab on the Configuration Settings screen): Click the Notifications tab.
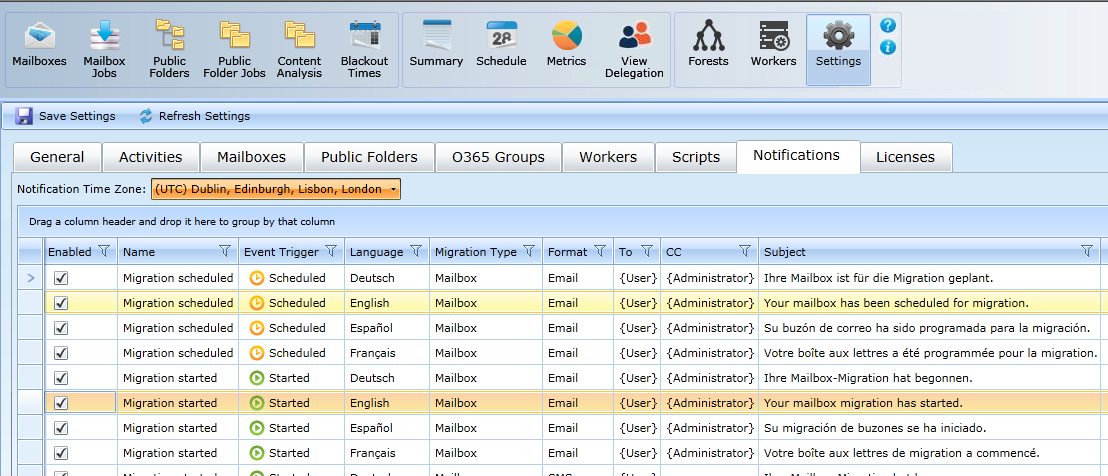
Select the Notification Time Zone from the drop-down list between the tabs and the table. This is the reporting time zone when date fields such as ScheduledStart are used in the notification message template body.
The table displays a list of available notification templates together with these attributes:
Enabled: Displays whether the template is enabled or disabled by the administrator. By default, Scheduled notification templates are always enabled.
Name: A descriptive identifying name to distinguish each template from the others in the list.
Event Trigger: Displays the status of the template, such as Scheduled or Completed.
Language: The language of the template. A full list of standard Language/Culture ID mappings is available in this Knowledge Base article.
Migration Type: The migration type of the template.
Format: Displays the type of media included in the template that goes out to users, such as Email or SMS.
To: The recipient of the notification.
CC: Any "carbon copy" (CC) recipient(s) of the notification.
Subject: The message Subject of this notification.
Migrator Pro for Exchange ships with five standard notification templates (Scheduled, Started, Completed, Error, and Migration automatically suspended). You can customize these with the Edit Template feature.
For any selected template (selected row in the table), the buttons across the bottom of the table let you Edit Template or Copy Template(s) or Delete Template(s). You can also Add Template.
The Add Template and Edit Template buttons open Migrator Pro for Exchange's Notification Template dialog box:
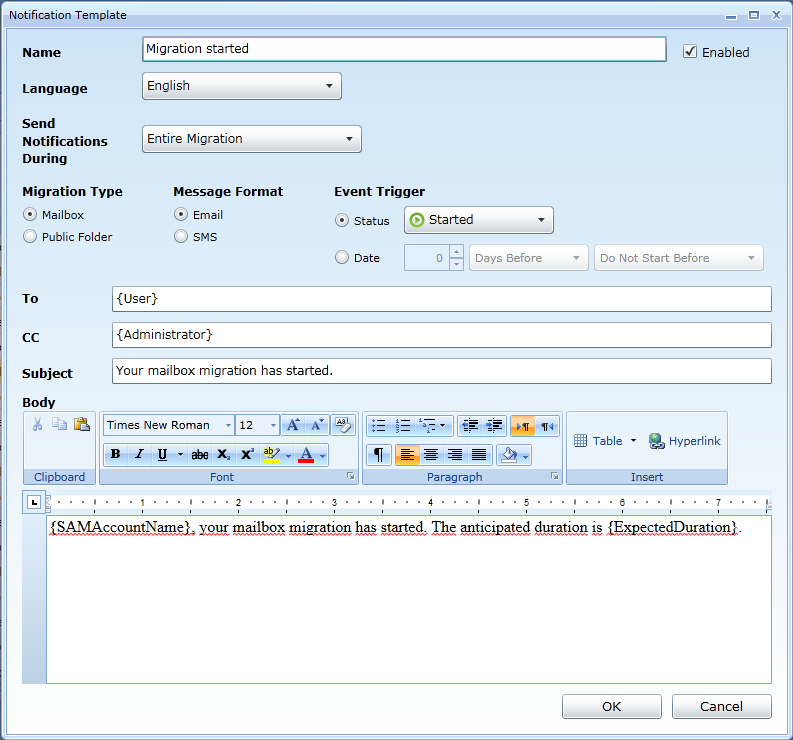
Enter or edit the settings in this dialog box:
Name: The name of the template, as it will appear in the Notifications table and other Migrator Pro for Exchange features.
Enabled (checkbox): Mark or unmark to make this template available (or unavailable) for Migrator Pro for Exchange to run.
Language (drop-down list): Specify the language for this template. Options are: English, French, German, Spanish, and any additional languages collected from the source mailbox properties.
Send Notifications During: Select an option from the drop-down list to specify the portion of the migration to which this notification applies. Options are: Entire Migration, Initial Migration, and Final Migration\Cutover.
|
|
Migrations scheduled using the Suspend when ready to complete option can have notifications defined for the Entire Migration, the Initial Migration or the Final Migration/Cutover. If a migration is scheduled without the Suspend when ready to complete option, the notifications will apply to the Entire Migration. |
Migration Type: Specify whether this notification is for a Mailbox or Public Folder migration.
Message Format: Specify whether this notification should be formatted as Email (sent as HTML messages) or SMS (sent as plain text messages). Switching from Email to SMS will erase any body text that may have already been entered.
Event Trigger: Select one of the two options to specify when this notification will be sent:
Status: If you select Status, then also specify (from the drop-down list) the condition that will trigger this notification:
Scheduled: Notification is sent to the user when the mailbox’s migration schedule is set.
Started: Notification is sent to the user when the migration begins.
Completed: Notification is sent to the user when the migration completes.
Error: Notification is sent to the user when the migration halts or errors.
Date: Use the controls here to specify a time condition that will trigger sending the emails generated from this template. You can specify a certain number of hours or days before the start or completion of the migration:
[spinner control]: The number (of hours or days).
[drop-down list]: Indicate whether the number specifies Days Before or Hours Before.
[drop-down list]: Indicate whether the trigger is relative to the start (Do Not Start Before) or end (Do Not Complete Before) of the migration.
To: Specify the message recipient(s), either as an SMTP address, or as the variable {User} or {Administrator} (including the curly brackets). You can specify multiple values here, separated by commas or semicolons or spaces.
CC: Specify anyone who should receive a copy of this notification, either as an SMTP address, or as the variable {User} or {Administrator} (including the curly brackets). You can specify multiple values here, separated by commas or semicolons or spaces.
Subject: Type the Subject of the email.
Body: The body contents of the email. This will be some combination of template text and one or more variables, as shown in the example below. If the Message Format (above) is set to Email, Migrator Pro for Exchange provides a rich-text editing bar (also shown in this example) that lets you further customize the appearance of the body text.
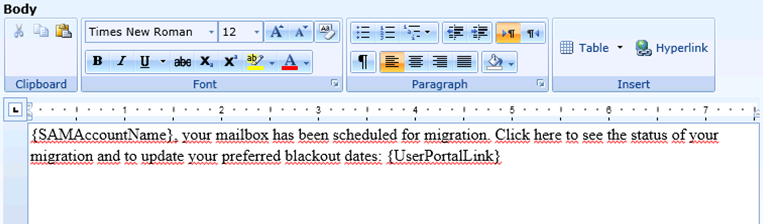
Within the template Body you can use these variables as you compose the text of your message:
|
Macro (Variable) |
Description |
Example |
|
{FullName} {Title} {FirstName} {LastName} {UserPortalLink} {SAMAccountName} {ExpectedDuration} {ScheduledStart} {ScheduledEnd} {DoNotCompleteBefore} {DoNotStartBefore} {ActualStart} {ActualEnd} {ErrorCount} {ErrorMessage} |
User’s First and Last Name User’s Title User’s First Name User’s Last Name Link to user portal page User’s Alias Expected duration of migration Scheduled time to start Scheduled time to end Do not complete migration before time Do not start migration before time Time migration started Time migration ended Number of errors during migration Error message during migration |
Scott Pepper Sergeant Scott Pepper
scott.pepper 01:04:38.4379257 Tuesday, April 12, 2016 3:30:44 PM (GMT) Tuesday, April 12, 2016 4:35:48 PM (GMT) Tuesday, April 12, 2016 3:30:44 PM (GMT) Tuesday, April 12, 2016 4:35:48 PM (GMT) Tuesday, April 12, 2016 3:30:44 PM Tuesday, April 12, 2016 4:35:48 PM 1 Mailbox is full |
|
|
If using any of the date variables in the template body, the time zone can be changed using the Notification Time Zone field on the Notifications tab. |
|
|
Remember to click the OK button at the bottom of this dialog box to save these notification template settings. And remember to click Save Settings (in the toolbar above the tabs) to save any changes you have made to other settings in the Notifications tab. |
The Licenses tab is where Migrator Pro for Exchange license keys are registered with the program. On this tab, all options are displayed whether or not the Advanced checkbox is marked.
To view or edit Configuration Settings (any tab): From the Admin Portal main toolbar, click Settings to open the Configuration Settings screen. Then click the tab for the settings you want to view or edit.
To view or edit the Licenses configuration settings (from any other tab on the Configuration Settings screen): Click the Licenses tab.
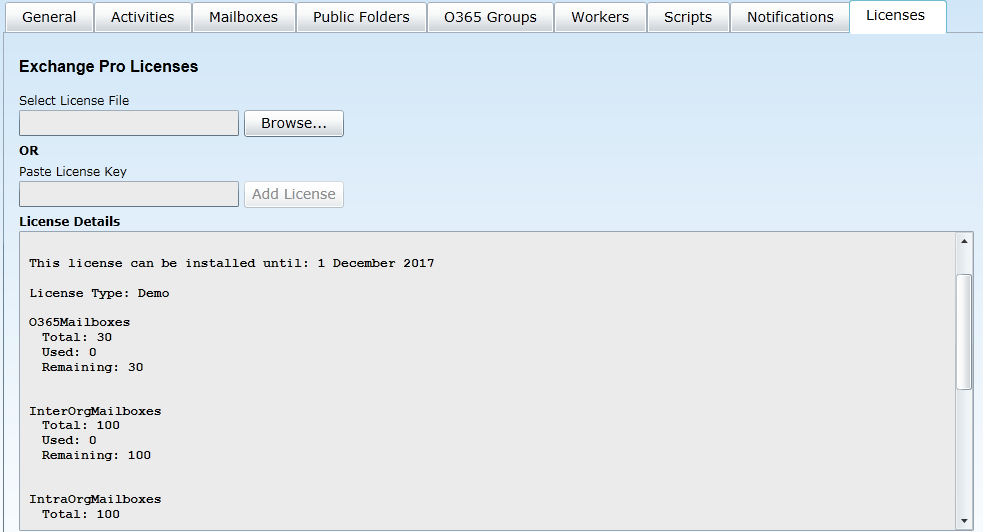
You can register a license by either of two methods:
Use the Browse... button to find and select the license file from some location on your local computer; or
Copy and paste the license key into the Paste License Key text box, and then click the Add License button.
|
|
Remember to click Save Settings (in the toolbar above the tabs) to save any changes you make to these settings. |