Configure DSN in the ODBC directory as per your requirement (for password based authentication or for RSA based authentication).
Create an Admin user for Snowflake using SharePlex setup, as shown in the following query:
create user <user_name> identified by '<user_password>';
Grant the SYSADMIN and USERADMIN roles to the Admin user using the following queries:
grant role SYSADMIN to user <user_name>;
grant role USERADMIN to user <user_name>;
Snowflake_setup internally uses the SYSADMIN role to perform the tasks; SYSADMIN in Snowflake has grants to create databases and schema.
Grant MANAGE GRANTS and CREATE USER grants to the user as shown in the following queries:
grant MANAGE GRANTS on ACCOUNT to SYSADMIN with grant option;
grant CREATE USER on ACCOUNT to SYSADMIN with grant option;
Provide Warehouse access to the Admin roles to be used for replication, as shown in the below queries:
grant USAGE on warehouse <warehouse_name> to role USERADMIN with grant option;
grant USAGE on warehouse <warehouse_name> to role SYSADMIN with grant option;
grant OPERATE on warehouse <warehouse_name> to role SYSADMIN with grant option;
Mention the same warehouse name, <waehouse_name> in the odbc.ini entry for Snowflake.
Create a new role with the name SHAREPLEX_ROLE for replication before running the setup.
create role SHAREPLEX_ROLE;
Grant the USAGE and OPERATE roles to the admin user for replication.
grant USAGE on warehouse <warehouse_name> to role SHAREPLEX_ROLE;
grant OPERATE on warehouse <warehouse_name> to role SHAREPLEX_ROLE;
Assign this new role to SYSADMIN for tracking newly created objects, as shown below:
grant role SHAREPLEX_ROLE to role SYSADMIN;
Use the Database Setup utility for Snowflake (snowflake _setup) to establish SharePlex as a Snowflake user and create the required SharePlex database objects.
This setup utility:
Uses already created SHAREPLEX_ROLE
Creates a new user or uses an existing user
Creates SharePlex internal tables and objects
It is recommended that you review all of the content in this topic before running the setup utility.
Run the Snowflake_Setup utility on the target Snowflake instance in the SharePlex replication configuration.
Within a server cluster, run the Snowflake Setup utility on the node to which the shared disk that contains the SharePlex variable-data directory is mounted.
For consolidated replication, run the Snowflake Setup utility for each variable-data directory.
Provide a DSN (Data Source Name) as mentioned below:
If you have a DSN defined, and you want to use it for the SharePlex connection, copy or link the ODBC files in which that DSN is defined (odbc.ini and odbcinst.ini) to the odbc subdirectory of the SharePlex variable-data directory. This prevents connection errors when the SharePlex processes connect to the database.
If you do not have a DSN defined but want to use one, you can create it in the template files provided in the odbc subdirectory.
For an example of the sample odbc.ini and odbcinst.ini files, see the example below.
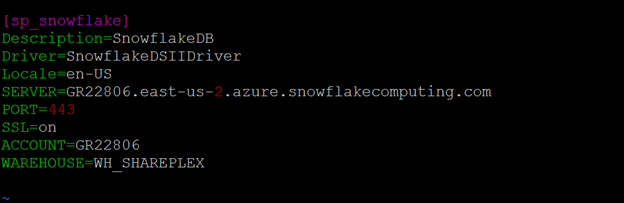
Sample of an ODBC file in a password based authentication:
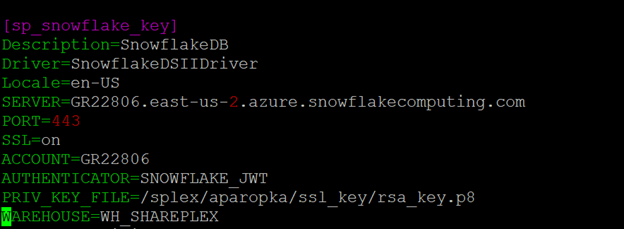
Sample of an ODBC file for in an RSA based authentication:
The database setup utility creates the SHAREPLEX_ROLE and assigns it to SharePlex users. SharePlex assigns the following privileges to the SharePlex_role:
|
Privilege types |
Privileges |
|---|---|
|
Database privileges |
|
| Schema | ALL PRIVILEGES |
Important! The Snowflake instance must be open before this procedure is performed.
Perform the following steps to run database setup for Snowflake:
(Linux only) If you are using multiple variable-data directories, export the environment variable that points to the variable-data directory for the SharePlex instance for which you are running Database Setup.
ksh shell:
export SP_SYS_VARDIR=/full_path_of_variable-data_directory
csh shell:
setenv SP_SYS_VARDIR=/full_path_of_variable-data_directory
Run the Snowflake database Setup command (./snowflake_setup ) using password or RSA based admin user.
Table 15: Setup prompts and response for password based authentication
| Prompt | Response |
|---|---|
| Enter the snowflake DSN name [ ] : |
Enter a DSN name. Example: sp_snowflake_5 |
| Is authentication based on RSA public key? [n] : | For password based authentication, enter "n" |
| Enter the Snowflake administrator name : | Enter an administrator name. |
| Enter the password for the administrator account: | Enter the administrator account password. |
| Enter the replication target database name : |
Enter the name of the Snowflake database where you want to install the SharePlex objects. Example: shareplex_test |
| Database name database does not exist. Would you like to create it? [y] : | If this prompt is displayed, the specified database does not exist. Press Enter to have the setup utility create it for you. |
| Enter the DB schema name: |
Enter the DB schema name. Example: shareplex_test_5 |
| DB schema name does not exist. Would you like to create it? [y] : | If this prompt is displayed, the specified DB schema name does not exist. Press Enter to have the setup utility create it for you. |
| Would you like to create a new SharePlex user? [y/n] : | Press Enter to accept the default to create a new SharePlex database user account in the specified database, or enter n to use an existing SharePlex account. |
|
Enter the name of the new SharePlex user: Enter the name of the existing SharePlex user: |
One of these prompts is displayed depending on whether you elected to create a new user or use an existing user. Enter the name of the SharePlex user. |
| Enter the password for the new SharePlex user: | Enter a password for the new SharePlex user. |
| Re-enter the password for the new SharePlex user: | This prompt is only shown if you created a new user. Enter the SharePlex password again. |
A successful setup terminates with a message similar to the following:
Completed SharePlex for Snowflake database configuration
SharePlex user name: amore2
Database name: SHAREPLEX_TEST
- - The datasource identifier in the SharePlex configuration is 'r.SHAREPLEX_TEST' - -
Table 16: Setup prompts and response for RSA based authentication
| Prompt | Response |
|---|---|
| Enter the snowflake DSN name [ ] : |
Enter a DSN name. Example: sp_snowflake_5 |
| Is authentication based on RSA public key? [y] : |
For password based authentication, enter "y". Note: Make sure that the RSA key has been configured for Admin user. |
| Enter the snowflake administrator name : | Enter an administrator name. |
| Enter the replication target database name : |
Enter the name of the Snowflake database where you want to install the SharePlex objects. Example: shareplex_test |
| Database name database does not exist. Would you like to create it? [y] : | If this prompt is displayed, the specified database does not exist. Press Enter to have the setup utility create it for you. |
| Enter the DB schema name: |
Enter the DB schema name. Example: shareplex_test_5 |
| DB schema name does not exist. Would you like to create it? [y] : | If this prompt is displayed, the specified database schema does not exist. Press Enter to have the setup utility create it for you. |
| Would you like to create a new SharePlex user? [y/n] : | Press Enter to accept the default to create a new RSA user account in the specified database, or enter n to use an existing SharePlex account. |
|
Enter the name of the new SharePlex user: Enter the name of the existing SharePlex user: |
One of these prompts is displayed depending on whether you elected to create a new user or use an existing user. Enter the name of the SharePlex user. |
| Enter path for RSA public key for configuration of New User. |
Enter the path for the RSA public key. (This field is applicable only for a new user) Note: For existing user account, make sure that the RSA key has been configured for Admin user. |
A successful setup terminates with a message similar to the following:
Completed SharePlex for Snowflake database configuration
SharePlex user name: amore2
Database name: PROVIDENCE
- - The datasource identifier in the SharePlex configuration is 'r.SHAREPLEX_TEST' - -
The SharePlex utilities help you configure, test, and manage the SharePlex environment.
Use the SharePlex license utilities to view, add, and remove license keys to hosts in the SharePlex replication environment. Each installation of SharePlex requires a valid license key.
There are three types of SharePlex license keys for each supported platforms:
Trial license keys
Following is the list of supported platforms for which licenses are available:
Oracle
File
JMS
Kafka
SQL Server
Postgres
MySQL
Snowflake
Event Hubs
All Platforms
SharePlex licensing information can be found in the Quest Software Product Guide. Please contact your account manager if you have questions.
If you do not have a valid license key, you may obtain one from Quest Technical Support or your Quest sales representative for the required platform from the above list of supported platforms. Use the appropriate procedure in this documentation to obtain the necessary information to support your license request.
NOTE: To install a trial version of SharePlex, users need to select the All Platforms option when prompted during installation of SharePlex or while running the splex_add_key utility.
On Unix and Linux systems, separate utilities are used to:
Use the splex_add_key utility to add a license key to a machine during the installation of SharePlex or afterward to convert from one type of license to another.
You can use the splex_add_key utility as follows:
To run splex_add_key:
If SharePlex is running, shut it down.
sp_ctrl> shutdown
Run splex_add_key from the install sub-directory of the SharePlex product directory.
$ /proddir/install/splex_add_key
Choose a platform to add/update license key:
SharePlex License Utility1) Oracle
2) File
3) JMS
4) Kafka
5) SQL Server
6) Postgres
7) MySQL
8) Snowflake
9) Event Hubs
10) All Platforms
q) Quit License Utility
Enter option:
NOTE: To install a trial version of SharePlex, users need to select the All Platforms option.
Enter the appropriate number from the above list to choose the platform.
Enter the key manually as received from Quest. Press Enter when finished entering the key.
Use the splex_get_key utility to view the SharePlex license key related details. Run this utility from the install sub-directory of the SharePlex product directory.
$ /proddir/install/splex_get_key
The information is similar to the following example:
$ /splex/proddir/install/splex_get_key
Platform = All
Product Name = SharePlex
Product Version = 11
License Number = 123-456-789
License Key Type = Trial
License Expiry = Midnight of Jan 01, 2050
License Key = lxxjLny9CqMCqdPZKZGRXIjnz7vpbTPQANliJi7PXJ7+Q8=
Use the splex_remove_key utility to remove already installed SharePlex license key for a particular platform. If no license key is installed on the machine, it will display the "No license installed" message.
To run splex_remove_key:
Run splex_remove_key from the install sub-directory of the SharePlex product directory to remove a license key. Remove key will display a list of previously added licence keys.
$ /proddir/install/splex_remove_key
Choose the appropriate platform to remove a license key:
SharePlex License Utility
1) Oracle
2) Postgres
q) Quit License Utility
Enter option: 1
A successful removal of the license terminates with a message similar to the following:
The SharePlex for Oracle license has been successfully removed.
This section contains instructions for using the SharePlex uninstallation program to remove SharePlex from a system. The uninstaller permanently removes the replication environment from the system.
To preserve the replication environment, including the queues that store the data, you can install a SharePlex upgrade or reinstall the current version, rather than uninstall SharePlex. Before you upgrade or reinstall SharePlex, see the Release Notes for the version you are installing to determine if there are any special upgrade or installation requirements.
