The Remote Management object provides the ability to install, configure or remove the Remote Management component to/from host computers.
Select to Install or Remove the Desktop Authority host software on client workstations.
Specify a listening port that Desktop Authority will use to communicate with client workstations. By default the Desktop Authority host software is configured to use port 2000.
Select this check box to display a system tray icon on the client workstation. This icon indicates that the Remote Management host software is installed on the client. Clicking on this icon provides a wealth of extra information, including a log of recent events and detailed performance data graphs.
Select this check box to allow all administrators access to start a remote management session. Clear this check box to disable administrators default access to remotely manage workstations. Explicit permissions must be granted to users who will have access to start a remote management session
Select this check box to enable the Desktop Authority system tray icon and request permission from the user at the workstation when a remote management session is to be started. Enabling the system tray icon also enables the ability to use the Chat function. If this box is cleared there will be no indication at a workstation when a remote control session is started. The Chat function will also be disabled.
Select this check box to open the port that allows a remote management connection.
Select this box, 


|
|
NOTE: Enabling the Remote Registry Service on client machines is no longer required for Remote Management functionality |
The Access Control List allows permissions to be controlled for Remote Management sessions.
Figure 48: Configure Access Control List permissions
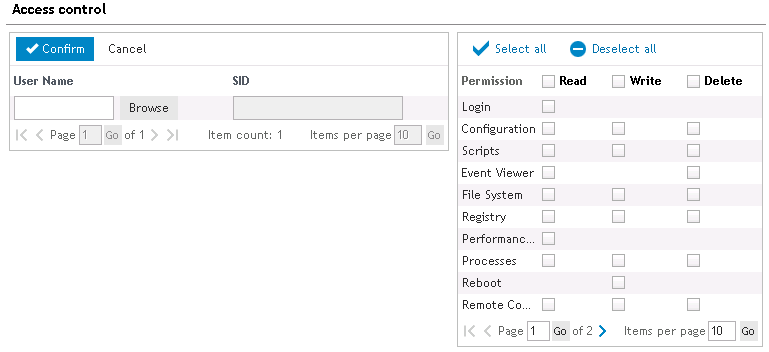
Anyone with any sort of access to Desktop Authority is implicitly granted Login access. This allows for looking at the Info page, reading the Help file, chatting with the user in front of the computer, and logging out.
Users with access to the Configuration module have access to all Basic permissions plus Computer Settings > Automatic Priorities, Server Functions > FTP capabilities, Performance Monitoring > Telnet/SSH Connections, Security > IP configurations and Preferences. Keep this in mind this grants users access to modifying Desktop Authority permissions.
Users can execute, create, change or delete scripts.
Allows the use of the Event Viewer module under Computer Management.
Allows the use of the File Transfer module, Computer Management > File Manager and Security > Desktop Authority Logs.
Allows for editing and compacting of the registry under Computer Management.
Ability to view performance and system information data under Performance Monitoring. Processes Allows access to the Process List, and adds the ability to terminate processes and/or change their priorities. These items can be found under Computer Management.
Ability to view Processes data under Computer Management.
Allows rebooting the computer and restarting the Desktop Authority service. This section can be found under Computer Management.
Allows use of both the screenshot-based and the Java-based Remote Control module.
Allows the use of the User Manager module found under the Computer Management section.
Allows the user access to Computer Settings.
Allows access to a command prompt on the host computer via the SSH protocol.
Grants the user rights to use SSH Port Forwarding.
Grants the user rights to use SSH Privileged Port Forwarding.
Grants the user rights to use SCP (Secure file Copy Protocol).
Allows the user access to the file system of the host computer via the SFTP (Secure File Transfer Protocol).
Allows the user to use the secured telnet client found in the browser under the Command Prompt item.
Allows access to the machine via Telnet - either using the built-in telnet client or any standalone terminal emulator.
Click Select All to mark all permissions. Click Deselect All to clear all permissions.
The Remote Management Advanced tab provides several advanced settings for Remote Management. The Advanced settings are comprised of several options pertaining to General, Interactive user's permission, Security, Audible notification, Logging, and IP Filtering settings.
Desktop Authority provides a mirror display driver on the W2K platforms. This display driver provides a faster and less CPU-intensive remote control session. Select this check box to use the mirror display driver. Clear this check box to disable the use of the mirror driver.
Select this check box to disable the wallpaper (or background desktop image) on the host computer when a remote control session is started. Clear this check box to view the image during the remote session.
The Remote Management host software provides the ability to transfer clipboards between host and client machines, allowing the ability to copy from one machine and paste on the other.
Specify the maximum number of kilobytes (KB) that can be transferred between machines. The default size is 1024 KB. Transferring significantly larger amounts may cause slowdowns. The maximum limit is 8 MB in both directions. If the clipboard is larger than the maximum limit nothing will be transferred.
Specify the number of minutes a remote host may be inactive for. If a period of inactivity is determined, the client will automatically be disconnected from the remote session.
Specify the number of times the display is to be updated each second.
Select this check box to enable the ability to print remotely. Clear this check box to disable the ability to print remotely.
Enter the confirmation text to be presented to the host when a remote control session is about to begin. The string '%%user%%' will be substituted by the name of the user who is attempting the remote control operation.
Specify the amount of time before the notification message to the host times out.
Select this check box to allow remote control access to a host when the local user does not answer the query for access. Clear this check box to cancel the query for access to the host when the local user does not answer.
When a remote session is in progress, a small window in the top right corner of the remote screen is displayed stating who is currently remotely connected to the machine. Select this check box to have this remote management notification displayed during the remote session. Clear the check box to display no connection notification dialog during the remote session.
Select this check box to allow immediate remote control access without requesting permission from the host. This is only possible if the user requesting remote access has Full control permissions. Clear this check box to disable this ability.
Select this check box to disable the host's keyboard and mouse during the remote session. This will prevent the host user from using the keyboard or mouse while the remote control session is in progress. Clear this check box to enable the host's keyboard and mouse during the remote control session.
Select this check box to lock the console in order to protect open files, if, due to a network error, the Java remote control client loses its connection to the server. Clear this check box to leave console as is when the connection is broken.
Select this check box to lock the console in order to protect open files, if the connection times out. Clear this check box to leave client as is when the connection times out.
Select this check box to lock the console when the remote session ends. Clear this check box to leave client as is when the remote session ends.
Select this check box to blank the display on the host computer during a remote control session. This is useful for preventing user interaction while remote work is in process.
Select this check box to have an audible beep on the host computer when a remote control session is initiated or ended.
Select this check box to have a periodic audible beep on the host computer during the remote control session.
Specify an interval for the periodic beep during the remote control session. The beep interval is specified in seconds.
Specify the number of days in which log files will be kept for. Set to zero to disallow the system from deleting any log files. Log files can be deleted manually from the specified log file location.
Specify the folder where log files will be stored. Leaving the check box empty will cause the log files to be stored in the x:\Program Files\Desktop Authority folder on the host machine.
The Remote Management IP address filtering feature allows the configuration of exactly which computers are allowed to access the Remote Management system. Click Add to add a new IP Filter to the list. Click Modify to edit an existing IP Filter. Click Delete to remove an existing IP Filter from the list.
Select Allow or Deny from the type list. Allow specifies that access will be granted to the defined IP address. Deny will refuse access to the IP address specified.
Enter either a single IP address with no subnet mask, an IP address with a subnet mask, essentially granting or denying access for a whole network, or an IP address with wildcards and no subnet mask. Valid wildcards are an asterisk (*) that matches any number of characters, or a question mark (?), that matches a single character only.
Select the Validation Logic tab to set the validation rules for this element.
Select the Notes tab to create any additional notes needed to document the profile element.
When adding or modifying a profile object element, the description appears above the settings tab. Enter a description to annotate the element. The default value for new profile elements can be changed by going to the system Preferences.
|
|
*Note: This feature is not a standard part of Desktop Authority Essentials. To obtain this feature, Desktop Authority Essentials must be upgraded to the Standard edition of Desktop Authority. |
The Security Policies object allows user security settings to be centrally configured. Security policies can be set for individual users or computers.
User policies are registry entries stored to the [HKey_Current_User] registry hive. This registry hive is stored in the user’s profile. On Windows 2008/7/8.1/10/2008 R2/2012/2012 R2/2016/2019 operating systems, each user has an individual user profile.
Computer-specific policies are registry entries stored to the [HKey_Local_Machine] registry hive. This type of policy will affect every person that uses the computer.
When a Policy is enabled, it remains in effect until you specifically disable it or select the Clear all existing policies first option. Once you configure the security policy to be disabled using either of these two methods, the user must log on one more time so that Desktop Authority may apply the "disabled" setting to the computer.
Security Policies are registry settings. Deleting a Policy entry from the list will leave the policy in effect whether it is enabled or disabled. To clear the policy setting, you must reset the policy in the list or check the Clear all existing policies first box.
Select Enable or Disable from the list to enable or disable a security policy.
Select a specific policy area from the Category list for a security policy to be set. The available categories are: (All Policies), Computer, Explorer, Internet Explorer, Network, System and WinOldApp. (All Policies) will display policies for all categories. WinOldApp provides policy settings for MS-DOS apps.
Selecting a policy category will filter the policy selection list below the category.
Select a policy from the list. This list is filtered based on the policy category chosen. To see all policies, select the (All Policies) category.
Select the User Account Control (UAC) tab for Security Policy settings pertaining to UAC on Windows 2008, Windows 7, Windows 8.1, Windows 10, Windows 2008 R2, Windows 2012, Windows 2012 R2, Windows 2016, and Windows 2019.
This setting determines the behavior of all UAC security policies on the target system. Select Enable from the drop list to use UAC policies throughout the target system. Select Disable from the drop list to disallow the use of UAC policies. Select Leave Alone to preserve the system's current UAC settings. By default, UAC policies are enabled on Windows 7 and later operating systems.
UAC changes on Windows Server 2008 machines require a reboot before the change will take effect.
Windows Security Center will notify the user that the overall security of the system has been compromised if UAC security policies are disabled.
All individual UAC security policy settings are disabled for individualized configuration unless the User Account Control (UAC) on Windows 2008 server selection is enabled.
By default the Built-in Administrator account will run all applications with full administrative privileges. Enable this option to prompt the Built-in Administrator with the consent dialog. From this dialog the administrator can then choose to permit or deny the action. Disable this option to allow the Built-in Administrator to run all applications with full administrative privileges. Select the Leave Alone option to preserve the system's current setting.
The elevation prompt is a dialog that is used to prompt the administrator for permission to continue, or to prompt the user for credentials in order for the requested elevation of permissions to continue. This option allows the behavior of the elevation prompt to be set for administrators. Select a setting, Leave Alone, Elevate without prompting, Prompt for credentials and Prompt for consent, from the drop list.
Select the Leave Alone option to preserve the system's current setting, which by default is Prompt for Consent.
The Elevate without prompting option will allow an operation that requires permission elevation to continue with prompting for consent or credentials.
The Prompt for credentials option prompts the administrator with the elevation prompt dialog. The user is required to enter their user name and password. The request will continue with the applicable privileges. When UAC is enabled, this is the default setting.
The Prompt for consent option forces the elevation prompt dialog to pop up when there is an attempt to perform an administrative task. This dialog consists of a Permit and Deny selection. Permit will allow the operation continues with the user's highest available privilege. The operation cannot continue if Deny is selected. This is the default selection when UAC is enabled.
The Prompt for consent from non-windows binaries (Win 7) option forces the elevation prompt dialog to pop up when there is an attempt to perform an operation for a non-Microsoft application. The user is prompted to select either Permit or Deny. If the user selects Permit, the operation continues with the user's highest available privilege. The operation cannot continue if Deny is selected.
The elevation prompt is a dialog that is used to prompt the administrator for permission to continue, or to prompt the user for credentials in order for the requested elevation of permissions to continue. This option allows the behavior of the elevation prompt to be set for standard users. Select a setting, Leave Alone, Elevate without prompting, Prompt for credentials and Prompt for consent, from the drop list.
The Prompt for credentials option prompts the user with the elevation prompt dialog. The user is required to enter their user name and password. The request will continue with the applicable privileges.
The Automatically deny elevation requests option will return an access denied error message to the user when an operation is attempted that requires elevation of privileges.
Select the Leave Alone option to preserve the system's current setting.
This setting determines the behavior of application installation. Select Enable from the drop list to pop up the elevation prompt dialog based on the configured elevation prompt behavior. Select Disable from the drop list to not trigger installer detection. Select Leave Alone to preserve the system's current settings.
This setting will enforce PKI signature checks on any interactive application that requests elevation of privilege. Enterprise administrators can control the admin application allowed list through the population of certificates in the local computers Trusted Publisher Store. Select Enable to enforce the PKI certificate validation of an application before it is allowed to run. Select Disable to not enforce PKI certificate chain validation before an application is allowed to run. Select Leave Alone to preserve the system's current settings.
This setting will enforce the requirement that applications that request execution with a User Interface Accessibility integrity level must reside in a secure location on the file system. Select Enable to launch the application only if it resides in a secure location. Select Disable to launch the application regardless of whether it resides in a secure location or not. Select Leave Alone to preserve the system's current settings.
When prompting for elevation permissions, the system can process the request on the interactive user's desktop or on the Secure Desktop. Select Enable to process elevation requests on the secure desktop. Select Disable to process elevation requests on the interactive user's desktop. Select Leave Alone to preserve the system's current settings.
This setting allows User Interface Accessibility programs to not automatically disable the secure desktop for elevation prompts. Instead, the prompts will appear on the interactive user's desktop instead of the secure desktop. By default, this setting is Disabled in Windows.
This setting enables the redirection of legacy application write failures to defined locations in the registry and file system. Select Enable to facilitate the runtime redirection of application write failures to a specific user location. Select Disable to allow applications that write data to protected locations to fail as they did in prior versions of Windows. Select Leave Alone to preserve the system's current settings. This is the default setting.
Select the Validation Logic tab to set the validation rules for this element.
Select the Notes tab to create any additional notes needed to document the profile element.
When adding or modifying a profile object element, the description appears above the settings tab. Enter a description to annotate the element. The default value for new profile elements can be changed by going to the system Preferences.
The Service Pack Deployment object allows you to deploy service packs for all Windows 7 clients. A few items to note regarding service pack deployment:
The variable $ServicePackFreeSpaceNeededInMB is used to override the available disk space amount. Select Global Options > Definitions or select the Definitions tab on the profile's settings.
Example:
$ServicePackFreeSpaceNeededInMB="1000"
Desktop Authority can bypass the automatic installation of service packs on specific computers. If you have specific computers that you would never like Desktop Authority to install a service pack on (such as a development station), create a file called SLNOCSD in the root directory of the System Drive. This allows you to generally apply service packs based on Validation Logic, while providing for special-case exemptions based on individual systems.
Select a client Operating System version from the list.
Select a language from the list. This language should specify the dialect of the operating system installed on the client as well as the service pack. If the languages do not match, the service pack will not be installed.
From the list, select the service pack to be deployed. Service Packs displayed in the list are filtered based on the OS Version selected.
Enter the complete path and filename where the installation executable exists or click Browse to locate the executable’s path. The installation executable may be called either spinstall.exe or update.exe based on the operating system being installed. The service pack install file is called spinstall.exe in Windows 2008.
Example:
\\server1\installs\W2KSP1\Update.exe
The executable file downloaded from Microsoft is an archive that must be extracted at a command line by using the -x switch. This will extract the service pack into multiple folders among which you will find update.exe.
The following parameters are used when installing service packs from the User Management Service Pack object:
Select the Validation Logic tab to set the validation rules for this element. Service Packs may only be applied to computers classified as a Desktop or Portable. Operating System and Connection type are disabled.
Select the Notes tab to create any additional notes needed to document the profile element.
When adding or modifying a profile object element, the description appears above the settings tab. Enter a description to annotate the element. The default value for new profile elements can be changed by going to the system Preferences.
The Shortcuts object provides the ability to centrally define shortcuts to be used on the client’s machine. A shortcut is a pointer to an application or folder. Once the shortcut is created, the user will never have to remember the details to access the referenced program or folder again. They simply run the shortcut.
Enter a name for the shortcut. This name will appear below the icon for the shortcut. This field is required.
Specify the folder where the shortcut will be created or removed from. Type a location or select one from the list. Available options to choose from are: All Users Desktop, All Users Programs Group, All Users Start Menu, All Users Startup Group, User Desktop, User Favorites (IE bookmarks), User Programs Group, User Quick Launch Bar, User Start Menu, User Startup Group, User Start Menu (Pin), User Taskbar (Pin).
A location may also be specified by a dynamic variable, environment variable or macro which is translated by Desktop Authority during the client logon process.
Example:
ShellProg\Shared Documents\Employee Manual
When Desktop Authority executes on the client, $ShellProg will be populated with the location of the user’s Start Menu Programs folder, for example: C:\Windows\Start Menu\Programs or D:\WinNT\Profiles\bclinton\Start Menu\Programs.
If the specified folder for the shortcut does not exist when Desktop Authority attempts to create the shortcut, the folder will automatically be created during the client logon process.
|
|
Note: User Start Menu (Pin) and Taskbar (Pin) locations are not supported in Windows 8.1. |
Select Create Shortcut or Remove Shortcut from the Action list.
Select this check box to overwrite an existing shortcut if it exists in the same location with the same name. Clearing the check box will not overwrite the shortcut if it exists.
Some programs need to reference other files in a specific folder. In order for the shortcut to find these files, the folder must be specified. Type the folder name or click the Browse button. In most cases this field will contain the path used in the Target field. This field is required.
Specify any optional command line parameters for the selected target program.
If you need to pass a reserved character (@, $, or %) to a program, you must double the reserved character within the Desktop Authority Manager. For example, if the program requires /@u-username as a command line argument, type /@@u-$UserID in the arguments field.
Some programs need to reference other files in a specific folder. In order for the shortcut to find these files, the folder must be specified. Type the folder name or click the Browse button. In most cases this field will contain the path used in the Target field. This field is required.
Enter a text description for the shortcut. This is displayed on the shortcut properties dialog.
Specify the icon file to display for the shortcut. An icon, icon library or program file may be specified. If there is more than one icon in the file specified, enter the icon number in the Icon index entry. An icon file may be selected by clicking the Browse button.
Specify the keyboard combination that will be used to start or switch to the target application. Shortcut keys are always a combination of the CTRL key plus the ALT key and then one other key to add to the sequence.
For example, to specify a shortcut key of CTRL + ALT+ T, enter the letter T in the field. Set the field to None to disable the shortcut key by pressing the BACKSPACE key.
The ESC, Enter, TAB, Spacebar, Print Screen or Backspace keys are not allowed as shortcut keys. If this shortcut key conflicts with a keyboard shortcut in another Windows application, the keyboard shortcut in the other Windows application will not work.
Select a window option from the list. This defines the style of the window the application will initially execute in. Select from Normal, Minimized, or Maximized.
Select the Validation Logic tab to set the validation rules for this element.
Select the Notes tab to create any additional notes needed to document the profile element.
When adding or modifying a profile object element, the description appears above the settings tab. Enter a description to annotate the element. The default value for new profile elements can be changed by going to the system Preferences.
One way to make use of shortcuts is to create a shortcut in your user's Internet Explorer Favorites. This example demonstrates how to create the Favorites shortcut.


