The File Operations object provides the ability to Copy, Delete, Move and Rename files and folders. File Operations support Local, Mapped and network drive paths as well as a generous portion of operation options.
Select Copy, Move/Rename, Delete or Create Folder from the Operation list to specify the action to execute on the specified files.
Specify the folder on which the selected Operation will act upon.
Specify the files on which the selected Operation will act upon.
For Copy, Move/Rename or Create Folder operations, specify the folder to be used as the destination for the selected Operation.
For Copy or Move/Rename operations, specify the file names to be used for the destination of the selected Operation.
Select this check box to enable extra File Operation options. When enabled, select changed before, changed after, changed between, changed on and older than from the list
Select changed before, for the selected operation to act on all files last modified prior to the specified date.
Select changed after, for the selected operation to act on all files last modified after the specified date.
Select changed between, for the selected operation to act on all files last modified between (and including) the specified dates.
Select changed on, for the selected operation to act on all files last modified on the specified date.
Select older than, for the selected operation to act on all files older than the specified number of days.
Select last accessed before, for the selected operation to act on all files that were last accessed before the specified date.
Select last accessed after, for the selected operation to act on all files that were last accessed after the specified date.
Select last accessed between, for the selected operation to act on all files that were last accessed between the specified dates.
Select last accessed on, for the selected operation to act on all files that were last accessed on the specified date.
Select last accessed more than X days, for the selected operation to act on all files that were last accessed more than the specified number of days ago.
Select this check box to include all subdirectories of the Source Folder in the selected Operation. Clear this check box to exclude all Source Folder subdirectories in the selected Operation.
Select this check box to continue performing the selected Operation regardless of any errors that occur during the execution of the action. Clear this check box to stop the selected Operation if an error occurs.
Select this check box to include all hidden and system files in the selected Operation. Clear this check box to ignore all hidden and system files in the selected Operation.
Select this check box for the selected operation to overwrite or delete read-only files. Clear this check box for the selected operation to ignore all read-only files.
For Copy or Move/Rename operations, select this check box for the operation to overwrite existing files. Clear the check box for the operation to ignore existing files.
For Copy or Move/Rename operations, select this check box for the operation to overwrite existing files if the destination file is older than the source file. Clear the check box for the overwrite operation to ignore overwriting destination files that are older than the source files.
Select this box to perform the selected operation asynchronously. In asynchronous mode, the File Operations element will execute at the same time as other File Operations elements. If this check box is cleared, applications will run sequentially one after another. Each application must complete before the next one will begin.
Select this box to force the operation to copy files to the corresponding 32-bit folder, when performing the operation on 64-bit operating systems.
Available for Move/Rename and Delete operations, select this check box to securely remove files/folders from the specified source using the DoD 3 specification.
Show the progress of the file operation.
|
Source Folder |
Source File |
Destination Folder |
Destination File |
Operation |
|---|---|---|---|---|
|
X |
|
X |
|
Rename folder |
|
X |
|
X |
|
Move folder |
|
X |
Single |
X |
|
Move file to different folder |
|
X |
Multiple |
X |
|
Move files to different folder |
|
X |
Single |
X |
Single |
Rename file |
|
X |
Multiple |
X |
Single |
Not supported |
|
X |
Single |
X |
Multiple |
Not Supported |
|
X |
Multiple |
X |
Multiple |
Not supported |
Select the Validation Logic tab to set the validation rules for this element.
Select the Notes tab to create any additional notes needed to document the profile element.
When adding or modifying a profile object element, the description appears above the settings tab. Enter a description to annotate the element. The default value for new profile elements can be changed by going to the system Preferences.
The File/Registry Permissions object provides the ability to modify NTFS File and Folder permissions or Registry permissions. Permissions are configurable for 2008, 7, 8.1,10, 2008 R2, 2012, 2012 R2, 2016, and 2019 systems only.
Select File/Folder or Registry from the Type list. The selected Type is the object that Permissions will be applied to.
Select Append, Overwrite or Revoke from the Action list. This action defines how to apply the Permissions to the selected object.
For the File/Folder Type, enter the Path to the object that Permissions will be applied to. For the Registry Type, enter the Hive and Key that the Permissions will be applied to.
Check this box to force the 32 bit registry location to be used instead of the 64 bit location, when executing on 64 bit operating systems.
Select Do not modify this object's inheritance, Allow this object to inherit from parent, Do not allow this object to inherit from parent and discard inherited permissions, Do not allow this object to inherit from parent and copy inherited permissions from the Inheritance list. The Inheritance selection defines how or if permissions for the object will be inherited.
The Permissions list designates which users and/or groups will be given permissions to the selected object (File/Folder or Registry)
Press Add to define users and/or groups to which permissions will be given to the selected object. Press Edit to edit an entry in the Permissions list. Press Delete to remove an entry from the Permissions list.
Figure 42: Creating permission sets
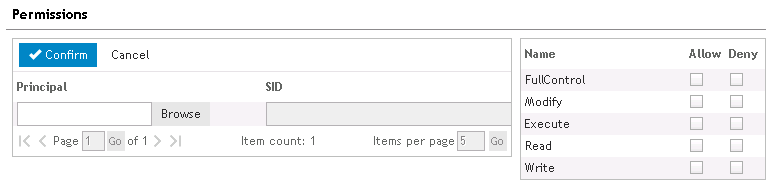
Once in Add/Edit mode update the following entries:
Specify a user or group that will be assigned the designated permissions.
The SID (Security Identifier) will be automatically populated once a Principal is selected.
The permission boxes represent the standard permissions that can be allowed or denied for the specified Principal. Select Allow to permit access to the object. Select Deny to refuse access to the object. Selecting either Allow or Deny Full Control will automatically select the Read, Write, Execute and Modify permissions.
Select Apply to this object only, Apply to this object and child objects one level deep, Apply to this object and allow all child objects to inherit, or Apply to this object and apply to all child objects from the Propagation list. The propagation selection defines which components (Parent and/or Child) of the object are affected by the Permission change.
Select Files, Folders, or Files and Folders from the list. The selected child object(s) will be included in the propagation of the applied permissions.
Select the Validation Logic tab to set the validation rules for this element.
Select the Notes tab to create any additional notes needed to document the profile element.
When adding or modifying a profile object element, the description appears above the settings tab. Enter a description to annotate the element. The default value for new profile elements can be changed by going to the system Preferences.
The Folder Redirection object provides the ability to change the Windows default location for specialized folders known as Shell Folders. Shell folders are folders that are specific to each authenticated user. They include the Contacts (Windows 7, Windows 8.1), Cookies (Windows 8.1), Desktop (Windows 8.1), Downloads (Windows 7, Windows 8.1), Favorites (IE Bookmarks)(Windows 8.1), History (Windows 8.1), My Music (Windows 8.1), My Pictures (Windows 8.1), My Videos (Windows 7, Windows 8.1), Personal (My Documents Folder)(Windows 7, Windows 8.1), Programs Group (Windows 7, Windows 8.1), Recent (Windows 7, Windows 8.1), Send To (Windows 7, Windows 8.1), Start Menu (Windows 7, Windows 8.1), Startup (Windows 7, Windows 8.1) and Temporary Internet Files (Windows 7, Windows 8.1).
Shell folders are located under the authenticated user’s profile, C:\Documents and Settings\profilename\.
By defaulting the location of these folders to a network share (or mapped drive), rather than the local computer, users are allowed to access their own desktop, bookmarks, recent document list, application settings, etc., regardless of the computer they log on to. This also enables the profile to be secured and backed up.
In addition to user-specific shell folders, Windows 2008/7/8.1/2008 R2/2012/2012 R2/2016/2019 also includes a common set of shell folders that are available to all users of the computer. This common set of shell folders is often referred to as the "All Users" profile or "Users Profiles".
Select a shell folder from the Shell folder list.
|
|
NOTE: Redirecting Temporary Internet Files to a network share is not supported with IE 8 and later. |
Specify a folder that the shell folder should be redirected to. The folder designation may be in the form of a path, mapped drive or UNC. Click Browse to navigate to the path. Desktop Authority’s dynamic variable selection is available for this field by pressing the F2 key.
|
|
NOTE: Although a path in the form of C:\RedirectedFolder may be used, it is recommended that a fully qualified UNC be used instead. Note that UNC paths longer than 260 are truncated by the operating system. If this occurs, the folder redirection will not work. |
Select this check box to restore the redirected folder to the operating system’s default location.
Select this check box to copy files from the current folder to the redirected folder when it is redirected.
Select the Validation Logic tab to set the validation rules for this element.
Select the Notes tab to create any additional notes needed to document the profile element.
When adding or modifying a profile object element, the description appears above the settings tab. Enter a description to annotate the element. The default value for new profile elements can be changed by going to the system Preferences.
The General object provides several miscellaneous settings including settings to purge the client TEMP files, password expiration warnings and others.
Select this checkbox to enable purging of the client computer's %TEMP% folder.
%TEMP% is an environment variable that defines the location of the User's temporary files folder. Desktop Authority can easily control the purging of this folder in order to keep the client’s machine free of extraneous, unused files. The user will never have to remember (or forget, as is usually the case) to manually purge this folder.
Purging is completed on the first Wednesday of each month.
Select Prompt from the list to let the user decide whether to purge the %TEMP% folder.
Select Always from the list to purge the %TEMP% folder on the first Wednesday of each month.
Specify the file(s) to purge from the %temp% folder. Use wildcards to specify multiple files. A subfolder may also be specified.
The default is [Prompt] purge.
Specify a file mask that defines exactly what files to include in the purge operation.
The default is to purge all *.tmp] files.
Enter a numeric value, or use the arrows, representing the number of days prior to expiration in which to enable a warning to the client that their password is about to expire. The warning will give the user an advanced reminder the specified number of days before the password will expire. If no number is entered, the warning is disabled.
Enter a numeric value, or use the arrows, representing the number of megabytes to enable a warning to the client if disk space falls below the specified size. If no number is entered, the warning is disabled.
To define local admin access for clients, enter the local admin username/password. After entering the local admin password, click OK. The password will be encrypted for display purposes in the Manager.
Select this box to use the currently logged on user credentials as the local admin password. Deselect this box to modify the credentials. Enter the Password twice to enter a new local admin password.
Select this check box to forcibly disconnect all existing network drive mappings before Desktop Authority drive mapping elements are executed. If Desktop Authority is executed and this check box is not selected, any persistent connections that the client may have defined for the same drive letter to be mapped by Desktop Authority will be overridden. Desktop Authority will not automatically remove all persistent connections on each client (unless this check box is selected) — only the ones that conflict with the mappings being applied by Desktop Authority during the logon process.
This check box can be set to one of three (3) different states: on (enabled) 


This check box can be set to one of three (3) different states: on (enabled)
|
|
Note: IP printers on servers will not be disconnected by this option. |
This option provides a mechanism by which the number of concurrent logons by a single user can be limited. Implementation of this feature requires a combined effort between Desktop Authority and the domain’s servers where the shares reside.
Once configured, Desktop Authority will immediately log off any user that attempts to concurrently log on more sessions than they are allowed.
Use this setting to clear or set the previous user’s logon name.
Set this check box to one of three (3) different states: on (enabled)
Select this check box if you are using Desktop Authority's Security Policies only. This setting instructs Desktop Authority to remove all existing security policies prior to applying new ones. Removing a security policy removes the setting from the registry which in effect disables the policy from being applied to the workstation.
Clear this check box if you are using Microsoft’s Policies in combination with Desktop Authority's Security Policies. Microsoft’s Group Policies are applied to the computer before the logon script executes, this option will ensure that Desktop Authority does not "clear" the existing Microsoft Policies.
Graying this check box acts exactly as if the check box is cleared unless there are other elements that either Select or Clear this option. If there are other elements with a selected or cleared check box, this option will be ignored. The last setting processed, either selected or cleared will take precedence over all other settings.
Select this check box to remove the Internet Explorer Take a Tour splash screen. Once removed, it cannot be reactivated by Desktop Authority.
Select this check box to remove the Internet Connection Wizard and prevent it from launching the first time each user of the computer attempts to launch Internet Explorer. Once the Internet Connection Wizard is removed, it cannot be reactivated (added back to the desktop) by Desktop Authority.
This check box can be set to one of three (3) different states: on (enabled),
Select the Validation Logic tab to set the validation rules for this element.
Select the Notes tab to create any additional notes needed to document the profile element.
When adding or modifying a profile object element, the description appears above the settings tab. Enter a description to annotate the element. The default value for new profile elements can be changed by going to the system Preferences.


