Generate InfoPath form template
 |
 |
Generate InfoPath form template
This action allows you to migrate your Notes Forms to InfoPath Form Templates.
If you select List, go to Template for form library for the wizard details.
Template for form library
 |
 |
Template for form library
Table 19. Template for form library
The second page of the wizard is where you select the Notes form elements to be migrated.
Table 20. Notes for elements
The third page of the wizard is where you set the default control sizes.
Table 21. Default control sizes
The fourth page of the wizard is used to set which Notes fields are migrated to InfoPath, and how those fields should be mapped when creating a InfoPath document migration job later. For more information, see Generating InfoPath forms (post version 5.2)
The following is a description of the options:
Table 22. Options
Name of the field on the Notes form to be migrated. This is not modifiable.
The name of the corresponding InfoPath field that is generated. This name can be changed if desired.
The fifth page of the wizard shows you the options you have selected.
Table 23. Options
Once the migration is complete, a dialog box will appear with the buttons:
The migrated form will appear as a .XSN file in the selected folder. If the option Write migration log files is checked, in the folder will be a subfolder named formname_Migrator for Notes to SharePointiplog. This folder contains all the source files that comprise the InfoPath template, and a log file named "Migrator for Notes to SharePoint_infopath_log.txt" if the form migration failed. These are useful for debugging in case the template does not load properly in InfoPath.
The newly migrated form can now be used to migrate Notes documents to InfoPath documents. For more information, see Generating InfoPath forms (post version 5.2)
Template for list form
 |
 |
Template for list form
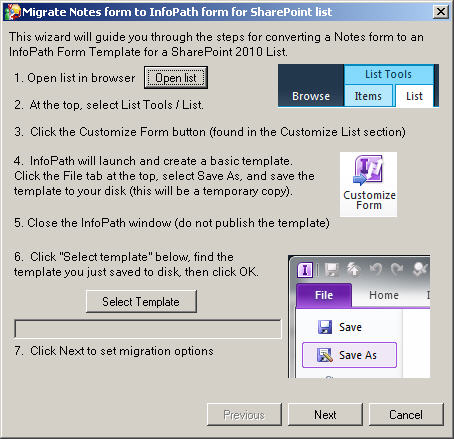
To create an InfoPath form template
Figure 2. Migrate Notes form to InfoPath form for SharePoint list
Generate third-party form template
 |
 |
Generate third-party form template
You can migrate a Notes form to a third party form, such as Nintex, and place it in SharePoint.
To generate Nintex forms

