
Using Foglight Hybrid Cloud Manager for AWS
Installation requirements
AWS Agent Configuration
AWS monitoring setup
Monitoring Tab
Getting authentication information through console
Creating an AWS Agent
Configuring data collection interval
Dashboard location and UI elements
Regions monitoring
System Info Tab
Tags Tab
Report Tab
Rule Configuration Tab
Administration Tab
Optimizer Tab
Cost Tab
Regions view
Explore - All Regions view
Summary - All Regions view
Region Summary view
Region Explore view
Account monitoring
EC2 Instances Monitoring
EC2 Instances view
Summary - All EC2 Instances view
EC2 Instance Summary view
Explore - Instance view
EBS monitoring
Administration Tab
The Administration tab of the Cloud Manager dashboard contains links to agent administration tasks that you can use to manage AWS performance agents.
Figure 26. Administration dashboard

|
3 |
The Cloud Manager dashboard opens.
|
4 |
Click Administration in the actions bar. |
For more information, see the following topics:
Tasks view
The Tasks view allows you to create an AWS agent, to create instance credentials, to assign AWS instances credentials, and to review license usage. For more information about how to create an AWS agent, refer to Creating an AWS Agent .
|
3 |
The Cloud Manager dashboard opens.
|
4 |
Click Administration. |
The Administration dashboard opens.
|
5 |
On the Tasks view, click Create Instance Credential, and then click User Name and Password from the prompted dialog box. |
The Add a New “User Name and Password” Credential dialog box opens.
|
6 |
In the Credential Properties view, type User Name and Password, confirm the password, and then click Next. |
|
7 |
|
8 |
|
3 |
The Cloud Manager dashboard opens.
|
4 |
Click Administration. |
The Administration dashboard opens.
|
5 |
On the Tasks view, click Create Instance Credential, and then click RSA Key from the prompted dialog box. |
The Add a New “RSA Key” Credential dialog box opens.
|
6 |
|
7 |
|
8 |
|
3 |
The Cloud Manager dashboard opens.
|
4 |
Click Administration. |
The Administration dashboard opens.
|
5 |
The Credentials dialog box opens.
|
6 |
The Assign Credential dialog box opens.
|
7 |
|
8 |
The Choose Instance Dialog box closes, and the selected instance appears on the EC2 Instances table. Click save. |
|
3 |
The Cloud Manager dashboard opens.
|
4 |
Click Administration. |
The Administration dashboard opens.
|
5 |
The Review License Usage dialog box opens.
|
6 |
The AWS license table shows the Account, Monitoring Agent, and Monitored Instance Count of your license.
|
7 |
Click the number in the Monitored Instance Count column. |
The Instances dialog box opens and shows the detailed information about all monitored instances.
If the number of monitored instance goes beyond your valid license, the following message will shows on the Cloud Manager dashboard: “Caution: Foglight Hybrid Cloud Manager is over-deployed by <number> monitored virtual machines. Please contact Quest to purchase additional licenses.”
Agents related commands
The Administration dashboard shows a list of existing agent instances and a set of agent management commands at the top of the list. Use it to verify that your agents are collecting data from the monitored environment.
The following commands are available:
|
• |
Add: Starts a workflow for creating new agent instances. For more information, see Creating an AWS Agent. |
|
• |
Refresh: Refreshes the list of agent instances and their states. |
|
• |
Activate: Activates one or more selected agent instances. Activating an agent instance starts the agent process on the machine on which the agent is installed. |
|
• |
Deactivate: Deactivates one or more selected agent instances. Deactivating an agent stops the agent process on the machine on which the agent is installed. |
|
• |
Start Data Collection: Starts the data collection for one or more selected agent instances. Starting an agent’s data collection causes the agent to begin monitoring the Hyper-V server and to send the collected metrics back to the Management Server. |
|
• |
Stop Data Collection: Stops the data collection for one or more selected agent instances. Stopping an agent’s data collection causes the agent to stop monitoring the Hyper-V server. |
|
• |
Edit Properties: Starts a workflow for editing the properties of one or more selected agent instances. Each agent comes with a set of properties that it uses to configure its correct running state. Editing agent properties . |
|
• |
Remove: Deletes the selected agent instance. |
|
• |
Update Agent: Updates the agent package to the latest version. |
|
IMPORTANT: Updating the agent package using this command generates the previously existing credentials. However, if you update the agent package by re-deploying its .gar file through the Agent Status page, the credentials need to be re-created. To do that, select an agent instance, click Edit Properties, and configure the required credentials on the Credentials tab of the Edit Tab Manager dialog box. |
Editing agent properties
|
3 |
Cloud Manager dashboard opens.
|
4 |
Click Administration. |
The Administration dashboard opens.
|
5 |
|
6 |
In the Edit Properties dialog box, edit the following properties, as needed. |
|
• |
Account Alias: The display name of this account. |
|
• |
Access Key ID: The access key retrieved in Getting authentication information through console. |
|
• |
Secret Access Key: The secret access key retrieved in Getting authentication information through console. |
|
• |
Collect Memory Metric: Select this option to enable the collection of instance memory metrics. The default value is disabled. |
|
• |
Collect Linux Volume Utilization: Select this option to enable the collection of Linux volume utilization. The default value is disabled. |
|
• |
Specify an agent name (Optional): Specify the name of agent. |
|
• |
Configure regions to be monitored (Optional): Select AWS regions for monitoring. All regions will be monitored if this field is not configured. |
|
• |
Select Virtual Machines to Monitor: Specify to monitor all virtual machines or only monitor specified instance. |
|
• |
If Monitor All is selected: By monitoring all virtual machines any virtual machine that is running in the monitored cloud will be monitored 24x7 consuming a monitored virtual machine license. Every virtual machine that is monitored will count against the purchased license pool. Any Monitored Virtual Machine that is above the purchased license limit will require an additional Foglight Hybrid Cloud Manager per Monitored Virtual Machine license. |
|
• |
If Monitor All is not selected: The following view appears on the bottom of the Selected IaaS Virtual Machines to Monitor dialog box. |

|
• |
If Automatically Monitor New Instances is selected, select instances that you do not want to monitor, and then click >> to move selected instances to the Removed from Monitoring table. |
|
• |
If Automatically Monitor New Instances is not selected, select instances that you want to monitor, and then click >> to move selected instances to the Virtual Machines Monitored by Foglight Hybrid Cloud Manager table. |
|
• |
If the Removed from Monitoring and Virtual Machines Monitored by Foglight Hybrid Cloud Manager tables are empty, and Automatically Monitor New Instances is not selected, the AWS agent will not collect any instance data. |
Configure the Cost Metrics collection. Collections will start only after the AWS Cost and Usage Report are created on the AWS Console. See To create an AWS Cost and Usage Report.
|
• |
Collect Cost Metrics: Select the check box to enable and configure the cost metrics collection. Collections will start only after the AWS Cost and Usage Report are created on the AWS Console. See To create an AWS Cost and Usage Report. |
|
• |
Account Id (12-digit number): See To get Account ID (12-digit number) to get this value. |
|
• |
S3 Bucket for Cost and Usage Report: Enter the name of your S3 bucket according to the AWS Cost and Usage Report setting. See To create an AWS Cost and Usage Report to get this value. |
|
• |
S3 Bucket Region for Cost and Usage Report: Select the region of your S3 bucket according to the AWS Cost and Usage Report setting. See To create an AWS Cost and Usage Report to get this value. |
|
• |
Cost and Usage Report Name: Enter the name of your AWS Cost and Usage report. See To create an AWS Cost and Usage Report to get this value. |
|
• |
Cost and Usage Report Path: Enter the Report path prefix according to your Report setting. The value of Cost and Usage Report Path will be blank, if you don't set the Report path prefix in AWS. See To create an AWS Cost and Usage Report to get this value. |
|
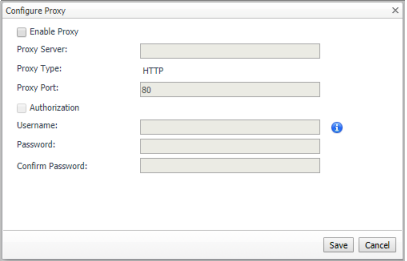
a |
Select the Enable Proxy check box to enable the proxy settings. |
|
b |
Input the host name or IP address for the Proxy Server and input the Proxy Port number. |
|
c |
If the proxy requires an authorization, select the Authorization check box, and input the Username and Password. |
|
7 |
Click Save. The Edit Properties dialog box closes and the list of agent instances automatically refreshes in the display area. |