Many of the SharePoint related actions available in the Content Matrix Console can be disabled on the server side. The table below lists the complete set of client actions that can be disabled from the server and provides the format of the action name required in the DisabledActions section of the ServerAdapaterCongifuration.xml file.
NOTE: When an action that is available via the client UI is disabled on the server, it will be visible in client menus but disabled.
|
Action |
Configuration File Format |
|---|---|
|
Change Global Navigation Settings |
Metalogix.SharePoint.Actions.Administration.ChangeGlobalNavigationAction |
|
Change Quick Launch |
Metalogix.SharePoint.Actions.Administration.ChangeQuickLaunchAction |
|
Create Folder |
Metalogix.SharePoint.Actions.Administration.CreateFolderAction |
|
Create List |
Metalogix.SharePoint.Actions.Administration.CreateListAction |
|
Create List From XML |
Metalogix.SharePoint.Actions.Administration.CreateListFromXMLAction |
|
Create Site |
Metalogix.SharePoint.Actions.Administration.CreateSiteAction |
|
Create Site Collection |
Metalogix.SharePoint.Actions.Administration.CreateSiteCollection |
|
Create Site Collection in Self-Service Mode |
Metalogix.SharePoint.Actions.Administration.CreateSiteCollectionSelfServiceMode |
|
Delete Discussion Item |
Metalogix.SharePoint.Actions.Administration.DeleteDiscussionItem |
|
Delete Item |
Metalogix.SharePoint.Actions.Administration.DeleteFolder |
|
Delete List |
Metalogix.SharePoint.Actions.Administration.DeleteItem |
|
Delete Site |
Metalogix.SharePoint.Actions.Administration.DeleteList |
|
Delete Site Collection |
Metalogix.SharePoint.Actions.Administration.DeleteSite |
|
Export Doc Items |
Metalogix.SharePoint.Actions.Administration.DeleteSiteCollection |
|
Publish Documents and Pages |
Metalogix.SharePoint.Actions.Administration.PublishDocumentsandPagesAction |
|
Update Site Collection Settings |
Metalogix.SharePoint.Actions.Administration.UpdateSiteCollectionSettingsAction |
|
Add Role Assignments |
Metalogix.SharePoint.Actions.Migration.AddRoleAssignmentsAction |
|
Copy Folder Permissions |
Metalogix.SharePoint.Actions.Migration.CopyFolderPermissions |
|
Copy Item Alerts |
Metalogix.SharePoint.Actions.Migration.CopyItemAlertsAction |
|
Copy List Alerts |
Metalogix.SharePoint.Actions.Migration.CopyListAlertsAction |
|
Copy List Permissions |
Metalogix.SharePoint.Actions.Migration.CopyListPermissions |
|
Copy List Role Assignments |
Metalogix.SharePoint.Actions.Migration.CopyListRoleAssignments |
|
Paste Web Parts |
Metalogix.SharePoint.Actions.Migration.CopyWebPartsAction |
|
Paste Master Page Gallery |
Metalogix.SharePoint.Actions.Migration.CopyMasterPageGalleryAction |
|
Paste Content Types |
Metalogix.SharePoint.Actions.Migration.CopySiteContentTypesAction |
|
Paste All Subsites |
Metalogix.SharePoint.Actions.Migration.CopySubSitesAction |
|
Copy Web Alerts |
Metalogix.SharePoint.Actions.Migration.CopyWebAlertsAction |
|
Copy Web Permissions |
Metalogix.SharePoint.Actions.Migration.CopyWebPermissions |
|
Paste Workflow Associations |
Metalogix.SharePoint.Actions.Migration.CopyWorkflowAssociationsAction |
|
Paste All List Items |
Metalogix.SharePoint.Actions.Migration.PasteAllListItemsAction |
|
Paste All List Items into Items View |
Metalogix.SharePoint.Actions.Migration.PasteAllListItemsIntoItemsViewAction |
|
Paste Audiences |
Metalogix.SharePoint.Actions.Migration.PasteAudiencesAction |
|
Paste Default Web Part Page |
Metalogix.SharePoint.Actions.Migration.PasteDefaultWebPartPageAction |
|
Paste Duplicate List |
Metalogix.SharePoint.Actions.Migration.PasteDuplicateListAction |
|
Paste Duplicate Site |
Metalogix.SharePoint.Actions.Migration.PasteDuplicateSiteAction |
|
Paste Folder |
Metalogix.SharePoint.Actions.Migration.PasteFolderAction |
|
Paste List |
Metalogix.SharePoint.Actions.Migration.PasteListAction |
|
Paste List as Folder |
Metalogix.SharePoint.Actions.Migration.PasteListAsFolderAction |
|
Paste List Email Notifications |
Metalogix.SharePoint.Actions.Migration.PasteListEmailNotificationAction |
|
Paste List Item |
Metalogix.SharePoint.Actions.Migration.PasteListItemAction |
|
Paste List Item into Items View |
Metalogix.SharePoint.Actions.Migration.PasteListItemIntoItemsViewAction |
|
Paste My Sites |
Metalogix.SharePoint.Actions.Migration.PasteMySitesAction |
|
Paste Navigation |
Metalogix.SharePoint.Actions.Migration.PasteNavigationAction |
|
Paste Roles |
Metalogix.SharePoint.Actions.Migration.PasteRolesAction |
|
Paste Site |
Metalogix.SharePoint.Actions.Migration.PasteSiteAction |
|
Paste Site Collection |
Metalogix.SharePoint.Actions.Migration.PasteSiteCollectionAction |
|
Paste Site Content |
Metalogix.SharePoint.Actions.Migration.PasteSiteContentAction |
|
Paste Site Lists |
Metalogix.SharePoint.Actions.Migration.PasteSiteLists |
|
Remove Role Assignments |
Metalogix.SharePoint.Actions.Migration.RemoveRoleAssignmentAction |
|
Event Suppression |
Metalogix.SharePoint.Actions.Migration.SuppressEvents |
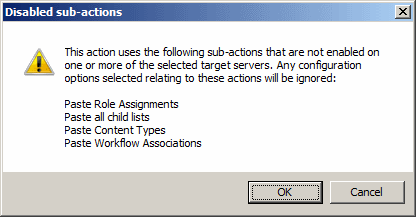
Note that many of the above listed actions are used by other actions. When a given action is enabled, but one or more of its sub-action is disabled, the sub-actions will not run. When a user attempts to run an action for which sub-actions are disabled, they will be notified with a dialog similar to the following:
Content Matrix uses a set of configuration variable files behind the scenes to help set and manage settings for all of the Content Matrix Editions. This section explains what the configuration variable files are, their general behavior, and where to find them.
Configuration variables are contained in the following three files:
·EnvironmentSettings.xml
·UserSettings.xml
·ApplicationSettings.xml
Some settings can be configured for all Product Editions, while other settings are limited to individual Product Editions.
Any settings that are configured in multiple files will be scoped to the lowest level (either in the "UserSettings.xml" file or the "ApplicationSettings.xml" file), including values that are pulled from the old EnvironmentSettings.xml file.
IMPORTANT: Make sure the Content Matrix Console is closed when making updates to configuration variable files.
This file allows users to configure general settings for all Product Editions. This means that these settings only need to be set in a single file, either for all users of the machine (if users are required to be local administrators) or for each individual user of the machine (if users are not required to be local administrators) and can be found in one of the following locations:
·If you are required to be a local administrator on the machine where Content Matrix is installed: C:\ProgramData\Metalogix
OR
·If you are not required to be a local administrator on the machine where Content Matrix is installed: C:\Users\<username>\AppData\Roaming\Metalogix\Common
UserSettings.xml File
This file allows users to configure general settings for all Product Editions for a specific user account (the logged in account). This means that these settings will be configured for all Product Editions, but only for the current user account. If another user would like to configure these same settings to work for them, they must be configured manually under the appropriate user account. It can be found in the following location:
C:\Users\<USER>\AppData\Roaming\Metalogix
This file allows users to configure settings that are limited to the specific Product Edition of Content Matrix Console, for a specific user account (the logged in account). This means that each Product Edition, for every user account, must be configuredindividually. While the "ApplicationSettings.xml" file for each Product Edition can contain some of the same settings, there are some settings that are Edition specific (for example, some settings may only work for SharePoint Edition, so they will only be available in SharePoint Edition). Any settings that are replicated through various version of the file will only be applied to the specific Edition.
For example, the "AllowCheckResults" setting is available in every "ApplicationSettings.xml" file, but it must be set on an individual Product Edition basis. Setting it for SharePoint Edition will not configure it for Public Folder Edition. It can be found in the following location:
C:\Users\<USER>\AppData\Roaming\Metalogix\Content Matrix Console - <Product> Edition.
For an individual Content Matrix Console instance, you can Configure Settings for Migrations Using the Import Pipeline.
Content Matrix has various XML properties that can be modified to fine-tune or help troubleshoot your Import Pipeline migrations. These properties can be found in the EnvironmentSettings.xml file.
NOTE: You can also contact Quest Support for assistance in identifying and resolving issues with migrations using the Import Pipeline. For a list of supported migration actions, see Objects and Actions Supported for Using the Import Pipeline.
The following XML properties can optionally be modified. However, it is generally recommended to not modify these values unless you are encountering issues when migrating using the Import Pipeline.
UploadManagerBatchSizeItemThreshold
This key controls the maximum batch size in item count, including all folders and documents, to be used if Content Matrix will be submitting batches according to number of items. The default value is 200 and the value must be a positive integer.
<XmlableEntry>
<Key>UploadManagerBatchSizeItemThreshold</Key>
<Value>200</Value>
</XmlableEntry>
UploadManagerBatchSizeMBSizeThreshold
This key controls the maximum batch size to be used if Content Matrix will be submitting batches according to size. The default value is 1000 megabytes and the value must be a positive integer. The value should be set carefully, taking into consideration factors such as total upload bandwidth, speed of data retrieval from the source system, and so on.
<XmlableEntry>
<Key>UploadManagerBatchSizeMBSizeThreshold</Key>
<Value>1000</Value>
</XmlableEntry>
MaxAzureBatchRetryCount
This key controls the maximum number of times Content Matrix will resubmit the batch until it is successfully migrated. (The default value is 5.)
<XmlableEntry>
<Key>MaxAzureBatchRetryCount</Key>
<Value>5</Value>
</XmlableEntry>
ErrorMessagesForRetryAzureBatch
This key specifies error conditions for which you want Content Matrix to resubmit a batch, when it normally would not.
NOTE: Separate multiple error messages with a pipe character (|), as shown in the example below.
<XmlableEntry>
<Key>ErrorMessagesForRetryAzureBatch</Key>
<Value>Item does not exist|Object Reference Not Set</Value>
</XmlableEntry>
Performance Settings
BufferSizeForPipelineMigrationInMb
This key controls the buffer size while uploading files to Azure Storage Account Containers using the Import Pipeline. The default value is 64, which means, for example a 128 MB file will be uploaded in two parts, 64 MBs at a time. The lower buffer size, the more quickly the computer processor handles the information. Keep in mind that the higher the value, the more system resources will be consumed.
<XmlableEntry>
<Key>BufferSizeForPipelineMigrationInMb</Key>
<Value>64</Value>
</XmlableEntry>
MaxParallelUploadFilesInPipeline
This key controls the number of files uploaded in parallel to Azure Storage Account Containers when using the Import Pipeline. The default value is 2, which means a maximum of two files can be uploaded in parallel. Keep in mind that the higher the value, the more system resources will be consumed.
<XmlableEntry>
<Key>MaxParallelUploadFilesInPipeline</Key>
<Value>2</Value>
</XmlableEntry>
UploadManagerMaxRetryCountThresholdForJobResubmission
WARNING: This value should not be changed unless absolutely necessary.
This key controls the amount of time to wait for a response from the reporting queue before re-requesting a migration job. This value is specified in multiples of 15 seconds, meaning that the default value of 960 corresponds to 4 hours and the minimum value of 120 corresponds to 30 minutes. This value must be a positive integer greater than or equal to 120.
<XmlableEntry>
<Key>UploadManagerMaxRetryCountThresholdForJobResubmission</Key>
<Value>960</Value>
</XmlableEntry>
Temporary Storage Location
UploadManagerLocalTemporaryStorageLocation
This key indicates the directory in which the temporary binary files and manifest XML files for each batch are saved. If no filepath is specified, the default file path is used.
<XmlableEntry>
<Key>UploadManagerLocalTemporaryStorageLocation</Key>
<Value>C:\ProgramData\Metalogix\Temp folder sample</Value>
</XmlableEntry>