The following permissions are required for accounts used to perform typical Client Profile Updating Utility tasks:
- Full Access on every mailbox in the source and target organizations to process profiles. See Specific case considerations for linked mailbox, shared folders, and for migration to Microsoft Office 365.
- Send As on every mailbox for administrative account in case you are planning to configure notifications.
Office 365
To grant Full Access and Send As permissions to to service account "CPUUAdmin" for all mailboxes on your Office 365 tenant you can use Add-MailboxPermission and Add-RecipientPermission PowerShell cmdlets:
$credential = Get-Credential
$exchangeSession = New-PSSession -ConfigurationName Microsoft.Exchange -ConnectionUri "https://outlook.office365.com/powershell-liveid/" -Credential $credential -Authentication "Basic" -AllowRedirection
Import-PSSession $exchangeSession -DisableNameChecking
Get-Mailbox | Add-MailboxPermission -User "CPUUAdmin" -AccessRights FullAccess -InheritanceType All -AutoMapping $false
Get-Mailbox | Add-RecipientPermission -Trustee "CPUUAdmin" -AccessRights SendAs
On-premises environment
To grant Full Access and Send As permissions to service account "CPUUAdmin" for all mailboxes in your environment you can use Add-MailboxPermission and Add-ADPermission powershell PowerShell cmdlets.
Get-Mailbox | Add-MailboxPermission -User "CPUUAdmin" -AccessRights FullAccess -InheritanceType All -AutoMapping $false
Get-Mailbox | Add-ADPermission -User "CPUUAdmin" -ExtendedRights "Send As"
|

|
TIP: To avoid any access issues for specified administrative account, it is recommended to create a source and a target Outlook profile for one mailbox, and then, in Outlook, log on to these profiles using this administrative account. In case the selected account has not enough access permission, Client Profile Updating Utility cannot update the profiles. |
Full Access permission allows to sign in to all mailboxes by using Outlook. For more information, see the Manage permissions for recipients article. However, Full Access permission do not let the service account to send notifications from the owner of the mailbox. Send As permission should be granted separately in case you are planned to send notifications from the owner of the mailbox.
Specific case considerations
Shared folders
In case Use the currently logged in user or Prompt for credentials options are selected, to process shared folders of other users in a profile shared folders, accounts under which CPUU connects to source and target mailboxes must have the Full Access permission on the mailboxes of other users in the source and target organizations, respectively.
Linked mailboxes
In case you have linked mailbox in target and the Source credentials will be used for access to target mailbox option is selected, the source account should have Full Access permission on the target mailbox.
Migration to Microsoft Office 365
For migration scenarios to Microsoft Office 365, the Use the currently logged in user option is not supported. Use the Prompt for credentials option to specify the user account under which CPUU will run. That also includes configurations with Single Sign-On (SSO) enabled, where sign on to Microsoft Office 365 under account of the logged-in user without prompting user credentials is not supported due to Microsoft Outlook restrictions. Microsoft Outlook cannot log on to the Office 365 mailbox without providing account credentials even if the federated user account is used. For more details, see the following article: https://technet.microsoft.com/en-us/library/office-365-user-account-management.aspx .
It is recommended that all the preparations needed for updating client mailbox profiles be made before the mailboxes are switched to the target Exchange server by the Mail Agent. The basic workflow for switching the mailboxes and updating client profiles is described below:
To configure the Client Profile Updating Utility to process the Microsoft Outlook profiles, perform the following steps:
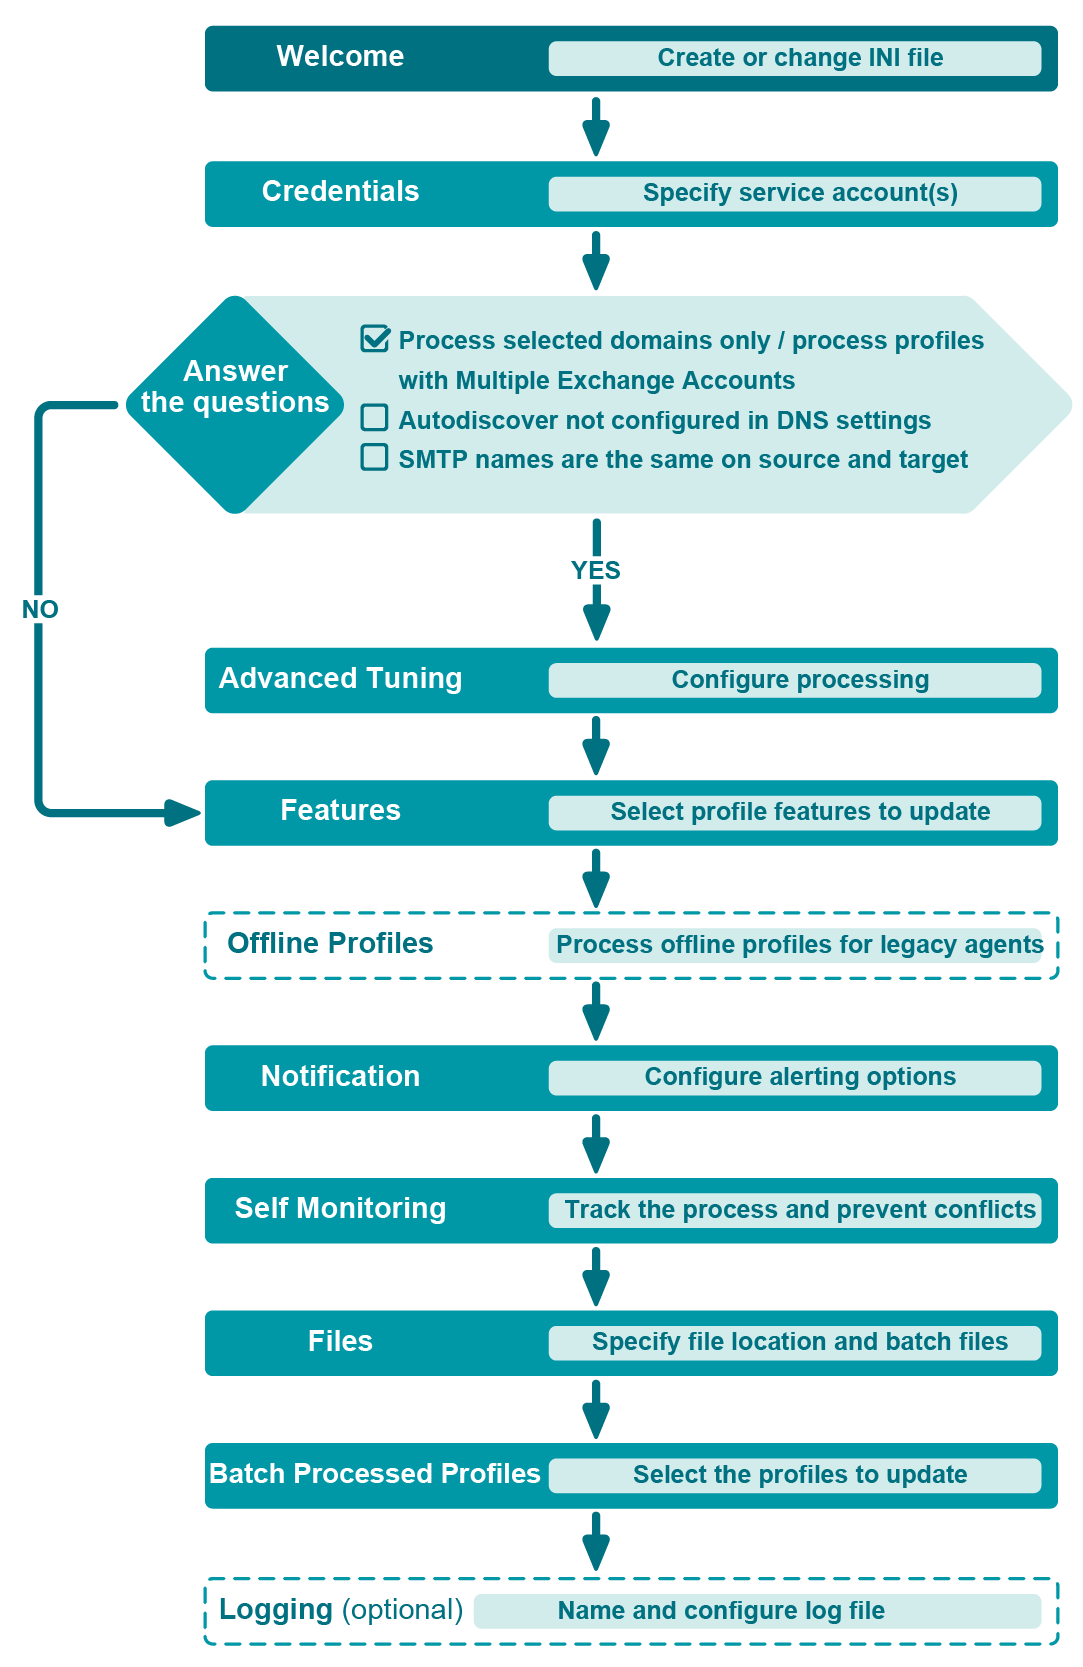
Step 1. Run the Client Profile Updating Utility Configuration wizard
- On the Welcome step, select whether you want to create a new configuration file or load an existing one.
- On the Credentials step, specify an account under which CPUU will log on to the source and target mailboxes. Required permissions for the account are described in Required Permissions.The following options are available on this step:
- Use the currently logged in user
The account of the user that log on to the workstation where CPUU will run. Please note this option may not be supported for Office 365 environments.
Force CPUU to prompt the user for credentials to access the source and target mailboxes. In case you have linked mailbox in target you can select Source credentials will be used for access to target mailbox check box to avoid multiple CPUU credential requests.
- Manually provide credentials
This option lets you specify credential to access the source and target mailboxes, or two different credential: one for the source mailbox and another for the target mailbox (if trust relationships are not established between the source and target domains) in the INI file. It is recommended to select safe restricted options here. For more details refer to Encryption Modes.
- On the Advanced Tuning step, you provide information that is necessary for the successful profile processing in any of the following specific cases:
- In case you want to limit processing scope or there are profiles with multiple Exchange accounts, Process profiles from specified domains only (required for profiles with multiple Exchange accounts) option should be selected. In this case you should provide list of SMTP domain names for all user and public folder SMTP names that should be processed. For example, domain.local.
- To ensure Autodiscover service access in environments, where DNS is not configured, it is recommended to select Manually configure Autodiscover service URL(s) in case it is not properly configured in DNS settings. In this case you should provide Autodiscover service URL for source, for target, or both.
- To process environments where domain part of SMTP addresses match, select Process profiles in case of same source and target domain parts of SMTP addresses. In this case you should provide list of SMTP domain names for all user and public folder SMTP names that should be processed and both Autodiscover Service URLs.
In case Test Autodiscover service availability when Next is clicked option is selected, the wizard verify that the specified Autodiscover services are available on the provided URLs. Wizard does not check the credentials are valid to use these services. This option is optional. Do not select this option for the case the Autodiscover services are not available at the moment.
- On the Features step, select the profile features you want to be updated.
- Use the Offline Profiles step if you want CPUU to process offline Outlook profile. This step is required for legacy agents only. Select whether the offline profiles should be processed always or only when the OST file can be kept. For more information about processing offline profiles, please refer to the Updating Microsoft Outlook Offline Profiles topic.
- If you want CPUU to display a verbose progress bar to user, select the Display progress bar and warnings to users check box on the Notification step. Note that the most critical warnings will be displayed even if the check box is not selected. For example, if you force CPUU to prompt for credentials, the dialog box for entering credentials will be displayed. On the Notification step, you also can specify whether you want to receive e-mail notifications about the profile updating progress.:
- Select whether a notification should be send each time a profile is updated or only when CPUU could not update a profile.
- Specify an e-mail address or addresses to which the notifications should be sent.
- Select what information should be attached to the notification. You can select to attach a summary or a full log file. If you choose not to include any attachments, the minimum necessary information will still be included in the subject and body of the notification message (if you do not change their default templates). By default the subject and the body of the notification message contain the following information:
Subject: %R: Profile %P on computer %H
Body: The mail client profile %P for user %U on computer %H has been processed by Client Profile Updating Utility (CPUU), and was %R. The profile was processed at %T, %D. See the CPUU log file for details.
Variables stand for the following information:
| %R |
UPDATED or NOT UPDATED |
| %P |
Name of the profile |
| %H |
Name of the computer where the profile was updated |
| %U |
Name of the user whose profile was updated |
| %T |
Time of the profile update |
|
%D |
Date of the profile update |
For more information about the notification message format, refer to the Technical Reference topic.
- On the Self Monitoring step, you can specify troubleshooting and conflict prevention options.
- On the Files step, you can select the batch files you want to create (CPUU_Update.bat, CPUU_Rollback.bat, CPUU_Cleanup.bat) and specify the location of the configuration file (CPUU.ini) with the parameters you have supplied. These files will be used to start CPUU in order to update profiles, roll back changes made by CPUU and clean up information saved by CPUU.
- On the Batch Processed Profiles step, select the profiles to be updated by CPUU using specified batch files. You can choose to process all profiles, select particular profiles or update only the default profile. This step is disabled if CPUU_Update.bat and CPUU_Rollback.bat are not created on the Files step.
- On the Logging step, you can specify a name for the CPUU log file that will help you to find required information during troubleshooting.
This step is disabled if you do not create batch files for the utility on the Files step.
The default name of the log file is CPUU_#h_#d_#t.log, where:
- #h - name of a computer
- #d - date when the file was created
- #t - time when the file was created
Alternatively, you can use the existing environment variable values to form the CPUU log file name. For example, you can add the logged-in username to the name of the log file by typing the following expression in the Log file box:
%username%_CPUU.log
The %username% parameter will be substituted with the real user name in whose security context CPUU starts.
It is also recommended that you configure CPUU to put log files to a network share where these files can be reached by administrators. In this case, use the UNC path syntax to specify the log file name, for example:
\\Servername\Sharename\%username%_CPUU.log
Note that users must be granted at least Write permission to put CPUU log files to the share.
Adding Files to the Logon Script
- Add all the Client Profile Updating Utility files to the folder that is used by the logon script. All the files are located in the %Program Files%\Quest\Client Profile Updating Utility folder by default, as follows:
- ClientProfileUpdatingUtility.exe
- ClientProfileUpdatingUtility_x64.exe
- DlgHookHandler.dll
- DlgHookHandler_x64.dll
- An INI file created by the wizard (CPUU.ini by default)
- A BAT file created by the wizard for updating profiles (CPUU_Update.bat by default)
- Include CPUU_Update.bat in the logon script.
Then, as soon as the mailboxes are switched and the users log on to their network, the Client Profile Updating Utility will start processing their profiles.
Step 2. Switch Mailboxes
As soon as CPUU is configured and ready to be started, you can start switching the source mailboxes to the target Exchange servers. For more information, please refer to the relevant Migration Manager for Exchange documentation.
Step 3. Update Profiles
As soon as the mailboxes are switched, CPUU will start updating user profiles. Wait while all profiles are updated.
Step 4. Perform Cleanup
After the migration has been completed, all profiles have been successfully updated, and you are absolutely sure that no rollback is required, you can run CPUU_Cleanup.bat that was created together with CPUU_Update.bat.
If users or public folders have the same source and target SMTP addresses, Autodiscover may return wrong mailbox configuration. To process the profile, CPUU requires additional configuration. Select Process profiles in case of same source and target domain parts of SMTP addresses option on Advanced Tuning step of the configuration wizard to provide required data. See Typical Scenariofor details.
After CPUU successfully finishes profile processing, Outlook configuration will point to target Autodiscover service URL. Otherwise, it will point to source Autodiscover service URL.
|
|
IMPORTANT: If the user has multiple Exchange profiles for the same mailbox, processing a single profile with CPUU might result in other ones to be automatically reconfigured by Outlook Autodiscover. The reconfiguration only happens when an unprocessed profile is opened in Outlook. For further details on Outlook Autodiscover, refer to outlook-2016-implementation-of-autodiscover. |
If you manually specify an account for profile update, the credentials are encrypted and stored in CPUU configuration file (CPUU.ini). To ensure that the stored credentials are not compromised, you can specify the conditions under which they can be decrypted:
- Restricted to the current user and host (intended for SwitchResMb)
Credentials can only be decrypted for profile processing only under logon sessions of the user who ran Configuration Wizard and created CPUU configuration file and only on the host where CPUU configuration file has been created.
|
|
NOTE: The only exception is a roaming user profile – in this case, the credentials can be decrypted for profile processing on all hosts where the roaming profile is valid. |
- Restricted to the current host (intended for SwitchResMb)
Credentials can be decrypted for profile processing under logon session of any users but only on the host where CPUU configuration file has been created.
- Unrestricted (not recommended, security risks should be reviewed)
Credentials can be decrypted for profile processing without any restrictions by user or by host where CPUU configuration file has been created. While we have implemented the reliable encryption algorithm, it is theoretically possible to reverse-engineer CPUU code and use the knowledge to decrypt credentials data.
|

|
Caution: Never use this mode in production environment and never use it in conjunction with administrative credentials! It is recommended for isolated test lab. |
|
|
TIP: Restricted to the current host is the most suitable encryption mode for simultaneous mailbox processing with SwitchResMB on same host under different logon sessions. |

