Performance Counters
Performance counters keep track of statistics during test execution. By default the following performance counters are recorded when a job executes, even though they do not display in the Performance Counter tab for a connection or job.
- AVG_TIME
- BPS
- DEADLOCKS
- TOTAL_ERRORS
- MAX_TIME
- RPS
- TOTAL_BYTES
- TOTAL_ROWS
- TPS
- USERLOAD
You can add performance counters to a connection or a job.
To add performance counters to a connection
- In the New Connection dialog when creating a new connection (or the Connection dialog for an existing connection), select the Performance Counters tab.
- To add a new counter, click
.
- Select a computer from the drop-down list.
- To display counters, expand an object node by clicking the node's down-arrow.
- Select one or more counters and click Add.
- When you have finished adding counters, click Close to close the Browse Performance Counters dialog.
- To delete a counter, select the counter and click
.
Oracle Statistics Collection
Benchmark Factory allows you to specify statistic collection options individually for each Oracle connection.
You can also specify default statistics collection options for all Oracle connections through the Settings dialog. Go to Edit | Settings | Oracle.
To specify statistics collection options for an Oracle connection
- In the New Connection dialog when creating a new connection (or in the Connection dialog for an existing connection), select the Statistics tab.
- Select one of the following:
- Statspack Options—Collect database-wide performance statistics using the Oracle Stats Pack utility.
-
AWR and ADDM Options—Collect database-wide performance statistics using the optional Oracle Enterprise Manager (OEM) “Diagnostic Pack” Automatic Workload Repository (AWR).
Note: A valid licenses is required to use the optional OEM Diagnostics Pack.
Tip: You can also specify default settings for Oracle performance collection and reporting options. Go to Edit | Settings | Oracle.
Oracle Clustering Options
Clustering is the process of using two or more computer systems that work together. Multiple servers are linked to handle variable workloads or to provide continued operation in the event one fails. Computers may be multiprocessor systems. A cluster of four computers with four CPUs each provides a total of sixteen CPUs processing at one time.
Use the Clustering tab in the Connection dialog of an Oracle connection to enable clustering. This allows you to perform Oracle Real Application (RAC) Testing.
To enable clustering for an Oracle connection
- In the Connection dialog, after entering connection information, select the Clustering tab.
- Select the Enable Clustering checkbox.
- Specify the number of nodes and then the percentage of users that will hit a particular node. See Real Application Clustering (RAC) Load Testing for more information.
- Click OK to save your changes.
Configure RAC Load Testing
Oracle uses clustering to allow one database to span multiple resources. Benchmark Factory can simulate user activity on these systems.
Performing Oracle RAC testing in Benchmark Factory requires the following steps:
Setting up the tnsnames.ora file
- Navigate to the tnsnames.ora file located in the Oracle directory. Transparent Network Substrate (TNS) is Oracle's networking architecture. TNS provides a standard application interface that enables network applications to transparently access underlying network protocols.
- Open the file in a text editor. Edit the tnsnames.ora file to set up clustering connections.
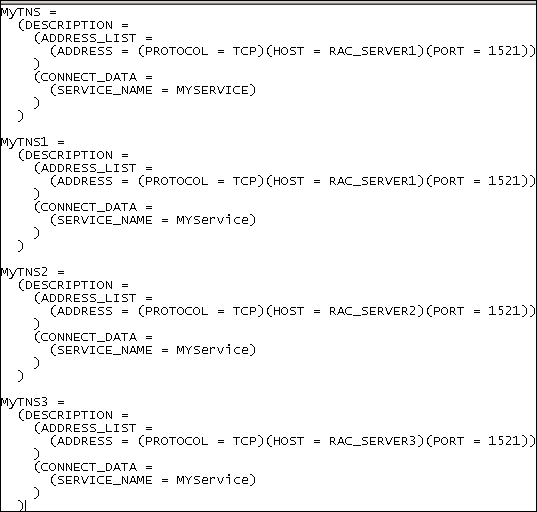
- For the first entry, the Net Service Name (in this example MyTNS) is used to define the root Net Service Name. The root Net Service Name is not used when running a test.
-
The remaining Net Service Names must be named with the root and a number. In this example, MyTNS is the root and MyTNS1, MyTNS2, and MyTNS3 will be used when the test is run. The "MyTNS" and "MyTNS1" connections are duplicates and are required for Benchmark Factory to perform load testing. “MyTNS2” and “MyTNS3” are for the other two machines in the cluster.
The following provides an example of a tnsnames.ora file set up for a three node cluster.
Creating the Benchmark Factory clustering connection
- Click New Connection in the main toolbar.
- Select Oracle from the drop-down list.
-
Enter the connection information. See Create Oracle Connection for more information.
Note: The Net Service Name reflects the same entry as the first entry in the tnsnames.ora file.
- After entering the connection information, select the Clustering tab.
- Select the Enable Clustering checkbox. The number of default nodes displayed is 2.
- Enter the desired number of nodes in the Number of Nodes. For this example, we have 3 nodes. The following provides the mapping structure from the Benchmark Factory nodes to the tnsnames.ora file.
- Node 1 = MyTNS1
- Node 2 = MyTNS2
- Node 3 = MyTNS3
- Next, you need to set up the percentage of users that will hit a particular node. Click inside the Percentage Column for each node and enter the desired percentage of users that will hit that particular node.
- Click OK to save your changes. The Oracle RAC Clustering has been set up and is ready to run.

