When you have completed the pre-migration preparations described in this chapter, go to Batch migration process, and/or see chapter 4 for information about SSDM (per-desktop) migration.
Migrator for Notes to Exchange includes two migration engines:
|
• |
The Data Migration Wizard migrates batches of users simultaneously, performs important administrative functions (mailbox creation, routing updates, etc.), and also migrates public distribution lists. |
|
• |
The Self-Service Desktop Migrator (SSDM) runs in memory on an end-user local workstation and migrates content for one user. SSDM streamlines the process of migrating local content, reduces burden on the migration team, and includes a Silent Mode to minimize end user interaction and requirements. |
Either migration engine can be used independently for the entire data migration, or the two may be used together to meet a variety of project requirements, as discussed in the Pre-Migration Planning Guide (see the Batch vs. Per-Desktop Migration topic in chapter 3).
This section provides process instructions for the batch-migration portion of a migration to Office 365 where an administrator uses the Data Migration Wizard to perform the migrations for multiple batches (collections) of users. SSDM (per-desktop) migration, described in chapter 4, can also be part of your Migration Plan.
|
NOTE: Do not begin the batch-migration process until you have completed all the Pre-migration preparations described earlier in this chapter. |
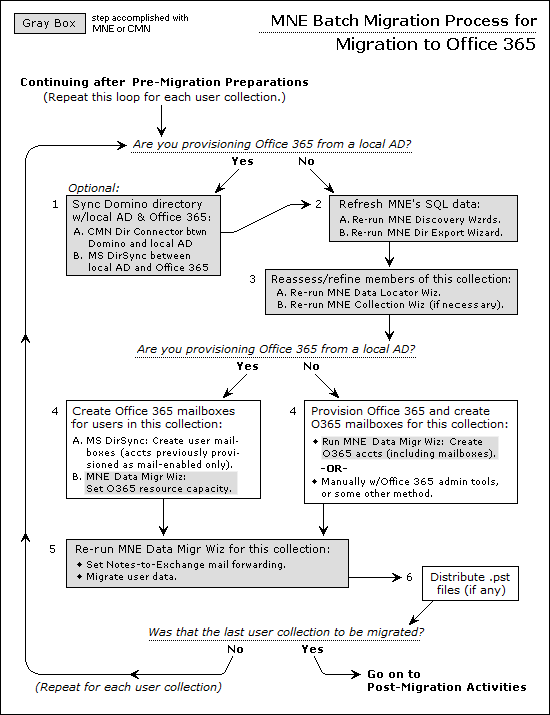
This batch-migration procedure is repeated for each user collection to be migrated as shown by the looping arrow in the flow chart.
|
NOTE: Notes groups (distribution lists) are typically migrated separately after all users have been migrated. The Post-migration activities described at the end of this chapter include the migration of groups. |
|
|
Conditional Step: Applies only if you provisioned Office 365 from a local AD, and used Quest CMN when provisioning your local AD, in which case this step is optional but recommended. Otherwise, skip to the next step. |
Many organizations experience staff additions and departures during a migration transition period and employees move from one office to another or are promoted or reassigned. Directory changes that occur during the migration project after the initial directory updates in the Pre-Migration Preparations can introduce data inconsistencies between the source and target environments. You can reconcile these differences using a “two-step” directory update between Domino and Office 365:
|
1 |
Configure the CMN Directory Connector for bidirectional updates between Notes and the local Active Directory. For details, see the Directory Connector chapter in the Coexistence Manager for Notes User Guide. |
|
NOTE: An object that is synchronized to Office 365 with proxyAddresses will lose the proxyAddress upon the next synchronization if the UPN is changed to match the Office 365 login—which disables mail routing from Domino to Exchange. |
