If you will provision the hosted AD from a local AD: It is important to verify the matching criteria for the object-merge process (in a later step). A unique matching attribute is required to match each Notes user to the corresponding security object in AD. A matching attribute may already be available, or a custom attribute can be populated in the Domino Directory and extracted, or a matching attribute can be populated into the MNE SQL database via TSV export/import.
If mail-enabled users already exist in a local proprietary Active Directory: Ensure the address listed in the exported TargetAddress column is appropriate. With existing mail-enabled users, Migrator for Notes to Exchange uses the TargetAddress to locate the AD object for mailbox creation. The value of the TargetAddress in the SQL database must match a valid SMTP address on the target mail-enabled object. Also, the TargetAlias addresses will be applied as secondary/proxy addresses, so it is important to verify them before proceeding.
Many of the Migrator for Notes to Exchange wizards are applied to particular user collections: user-defined subsets of the total universe of Notes users to be migrated. For example, in the batch migration of users by the MNE Data Migration Wizard, the batches are defined by the user collections.
User collections can come in all sizes, from a single user up to the entire universe of users all in a single collection. Collections typically number a hundred or so users per batch when migrating to a local proprietary Exchange, but often are much smaller when migrating to Office 365. The Migrator for Notes to Exchange Pre-Migration Planning Guide (see Batch vs. Per-Desktop Migration in chapter 3) explains how target type influences the optimum number of users per collection, and why it is important to devise a grouping strategy for defining collections—to specify number of users per collection, grouping method, and migration scheduling.
Use the Collection Wizard now to define your user collections. Remove any objects from collections that you do not want to provision into the target AD. Chapter 5 of the Migrator for Notes to Exchange Administration Guide provides instructions and application notes for the Collection Wizard.
|
NOTE: Notes groups (distribution lists) are usually defined and migrated separately, after all users are migrated. The Post-migration activities at the end of this chapter include the definition of group collections and migration of groups. |
|
|
Conditional Step: This step applies only if your Notes environment uses any non-standard design classes. |
The MNE Notes Migration Manager (the MNE console) lets you identify any non-standard Notes design classes that are associated with Notes NSF files, but that the wizards would not recognize because the names are different from the Notes-standard design classes. The Design Classes table in Notes Migration Manager enumerates all such non-standard design classes, and associates each design class with one or more particular data types: mail, archives, or PABs. If the Data Migration Wizard or SSDM finds an NSF file that doesn’t match any of the program's default design classes for archive, mail or PAB files, the program will look at these tables to find an alternate design class, and thereby determine the file type.
If your Notes environment has any non-standard design classes, use the Manage Design Classes screen in Notes Migration Manager to define them now, as part of this collection-definition step. This feature is fully documented in the Migrator for Notes to Exchange Administration Guide, chapter 1 (see User Collections: Manage Design Classes).
|
|
Conditional Step: This step and the next apply only if you intend to provision Office 365 from a local proprietary AD. If you are provisioning Office 365 by Migrator for Notes to Exchange or some other method, the provisioning must occur in the Batch migration process later in this chapter. For now, skip to step 13. |
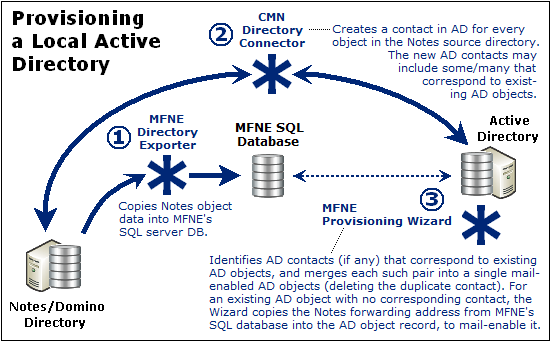
Quest recommends this process to provision a local Active Directory (after the directory export):
|
1 |
Synchronize the Notes/Domino directory with the local AD. Quest recommends using the CMN Directory Connector to perform a bidirectional update between the Domino directory and Active Directory. Other tools and methods are also possible, but CMN was designed to complement the Migrator for Notes to Exchange tools. This synchronization extracts user data from the Notes source and creates corresponding mail-enabled contacts in AD, and vice-versa, to update both directories with routing objects corresponding to the users in the other system (to establish complete directories). |
|
2 |
Run the MNE Provisioning Wizard for all user collections to consolidate any contact/object duplicates in AD and to mail-enable objects that are already in AD. The Provisioning Wizard merges the contact information into the original corresponding AD object record, and deletes the contact, leaving a single mail-enabled object in AD for each Notes user. If contacts are not added to AD for directory coexistence, the Provisioning Wizard can (without contacts) mail-enable the existing AD security principals. When no corresponding contacts exist in AD, the wizard pulls attributes and addresses from the MNE SQL database to mail-enable objects. |
|
3 |
Verify Notes forwarding addresses. A merged AD object address attribute tells future CMN directory updates to not re-copy the corresponding Notes object. The routing addresses must be verified before you continue this process. |