Chat now with support
Chat with Support

NetVault 11.4.5 - Administration Guide

Introduction Getting started Configuring clients Configuring storage devices Backing up data Managing policies Restoring data Managing jobs Monitoring logs Managing storage devices
Monitoring device activity Managing disk-based storage devices in table view Managing disk-based storage devices in tree view Managing tape libraries in table view Managing tape libraries in tree view Managing tape drives in table view Managing tape drives in tree view Adding shared devices
Managing storage media Managing user accounts Monitoring events and configuring notifications Reporting in NetVault Backup Working with client clusters Configuring default settings for NetVault Backup
About configuring default settings Configuring encryption settings Configuring plug-in options Configuring default settings for post-scripts Configuring default settings for Verify Plug-in Configuring Deployment Manager Settings Configuring Job Manager settings Configuring Logging Daemon settings Configuring Media Manager settings Configuring Network Manager settings Configuring Process Manager settings Configuring RAS device settings Configuring Schedule Manager settings Configuring Web Service settings Configuring Auditor Daemon settings Configuring firewall settings Configuring general settings Configuring security settings Synchronizing NetVault Time Configuring default settings for global notification methods Configuring the reporting utility Configuring NetVault Backup to use a specific VSS provider Configuring default settings using Txtconfig
Diagnostic tracing Managing diagnostic data Using the deviceconfig utility NetVault Backup processes Environment variables Network ports used by NetVault Backup Troubleshooting

Creating restore jobs

You can use the restore job wizard to create and submit restore jobs. The wizard can be accessed from the Create Restore Job link in the Navigation pane.

4
In the Navigation pane, click Create Restore Job.
On the Create Restore Job — Choose Saveset page, the saveset table provides a list of available savesets.

Saveset is online (all segments are online).

Saveset is partially online (some segments are online).

Saveset is offline (all segments are offline).

Table 43. Saveset filters

Client

Displays savesets created for particular clients.

Click the Client box.
In the Choose Client dialog box, select the client.
Click OK to close the dialog box.

Plugin Type

Displays savesets created using a particular plug-in.

Click the Plugin Type box, and in the list, select the plug-in.

Date

Displays savesets created during a specified period.

Click the Date box, and in the list, select the option that you want to use. The available options are Last 24 hours, Last Week, Last Month, Last 6 Months, Last Year, and Any.

Job

Displays savesets created for particular jobs.

Click the Job box, and in the Choose Job dialog box, select the jobs. Click OK to close the dialog box.
6
The Create Restore Job — Choose Saveset page loads a maximum of 5000 records initially. The total number of records fetched is displayed at the lower-right corner of the table.
You can click Load more to load the next set of records, if available. Each load action fetches a maximum of 5000 records. This button is disabled if there are no more records to load.
NOTE: If the online backup index is unavailable for the selected saveset, the Confirm load dialog box is displayed. To load the index from the backup media, click OK, and then in the Load Index dialog box, type or select the number of days you want to store the index in the NetVault Database.
When you select a saveset, the following details are displayed in the Saveset Information area: job ID number, job title, tag, server name, client name, plug-in name, saveset date and time, retirement setting, Incremental Backup or not, archive or not, and saveset size.
8
On the Create Selection Set page, select the items that you want to restore.
9
Click Edit Plugin Options, and configure the options that you want to use.
Click Next.
10
On the Create Restore Job page, specify a name for the job. Assign a descriptive name that allows you to easily identify the job for monitoring its progress.
11
In the Target Client list, select the restore target. To restore data to the same client (from which data was backed up), use the default setting.
To restore data to an alternate client, select the target client in the list. Alternatively, click Choose. In the Choose the Target Client dialog box, select the client, and click OK.
12
In the Schedule list, select an existing Schedule Set, or click Create New, and configure the schedule type and schedule method. For more information. For more information, see Creating Schedule Sets.
The predefined set “Immediate” is selected by default. To run the job as soon as it is submitted, use this set.
13
In the Source Options list, select an existing Source Set, or click Create New, and configure the source device options. For more information, see Creating Source Sets for restore jobs.
The predefined set “Any Device” is selected by default. To select any available device for the job, use this set.
14
In the Advanced Options list, select an existing Restore Advanced Options Set, or click Create New, and configure the options that you want to use. For more information, see Creating Restore Advanced Options Sets.
The predefined set “Restore from selected backup” is selected by default.
15
Click Submit to submit the job for scheduling.
You can monitor the job progress from the Job Status page and view the logs from the View Logs page. For more information, see Viewing job activity and Viewing log messages.

Restoring data using an existing Restore Selection Set

You can use the following procedure to restore data using an existing Restore Selection Set. This procedure is useful if a user role is not granted the “Jobs — Administer backup/restore sets” privilege, which is required to create or edit a Restore Selection Set.

2
In the Set Type list, select Restore Selection.
4
On the Edit Selection Set page, click Next.
On the Edit Selection Set page, modify the data selections, set name, or plugin option.
Click Next. In the Confirm overwrite dialog box, click OK to overwrite the existing set.

Searching for files in savesets

The Search option on the Create Restore Job — Choose Saveset page allows you to find specific files or data items without opening any savesets or browsing through their contents. You can use filenames or regular expressions to find the data items that you want to restore.

1
On the Create Restore Job — Choose Saveset page, click Search.
2
In the Search for files in savesets dialog box, configure the following options:
Search String: Type the search string.
Regular expression search: To use POSIX (Portable Operating System Interface for Unix) regular expressions in the Search String box, select this check box.
Case sensitive: To perform a case-sensitive search, select this check box.
3
Click Search. On the Search Results page, you can view the savesets that contain the specified files or data items.
5

Viewing media list

The Media List option on the Create Restore Job — Choose Saveset page lets you view information about the media items used to store a backup. You can view details about the data segments and index segments for a backup.

1
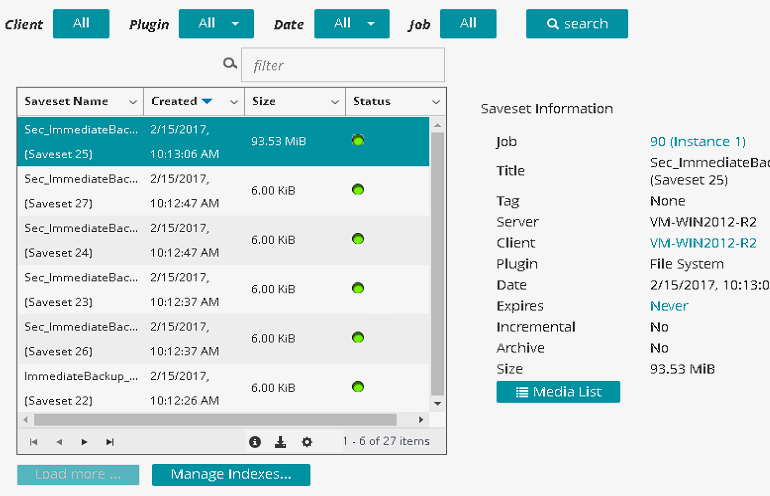
On the Create Restore Job — Choose Saveset page, select the applicable saveset.
2
In the Saveset Information area, click Media List.
Backup size: This area shows the total size of the saveset in number of bytes
Data segment table: This table shows information about the media items that contain the data segments. You can view the following details: media label, media group label, stream ID, starting byte number, ending byte number, and media location
Index segment table: This table shows information about the media items that contain the index segments. You can view the media label and media location.
4
Click Close to close the dialog box.
Related Documents

The document was helpful.

Select Rating

I easily found the information I needed.

Select Rating