This section includes the following topics:
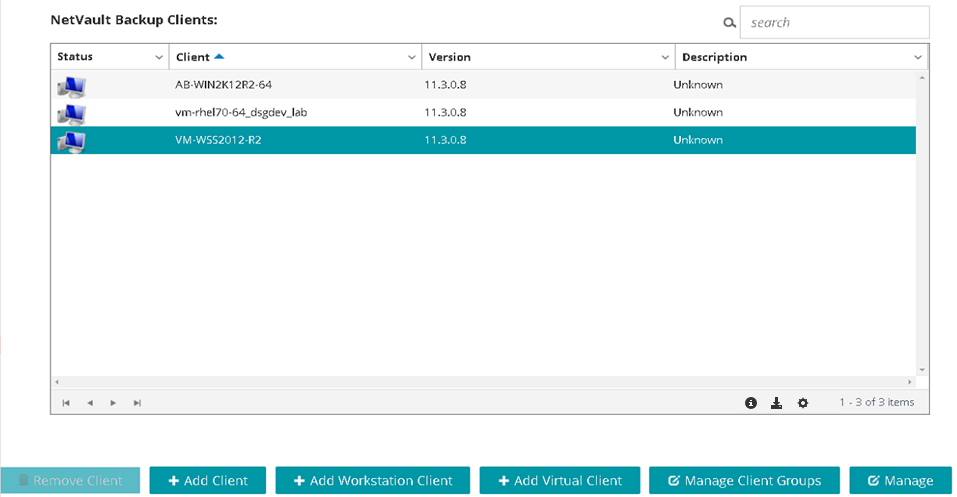
You can view all existing clients from the Manage Clients page. The page displays the client name, description, status, and product version. To view more information about a client, select the client, and click Manage.
|
1 |
In the Navigation pane, click Manage Clients. |
|
2 |
On the Manage Clients page, you can view all NetVault Backup Clients that are added to the server. The page also displays Workstation Clients and Virtual Clients. |
|
• |
Status: Displays the status icons, which indicate the type of client and whether the client is online or offline. |
|
• |
Client: Displays the NetVault Backup name assigned to the client. |
|
• |
Version: Displays the NetVault Backup version installed on the machine. |
|
• |
Description: Displays the client description. |
|
5 |
|
6 |
On the View Client page, you can view the following details: |
|
• |
Client Summary: The Client Summary area displays the following information: NetVault Backup machine name, client description, NetVault Backup version, machine ID, network name of the machine, IP address, release information, and OS. |
|
• |
Server Capabilities: To view the server license capabilities, click this link. You can view the license capabilities for clients, SmartClients, and various types of devices. |
|
• |
License Key Details: To view the license key information for the server or client and any licensed plug-ins installed on the machine, click this link. |
|
• |
Installed Plug-ins: The Installed Plug-ins table displays the plug-ins installed on the selected client. The details include the plug-in name, version number, and installation date. |
|
1 |
In the Navigation pane, click Manage Clients. |
|
2 |
|
3 |
|
4 |
Click Save to save the details and close the dialog box. |
Before you start the push installation procedure, verify that the following requirements are met:
|
• |
Copy the packages to a shared location: Copy the client and plug-in packages to a shared location. Only CIFS shares are currently supported as package stores. The path must be accessible to the NetVault Backup Server and all target machines where you want to install the packages. |
|
• |
Configure a package store in NetVault Backup: After copying the installation packages, configure the shared location details in NetVault Backup. For more information, see Configuring a package store. |
|
1 |
In the Navigation pane, click Guided Configuration, and then on the NetVault Configuration Wizard page, click Install Software/Add Clients. |
|
2 |
|
3 |
In the Package Store list, select the repository that contains the installation packages that you want to deploy. |
|
4 |
To add plug-in packages, click Add NetVault plug-in package. |
|
5 |
On the Machines to Have NetVault Software Installed page, click Choose Machines, and select From available machines. |
|
6 |
|
8 |
To submit the task, click Install Software/Add Clients. |
|
1 |
In the Navigation pane, click Guided Configuration, and then on the NetVault Configuration Wizard page, click Install Plugins. |
|
2 |
In the NetVault Backup Clients table, select the clients on which you want to install the plug-in. |
|
3 |
Click Choose Plug-in File, and in the browse window, navigate to the location of the “.npk” installation file for the plug-in (on the installation CD or the directory to which the file was downloaded from the website). |
|
4 |
Select the platform-specific binary file for the plug-in, and click Next to begin installation. |
From the Manage Clients page, you can install a plug-in on a single client. This method is available to both Linux and Windows systems.
|
1 |
In the Navigation pane, click Manage Clients. |
|
2 |
In the NetVault Backup Clients table, select the client on which you want to install the plug-in, and click Manage. |
|
4 |
Click Choose Plug-in File, and in the browse window, navigate to the location of the “.npk” installation file for the plug-in (on the installation CD or the directory to which the file was downloaded from the website). |
|
5 |
Select the platform-specific binary file for the plug-in, and click Install Plugin to begin installation. |