Chat now with support
Chat with Support

NetVault 11.4.5 - Administration Guide

Introduction Getting started Configuring clients Configuring storage devices Backing up data Managing policies Restoring data Managing jobs Monitoring logs Managing storage devices
Monitoring device activity Managing disk-based storage devices in table view Managing disk-based storage devices in tree view Managing tape libraries in table view Managing tape libraries in tree view Managing tape drives in table view Managing tape drives in tree view Adding shared devices
Managing storage media Managing user accounts Monitoring events and configuring notifications Reporting in NetVault Backup Working with client clusters Configuring default settings for NetVault Backup
About configuring default settings Configuring encryption settings Configuring plug-in options Configuring default settings for post-scripts Configuring default settings for Verify Plug-in Configuring Deployment Manager Settings Configuring Job Manager settings Configuring Logging Daemon settings Configuring Media Manager settings Configuring Network Manager settings Configuring Process Manager settings Configuring RAS device settings Configuring Schedule Manager settings Configuring Web Service settings Configuring Auditor Daemon settings Configuring firewall settings Configuring general settings Configuring security settings Synchronizing NetVault Time Configuring default settings for global notification methods Configuring the reporting utility Configuring NetVault Backup to use a specific VSS provider Configuring default settings using Txtconfig
Diagnostic tracing Managing diagnostic data Using the deviceconfig utility NetVault Backup processes Environment variables Network ports used by NetVault Backup Troubleshooting

Creating Target Sets

A Target Set is used to specify target device and media options for backup jobs. You can create Target Sets from the Create Backup Job page.

1
Start the backup job wizard, and click Create New next to the Target Storage list.
2
On the Backup Job Wizard — Create Target Set page, click the corresponding button, and configure the options described in the following sections:
3
Click Save, and in the Create New Set dialog box, type a name for the set.
Click Save to save the Target Set.

Selecting the device

1
On the Backup Job Wizard — Create Target Set page, click Device Selection, and configure the following settings.

Any Device

This option is selected by default. If you do not specify a device, NetVault Backup uses any suitable device for a job.

Specify Device

To use particular devices for a job, select this option. In the associated box, clear the check marks for the devices that you do not want to use. When you exclude a library, the associated drives are automatically excluded.

You can also use the following buttons to select or clear devices:

Unselect all: Clears all devices.
Toggle selection: Clear the selected devices and select the cleared devices.

Local Drives Only

To use only devices that are locally attached to the target client, select this check box.

If you select the Any Device option, NetVault Backup tries to find a suitable local device (local to the NetVault Backup client). To use any other device, you can set a higher media request weight for that device. For more information about media request weightings, see Configuring media request weightings.

2
Click Set to save the settings and close the dialog box.

Specifying media options

1
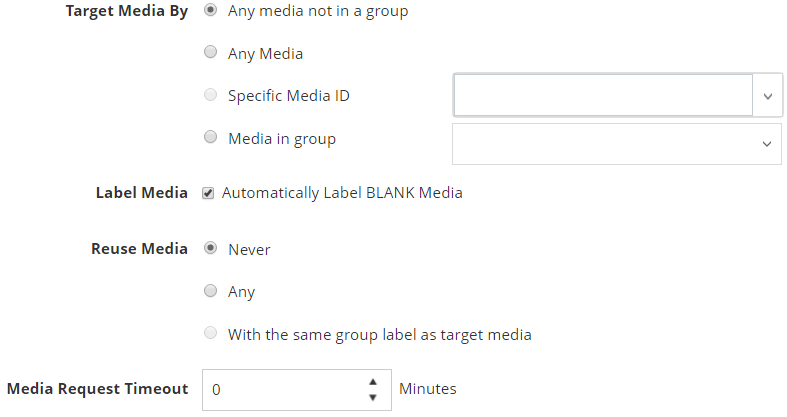
On the Backup Job Wizard — Create Target Set page, click Media Options, and configure the following settings.

Target media by

Select one of the following options:

Any media not in a group: This option is selected by default. To use media items that do not belong to any media group, leave this option selected.
Any media: To use any suitable media item regardless of its group association, select this option.
Specific Media ID: To use particular media items, select this option. In the list of media items, select the label for the target media.
Media in group: To use media items that belong to a particular media group, select this option. In the list of media items, click the group label for the target media. Media group labels are case‑insensitive.

Label Media

To automatically label blank media items during backup, select the Automatically label BLANK media check box.

By default, NetVault Backup assigns a system-generated label to blank media. The label consists of the NetVault Backup Server Name, the current date, and a seed number.

You can configure NetVault Backup to use media barcodes as the default labels. For more information, see Configuring general settings for Media Manager.

Reuse media

Select the appropriate option from the following:

Never: This option is selected by default. To ensure that media marked for re-use are not used for backup, leave this option selected.
Any: To allow any suitable reusable backup media regardless of the group association, select this option.
With the same group label as target media: To reuse media that belong to same media group as the target media, select this option. This option can only be set if you have specified a group label for the Target media by option.

Media request timeout

Type or select the amount of time NetVault Backup waits for the backup media. The timeout value is specified in number of minutes. If the required media item is not available within the specified interval, the job is automatically aborted.

The default value is zero (0). With the default setting, the job waits indefinitely until the media is provided or the job is manually aborted.

The maximum timeout period that can be set is 1440 minutes (24 hours), which ensures that current instance is aborted before NetVault Backup runs the next instance of a Daily job.

NOTE: Backups to disk-based devices are stream-oriented. The concept of media does not apply to disk-based devices. The media options Target Media By, Label Media, and Reuse Media do not apply to disk-based storage devices.

If a media group contains tape media and NetVault SmartDisk devices, NetVault Backup always uses the physical or virtual tape media from that group. To write backups to a NetVault SmartDisk device, you must explicitly select the device.

2
Click Set to save the settings and close the dialog box.

Configuring media sharing options

1
On the Backup Job Wizard — Create Target Set page, click Media Sharing, and configure the following settings.

Ensure backup is the first on the target media

To write a backup at the beginning of a tape, select this check box. The data can be restored quickly if the saveset is located at the beginning of a physical tape.

Only new or blank media are eligible for backups that use this option.

NOTE: When performing multi-stream backups, do not select the Ensure backup is the first on the target media check box. If you select this check box for multi-stream backups, each data stream targets a separate piece of media to exist as the first backup on the media item. Thus, if a backup generates five streams, the job tries to obtain five blank or new media items.

Protect media from further writes after backup

To write-protect a piece of media after the backup completes, select this option.

Only use media with a minimum of <x> gigabytes of free space

To specify the minimum amount of space required on the target media, type or select the value. The value must be specified in GB.

NOTE: The Media Sharing options do not apply to disk-based storage devices.
2
Click Set to save the settings and close the dialog box.
Related Documents

The document was helpful.

Select Rating

I easily found the information I needed.

Select Rating