|
 |
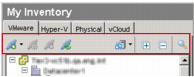
My Inventory pane toolbar and icons
Add: Click this command to add a backup or replication job.
Cancel: To cancel a job that is running, click this command.
Edit: Click this icon to open the appropriate wizard and make updates to the configuration for the job.
Disable: When you click this command, the job that is selected in the Working Inventory pane is disabled. A pause icon appears next to the listing.
Enable: When a disabled job is selected in the Working Inventory pane, click this command to enable the job. A run icon appears next to the listing.
Remove: When you click to select a job or savepoint in the Working Inventory pane and then click this icon, the job is removed.
Run: Click this command to run the job that is selected. This option reloads the window and displays the job in My Jobs: Current Jobs.
The following icons appear in the My Inventory pane, and are enabled based on which tab you are viewing, and what you select in the My Inventory and Working Inventory panes.
Add: The action this command triggers depends on the node that you have selected in the My Inventory pane.
Properties: When a VC is selected, click Properties to view the credentials used to connect to it.
Remove: This command is available to delete any object that has been added to the view.
Refresh: Click this icon to refresh the My Inventory pane. Initially, only the highest-level node appears (VC). A Loading Inventory message appears while the pane refreshes.
Inventory: Click one of these icons to display the Hosts and Clusters or Virtual Machines and Templates view.
Expand All: This option expands the tree view. After refreshing the pane, click this icon to reload the tree structure under the VC node.
Collapse All: Click this icon to collapse the tree view so that only the VC node appears in the pane.
Search: Click this icon to display the Search Inventory field and find a specific item in the selected inventory pane.
| |
|
VMware inventory tab
Hosts and clusters
Folder: Click this icon to expand the view.
Resource Pool: Click this icon to expand the view.
VirtualCenter: Right-click this icon to access these commands:
ESX(i) Cluster: Right-click this icon to access these commands:
ESX(i) Host — not credentialed: Right-click this icon to access these commands:
ESX(i) Host (Credentialed): Right-click the icon to access these commands:
ESX(i) Host Add: Click this icon to add a VMware® ESXi™ host.
ESX(i) Host Disconnected Right click this icon to connect to the host.
ESX(i) Host Error: Right-click this icon to determine the error.
ESX(i) Host Maintenance Mode: Indicates that the host is in maintenance mode, and might not be available.
vApp: VMware vSphere® vApp(s)™ can include any applications running on any operating system, and provide a mechanism for customers to move their applications between internal clouds or external clouds with still the same service levels.
Change Block Tracking: This icon indicates that a job has Changed Block Tracking (CBT) enabled. Click the icon to disable.
Virtual Machine Powered Off: Right-click this icon to access a menu of the following commands:
Virtual Machine Powered On: Right-click this icon to access a menu of the following commands:
Virtual Machine Suspended (Paused): Right-click this icon to access a menu of the following commands:
Virtual Machines and Templates Inventory view
VirtualCenter: Right-click at this node level to access these commands:
Virtual Center Add: Click this icon to add a vCenter.
Virtual Machine: Right-click the node to access these commands:
Virtual Machine Folder: Click this icon to display the VMs in this folder.
Virtual Machine Folder Open: Clicking this icon collapses the view and closes the folder.
Virtual Machine Powered Off: Right-click this icon to access a menu of the following commands:
Virtual Machine Powered On: Right-click this icon to access a menu of the following commands:
Virtual Service: Click this icon to expand the list of services.
Running Virtual Machine: Right-click the node to access these commands:
Backup Virtual Machine: Right-click the preferred VM, and click this icon to start a backup job for this VM.
Replicate Virtual Machine: Right-click the preferred VM, and click this icon to start a replication job for this VM.
Change Block Tracking: This icon indicates that a job has CBT enabled. Left click the icon to disable.
Connected: This icon shows that the node is connected.
Connecting: This icon indicates that a node is in the process or connecting.
Data Center: Selecting this icon expands the data center and displays all objects in it.
Disconnected: This icon indicates that the Node is disconnected.
Error: This icon indicates that an error has occurred, or that more data is required.
Hierarchy: This icon indicates the organization of the inventory displayed.
Inventory Tree Wait: This icon is displayed while vRanger searches for all the components in the inventory.
Credentialed/Licensed: This icon shows that the VM or host is licensed.
Invalid Licensed Credentials: This icon shows that the credentials are invalid.
Resource: This icon indicates the presence of a resource in the inventory.
Save: Clicking this icon saves any changes made.
Server: This icon indicates a server in the inventory.
Virtual Machine Template: copy and paste this template as needed to reproduce VMs.
vApp: VMware vSphere® vApp(s)™ can include any applications running on any operating system, and provide a mechanism for customers to move their applications between internal clouds or external clouds with still the same service levels.
BackupReplication License: Indicates that the VC is licensed for both backup and replication.
Backup or Replication License: Indicates that the VC is licensed for either backup or replication.
| |
|
Hyper-V inventory tab
Hyper-V Cluster: Right-click this icon to access the following commands:
Hyper-V Host: Right-click this icon to access the following commands:
Hyper-V Host Warning: This icon indicates that agent present on the host is not compatible with the version of vRanger in use.
Virtual Machine Powered Off: Right-click this icon to access the following commands:
VM Powered On: Right-click this icon to access the following commands:
| |
|
Physical inventory tab
Physical Machine: Right-click this icon to access a menu of the following commands:
Physical Machine Warning: This icon indicates that agent present on the physical machine is not compatible with the version of vRanger in use.
Physical Machine Disconnected: This icon indicates that vRanger cannot communicate with the physical machine. Reasons for the lack of communication include but are not limited to: the machine is powered off, the agent is not installed on the machine, there is a network error, and so on.